Pages

Tuesday, April 30, 2013

Heartfelt

I am sharing a little sneak peek of my card on the  Want2Scrap© Blog today - you can see all of the details on the HERE. I would love you to pop over and let me know what you think!


 Thank you for your comments and all of the support you give me - you make blogging such an amazing place to be!! Your encouragement is such a blessing for me - it makes my day! God bless you!

{{{hugs}}}


Monday, April 29, 2013

Bird Cage 2

 It is impossible NOT to love the new Spellbinders Die D-Lites!!  There I have said it - I ADORE these divine Dies and am excited to be using them!


I have cut the birdcage using the Spellbinders Grand Calibur® Machine and the Bird Cage Two  Spellbinders™ Shapeabilities® Die D-Lites™.   The SRM Sticker sentiment has been added to the Fleur de Lis Squares Nestabilities® Decorative Element die template.


The birdcage is layered onto Labels Four Nestabilities®and  5 x 7 Elegant Labels Four
 Spellbinders™ Nestabilities®


This card is for the following challenges:
 613 Avenue Create - Anything Goes 
Creative Inspirations Paint - Anything Goes 
 One Stitch At A Time - Cards for a Mom 
QKR Stampede – Favorite Things
 Stampin' For The Weekend - Die Cuts/Punches
Paper Crafting Journey - Use a Sentiment
 Amusing Challenges - Anything Goes 
Pile It On - April Showers bring May Flowers 
 
Thank you for your comments and all of the support you give me - you make blogging such an amazing place to be!! Your encouragement is such a blessing for me - it makes my day! God bless you!
{{{hugs}}

Sunday, April 28, 2013

Family Photo

Some cards are created just for fun - although this family does not look like it is having any - but they do make me smile!


I have used the Tim Holtz Stampers Anonymous Lost and Found Stamp set, stamped using
IMAGINE Crafts®/Tsukineko® VersaFine™ Archival Pigment Ink - Vintage Sepia and Onyx Black.

I have also used one of the new Want2Scrap© Stencils - love the Brick Wall that is just peeking through the side of the image.


This card is for the following challenges:
 My Time to Craft - Use Kraft 
Sweet Stampin - Anything but Birthday
Crafty Ribbons - Anything Goes with Ribbon
  Happy Campers - Use a Mask or stencil
  Crafting By Design - Anything Goes 
Sisterhood of Crafters  - Anything Goes
 Simon Says Stamp - Anything Goes

Thank you for your comments and all of the support you give me - you make blogging such an amazing place to be!! Your encouragement is such a blessing for me - it makes my day! God bless you!
{{{hugs}}

Friday, April 26, 2013

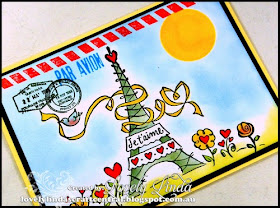
Par Avion

I am always looking for something different to do for Card Design Class - it is so easy to create cards that come naturally, but I like to try some different things to take us all out of our comfort zones....


One layer cards is not a comfort zone for me, but I do like to try creating some every now and then....add to the equation no embellishments - well, that is just plain skeery! LOL!


I have used a Penny Black®, Inc. image, stamping it with IMAGINE Crafts®/Tsukineko® VersaFine™ Archival Pigment Ink - Onyx Black.  I have coloured using
IMAGINE Crafts®/Tsukineko® Memento™ Markers.


Masking has been used to create a sun and  the postmark image to create a postcard scene.


This card is for the following challenges: 
Crafting By Design - Anything Goes 
Creative Belli - Spring 
Creative Moments - Spring 
 Divas by Design - Movie Inspired - French Kiss 
Simon Says Stamp - Anything Goes 
Sisterhood of CraftersAnything Goes
 Top Tip Tuesday - No Machine Sewing 
Make it Monday - always Anything Goes

Thank you for your comments and all of the support you give me - you make blogging such an amazing place to be!! Your encouragement is such a blessing for me - it makes my day! God bless you!
{{{hugs}}

Thursday, April 25, 2013

Mini Album Tutorial

I am sharing the @Step by Step Tutorial on the Spellbinders Blog today and the theme is "Mini Albums or Journal Covers" - it is a personal favourite of mine - I love Mini Albums and cannot resist adding lots of Dies and embellishments to them - I have tried to exercise some self control with this Album - but...well, you will see.


Thank you for stopping by today, I hope you have been inspired by my Mini Album, you can CLICK HERE to see tall of the details - you are only limited by your imagination!


{{{hugs}}}


Tuesday, April 23, 2013

AIR Tutorial #3 - Creative Medium

 For my third AIR Tutorial this month I have decided to UPCYCLE a Photo Box that has been lying around the house for five years - yes five whole years.  In my defense, I have always meant to do something with it but......


Once I received my box of goodies from Imagine Craft, I just knew that it was time to 'bring this baby' back to life and vintage was the way to go!


Preferred Promotional Partners:

Other:  Photo Box, Vintage Paper, Want2Scrap bling, recycled buttons, glue
I started by using Imagine Crafts/ Tsukineko Creative Medium to attach any vintage paper that had started lifting from the Photo Box.  I have used a Ink Blusher.


Next I used the Multi-purpose Squeegee  to smooth the paper and make sure any air bubbles were removed, along with any excess Creative Medium.


Vintage buttons have been glued to the center of each of the lid pieces, once they have dried in place StazOn - Jet Black has been applied with an Ink Blusherand sealed using  GlazOn - Vintage.  You can see the full effect of this in the photos below.


The same process has been applied to the large button that has been added to the front of the Photo Box, concentrating on the embossed emblem.

  I have also added a strip of Tape Measure Ribbon along the lower edge of the box.


Cut three (3) different keys using the Jewel Keys Spellbinders™ Shapeabilities® dies - one set in
Precious Metals Premium Craft Foils Assortment - I used the old gold and one set with cardboard.  Adhere the foil keys to the matching card ones, this gives a firmer embellishment.

 Next rub them over using StazOn - Jet Black and a dauber - this gives an aged look, as you can see in the photos below.


Finish off by adding a coat of GlazOn - Clear.


Attach the Jewel Keys to the Photo Box using twine and finish off with any other vintage embellishments you have.

I hope you are already thinking of things you have at home you can add the vintage touches to using Imagine Crafts/ Tsukineko products.  The possibilities are endless.


Thank you for your comments and all of the support you give me - you make blogging such an amazing place to be!! Your encouragement is such a blessing for me - it makes my day! God bless you!

{{{Hugs}}}

Monday, April 22, 2013

Happy Birthday

I have something a little different to share with you today - a different style and definitely a different palette


The thing that remains the same is I am still working my way through bits and pieces (or bits and bobs as my Mum would say)! LOL!


I have used Frame One and Poppy Patch Spellbinders™ Shapeabilities® Die D-Lites™, these have been layered onto the Labels Twenty-Nine Spellbinders™ Nestabilities®.  All Dies have been cut using Spellbinders Grand Calibur® Machine.


compliments the My Mind's Eye™ Chevron patterned paper so well - how could I resist it! 


This card is for the following challenges:
613 Avenue Create - Anything Goes 
Addicted to Stamps Challenge - Birthday card with Birthday Sentiment 
2 Sisters - Blue and/or Green 
Allsorts - Passion for Flowers
 Bloggers - In Bloom
 Card Makin' Mamas - Ribbon 
Crafts and Me - Bling
Color Throwdown - Colors


 Thank you for your comments and all of the support you give me - you make blogging such an amazing place to be!! Your encouragement is such a blessing for me - it makes my day! God bless you!
 {{{hugs}}}