Pages

Friday, November 29, 2013

Happy Birthday 2U

Hello Blog friends - it feels like forever since I have been here with a card for you, but in reality it is not - just had a lot happening in the meantime.


 I have been playing with the ever increasing pile of images and bits of paper gathering on my desk - I always like to see what I can create from them.  This gorgeous bird image is from Crafty Secrets and has been waiting for a home for some time.  The feathers are from a face mask my husband had as a photography prop, but then we got a puppy - enough said about that LOL! Just quietly I am happy I rescued these adorable little feathers.


 The papers are from Authentique Papers and is a negative Die from the Branching Out Spellbinders®  Nestabilities® Card Creator.  The Tag is from the Fancy Tags Two Shapeabilities.  All Dies have been cut/embossed using the  Grand Calibur® Machine. 


This card is for the following challenges:
Deep Ocean Challenge Favourite Colour Combo
 Through The Craft Room Door - Alway's Anything Goes
 Top Tip Tuesday - Be Krafty (Use Kraft Card)
 Anonymous Stamps Challenge - Anything Goes
 Artistic Inspirations - Anything Goes 
Bunny Zoe's Crafts - Shabby Chic/Vintage
Card Mania Autumn Colors 
 Crafting from the Heart - Anything Goes
Paper Playtime - Anything Goes 
Whoopsi Daisy - THINGS WITH WINGS
 Amusing Challenges - Anything Goes
 Challenges 4 Everybody - Anything Goes 
Robyn`s Fetish - Vintage Style


Thank you for your comments and all of the support you give me - you make blogging such an amazing place to be!! Your encouragement is such a blessing for me - it makes my day! God bless you!

{{{Hugs}}}
Follow on Bloglovin


Thursday, November 28, 2013

Want2Scrap Beautifully Framed - Sneak Peek


I have a card on the Want2Scrap Blog  and wanted to give you a sneak peek of the gorgeous bling frame I have created for my image - you can never have too much bling on this kind of card - don't you think?! You can see the whole project by clicking HERE.


Thank you for your comments and all of the support you give me - you make blogging such an amazing place to be!! Your encouragement is such a blessing for me - it makes my day! God bless you!

{{{Hugs}}}

Tuesday, November 26, 2013

Spellbinders Labels Thirty-Two Sneak Peek


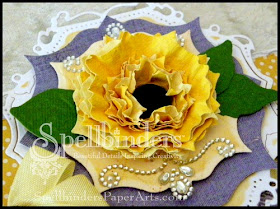
I am excited to be sharing the Tutorial on the Spellbinders Blog today - this week we are using the Labels Thirty-Two Nestabilities and I am have used it to create this gorgeous flower - a bit like a sunflower don't you think?!? You can see the Tutorial and the finished project by clicking HERE.

Thank you for your comments and all of the support you give me - you make blogging such an amazing place to be!! Your encouragement is such a blessing for me - it makes my day! God bless you!

{{{Hugs}}}

Monday, November 25, 2013

Tulip Love

Pink and green are so pretty together - don't you think!?  I love the way they have come together on this card in such soft tones.


The tulip is a sticker and has been layered onto the cut/embossed Labels Eighteen Spellbinders® Nestabilities® and then on the Beaded Ovals Spellbinders® Nestabilities Decorative Elements.  Before removing the Due Cut from the Die, sponge around the inside edges using IMAGINECrafts®/Tsukineko®.


The sentiment is from SRM Stickers and has been layered onto white card cut using the Standard Circles SM Spellbinders® Nestabilities®, inturn layered using Scrapbook Adhesives by 3L™ - Foam Squares.  


A Circle of pink bling from the Want2Scrap©  Nestabling Heart Circles Pink Pearl


This card is for the following challenges: 
Amusing Challenges - Anything Goes 
Challenges 4 Everybody - Anything Goes  
Creative Inspirations Paint - Anything Goes 
Brown Sugar – Anything Goes 
4 Crafty Chicks - Anything Goes 
4 Krafty Girlz Anything Goes 
Aud Sentiments Challenge - Any Sentiment  
Baffies Kreativladen - Anything goes 
Whimsy Inspiration - Anything goes
WordArt Wednesdays - Anything goes
 
Thank you for your comments and all of the support you give me - you make blogging such an amazing place to be!! Your encouragement is such a blessing for me - it makes my day! God bless you!

{{{Hugs}}}
Follow on Bloglovin

Saturday, November 23, 2013

AIR #3 November - Artists Challenge - Monterey Pine


I am here with my third November Tutorial as an Artist in Residence for IMAGINECrafts®/Tsukineko®.  This time is the Artists Challenge - we are featuring the new wood - Monterey Pine embellishments and they are fabulous!  I hope you like how I have used one on my card.


  • Memento Luxe™ Mixed Media Pigment Ink in Tuxedo Black
    Brilliance™ Pigment Ink in Sky Blue
  • Memento™ Dye Ink in Summer Sky and Espresso Truffle 
    Monterey Pine - Ovals
  • Sponge Daubers™
  • Jumbo Daubers™


Preferred Promotional Partners:


Other: 
Want2Scrap© - Beautiful Bling Borders by Nina Brackett - Beautiful Blooms    
Scrapbook Adhesives by 3L® - E-Z Runner - permanent, The Manor House Flowers, White card, Brown card, script patterned paper, Luggage Tags, scissors, foam tape, Paris Rubber Stamps by Cavallini Papers and Co


Step 1:  Sponge the Luggage Tag using The Crafters Workshop in Summer Sky and Memento Dye Ink in Espresso Truffle, using Sponge Daubers.


Step 2:  Cut card base 10cm x 30cm, score across the middle at 15cm and fold in half - giving a base of 15cm x 10cm.

Step 3:  Cut patterned paper slightly smaller, sponge around the edges using a Sponge Dauber and Memento Dye Ink Dew Drop in Espresso Truffle.

Step 4: Sponge around the edges of the patterned paper using Memento Dye Ink Dew Drop in Espresso Truffle and a Sponge Dauber. 

Step 5:  Adhere the tag to the card base as shown below using Scrapbook Adhesives by 3L® - E-Z Runner - permanent.


Step 6: Cut one (1) Eiffel Tower from the French Frills Spellbinders® Shapeabilities®.  Before removing the card from the Die, sponge with the Memento Dye Ink in Espresso Truffle using a Jumbo Dauber.


Step 7: Attach the tag at an angle using Scrapbook Adhesives by 3L® - E-Z Runner and adhere the Eiffel Tower Die using liquid glue. 

Step 8:  Attach the flowers using glue under the Eiffel Tower Die as shown below.


Step 9: Sponge the Monterey Pine Oval using the Brilliance Pigment Ink in Sky Blue using a Sponge Dauber. 

Step 10:  Stamp the crown image into the inked Monterey Pine Oval using the Memento Luxe Mixed Media Pigment Ink in Tuxedo Black.


Step 11: Adhere the finished Monterey Chip to the card using liquid glue.


Thank you for your comments and all of the support you give me - you make blogging such an amazing place to be!! Your encouragement is such a blessing for me - it makes my day! God bless you! 
{{{hugs}}}
Follow on Bloglovin


Wednesday, November 20, 2013

Spellbinders Platimun Party! Blog Hop

I am excited to be part of the Spellbinders Platinum Preferred Partners Blog Hop - Each individual brand may also be hosting their own special giveaways... so be sure to check them all out!
This is a two day event: Wednesday, November 20th and Thursday November 21st.


“Enter for the Grand Prize Drawing”


You can get the links of the other Designers by popping over to the IMAGINE Crafts Blog  Please visit the Spellbinders Page for complete rules for the Blog Hop.


Today I am excited to be sharing a project for IMAGINE Crafts®/Tsukineko® - highlighting the new Holiday Dies from Spellbinders - what an amazing combination! 


  • IMAGINE Crafts® Creative Medium™
  • IMAGINE Crafts®/Tsukineko® Memento™ Dye Ink Dew Drop in Summer Sky
  • IMAGINE Crafts®/Tsukineko® Memento™ Dye Ink Dew Drop in Peanut Brittle
  • IMAGINE Crafts®/Tsukineko® Memento™ Dye Ink Dew Drop in Desert Sand
  • IMAGINE Crafts®/Tsukineko® Memento™ Dye Ink Dew Drop in Gray Flannel
  • IMAGINE Crafts®/Tsukineko® VersaFine™ Archival Pigment Ink full pad in Onyx Black
  • IMAGINE Crafts®/Tsukineko® Memento Luxe™ Mixed Media Pigment Ink full pad in Wedding Dress 
  • IMAGINE Crafts®/Tsukineko® Sponge Daubers™ 
  • IMAGINE Crafts® Fireworks!™ Craft Spray in Summer Sky  
  • IMAGINE Crafts® Fireworks!™ Craft Spray in Desert Sand 
Preferred Promotional Partners:
Other:   Want2Scrap© - bling; Luggage Tag; White card; Black card; double sided tape; Scrapbook Adhesives by 3L® - E-Z Tape Runner;  Dodz 3D Clear Adhesive Dots; Darkroom Door stamp set; recycled acrylic from chocolate box.

 
Emboss the Authentique™ Paper - Glistening Collection using the Holiday Magic Spellbinders® M-Bossabilities™ folder.  Sponged the raised pattern using the IMAGINE Crafts®/Tsukineko® Memento™ Dye Ink in Summer Sky and a Sponge Dauber™.  For a deeper colour add as many coats as desired.

Emboss a sheet of clear acrylic also using the Holiday Magic Spellbinders® M-Bossabilities™ folder using the  Spellbinders™ Grand Calibur Cutting Machine


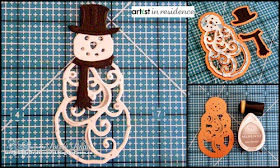
Cut/emboss one (1) Mr. And Mrs. Snowman Spellbinder Shapeabilities in white card, the hat and scarf in black card.  Use the Die as a stencil and sponge using IMAGINE Crafts®/Tsukineko® Memento™ Dye Ink in Gray Flannel and a Sponge Dauber™


Sponge a luggage tag using IMAGINE Crafts®/Tsukineko® Memento™ Dye Ink in Summer Sky and Peanut Brittle and InkBlushers™, blending the colours together until you get the desired effect.  Spritz with water and dab dry with a tissue to for a mottled effect.


Place The Crafters Workshop 6x6 Stencil - Mini Well Rounded onto the luggage tag and randomly apply IMAGINE Crafts® Creative Medium™ using an InkBlushers™.  Allow to dry - alternatively a Heat Gun can be used - do not hold too close to the project.

Place the Stencil over the areas raised by the Creative Medium™ and gently sponge using IMAGINE Crafts®/Tsukineko® Memento Luxe™ Mixed Media Pigment Ink in Wedding Dress and an IMAGINE Crafts® InkBlusher™


Stamp the Darkroom Door image using IMAGINE Crafts®/Tsukineko® VersaFine™ Archival Pigment Ink in Onyx Black.  Spritz the tag using IMAGINE Crafts® Fireworks!™ Craft Spray in Summer Sky and Desert Sand.  Gently wipe the raised dots using a tissue to remove any residue of the sprays.


Fold a card base measuring 6" x 8" in half to give a 6x4 base.  Sit the embossed acrylic over the embossed and sponged patterned paper - you will feel the embossed patterns slip into place.  Tape together using Scrapbook Adhesives by 3L® - E-Z Tape Runner.  Layer onto white card, cut slightly smaller than the card base.  Adhere all layers using the E-Z Tape Runner.


Using liquid glue, adhere the Snowman to the right lower corner of the finished tag.  Attach layered snowflakes cut using the   2013 Snowflake Pendant Shapeabilities® and DCWV® Glitter paper.  Attach a sentiment from the  Authentique™ Paper - Glistening Collection and attach Want2Scrap© - bling to the card as shown in the photos below. 


Thank you for your comments and all of the support you give me - you make blogging such an amazing place to be!! Your encouragement is such a blessing for me - it makes my day! God bless you!

{{{Hugs}}}