Pages

Tuesday, August 29, 2017

Spellbinders Mummy's Boy Layout Tutorial

Hello friends - my tutorial for Spellbinders today is in the form of a layout - using Spellbinders Dies.  I have found they add so much to my layouts and make it so much easier - and quicker - I tend to take my time and it can be days before I finish what I have started - but no longer!!


I have used a mixture of dies and had a lot of fun doing it.  You can see how it has been done as you follow along with my Tutorial.

1. Adhere the Graceful Sweet Words Card Creator to the base of the patterned paper.
2. Cut/emboss using the Platinum 6 Die Cutting and Embossing Machine - 6" Platform.
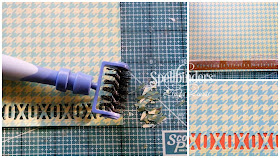
3. Remove the excess pieces using the Tool 'N One.
4. Adhere a strip of orange card stock behind the die cut border.

5.Cut/emboss three (3) Seth Apter Trifecta Etched Dies using orange card stock, adding #1 die from the Trifecta Die to the centre.
6. Separate the Die cuts from the negative Dies and put aside the negative Dies for a future project.

7. Adhere the Film strip with photos to a piece of patterned paper
8. Adhere the layered paper to the 12 x 12 card stock.
9. Adhere the Splatter Proof and Trifecta Die cuts randomly onto the layout.

10. Outline the Die cuts using a Black Gel pen.
11. Stamp the Turnaround 4 into the centre of the large  Splatter Proof Die cuts using Teal Zeal Ink.
12. Pop up the sentiments using 3D Foam Squares.

13. Adhere alphabet stickers to the filmstrip.
14. Pop up Chipboard Banners onto the top left corner of the layout, using 3D Foam Squares.
15. Use a handmade stencil to randomly add stenciling to the layout.

Spellbinders Supplies:
Other :  Liquid Glue; Scrapbook Adhesives by 3L: E-Z Adhesive Runner, 3D Foam Squares; white and orange card stock; patterned paper;Want2Scrap Blue Enamel Dots;  Film Strip Chipboard; Imagine Memento Ink in Teal Zeal; Authentique Paper: Patterned Paper, Chipboard Embellshments.

Thank you for your comments and all of the support you give me - you make blogging such an amazing place to be!! Your encouragement is such a blessing for me - it makes my day! God bless you!

{{{hugs}}} and happy crafting

Monday, August 28, 2017

Birthday Rose

Hello friends, it has been a busy few days for me due to many things, but all good.  I have had publication deadlines, Design Team deadlines along with an crating friend visiting from overseas and of course there is the Grandson and my world stops when he comes LOL!  Today I have a quick card to share with you with some technique in it and of course Spellbinders and bling.


The background has been embossed using an older Spellbinders 3D Embossing Folder.  I have used great card stock and once embossed using the Platinum Die Cutting Machine.  This has then been ponged using Imagine Memento Luxe ink in Wedding Dress and popped up onto a pre-cut card base using Scrapbook Adhesives by 3L 3D Foam Squares.


The flower is from Anna Griffin Inc and I love the way it is already layered, fitting onto the card front so beautifully.  A stamped sentiment has been added along with a double seam binding bow and a mulberry paper rose.  The Want2Scrap Beautiful Bling Borders has been added along the top of the card front and a strip of lace adhered and Silver Rhinestones along that.


This card is linked to the following challenges:
Imagine That! CreativePlayground - Anything Crafty Goes
Scrappers Delights - Anything Goes
Alphabet Challenge - L is for Lovely Lace
Simply Papercraft - Anything Goes
Seize The Birthday -  Birthday + Optional Topping of Anything Goes
House That Stamps Built - Anything Goes
Sisterhood of Crafters - Anything Goes
The Crafty Addicts - Anything Goes/Option of Girly
WordArt Wednesdays - Anything Goes 
Crafty Sentiment Designs - Anything Goes
Lemon Shortbread - Always Anything Goes

Take care friends and Thank you for your comments and all of the
 support you give me - you make blogging such an amazing place to be!! Your encouragement is such a blessing for me - it makes my day! God bless you!

                {{{Hugs}}} and happy creating     
             

Thursday, August 24, 2017

Hello Birdie

Hello friends, the last few days have been a taste of spring for us, it is my favourite season and so welcome after a cold winter. 


I could not resist creating a 'beachy' card using the patterned paper from the Free Gift with Love Cardmaking 17 - aptly named Sea Shore.


The bird is from Katzelkraft and has been coloured using Chameleon Pens.  It has been fussy cut/hand cut using scissors and popped up onto a Spellbinders  Pierced Circle Nestabilities and Seth Apter Robo Star Etched Dies - these have been cut/embossed using the Platinum 6 Die Cutting and Embossing Machine - 6" and popped up onto a Nestabilities Celebrations Pierced Rectangles Etched Dies, using  Scrapbook Adhesives by 3L 3D Foam Squares.  These layers have been popped up onto a yellow card base - also using  Scrapbook Adhesives by 3L 3D Foam Squares. 


The sentiment is from the Hello Geo Heart Wild & Free by Debi Adams Etched Dies and has been adhered using glue.
This card is linked to the following challenges:
Digi Choosday Challenge - Anything Goes
Lemon Shortbread - Always Anything Goes
Paper Minutes - Anything Goes 
Retarte - Anything Goes  
Challenge Up Your Life - Summer  
2 Crafty Critter Crazies - Anything Goes with a Critter
Crafty Animals - Always Anything Goes
Create and Inspire - Anything Goes + optional Summer Theme
Die Cut Divas - Anything Goes
Eclectic Ellapu - Anything Goes
Not Just Cards - Always Anything Goes
Paper Craft Happy Challenges - Anything Goes with an Animal

Thank you for your comments and all of the support you give me - you make blogging such an amazing place to be!! Your encouragement is such a blessing for me - it makes my day! God bless you!

{{{hugs}}}and happy crafting

Wednesday, August 23, 2017

Penny Black Kisses and Flowers

Hello friends, I am happy to say I have had a productive day.  One of the things I did manage to achieve was creating this Whimsical card using the beautiful Penny Black Inc  stamp.


The image has been stamped using Imagine Memento Ink ink Tuxedo Black onto white card stock and coloured using Chameleon Pens.

The coloured image has been fussy cut/hand cut using scissors and popped up onto the cut/embossed Nestabilities Celebrations Pierced Ovals Etched Dies #5 #6 (#1 being the smallest).  This has been layered into a pre-cut card front using using Scrapbook Adhesives by 3L 3D Foam Squares.  The card base has been cut using the Nestabilities Romantic Rectangles Two Etched Dies and the Platinum Die Cutting Machine.

Finishing off with a double Seam Binding Bow and Mulberry Paper Rose on the top left corner and Want2Scrap 250 Count Orange Rhinestones.

This card is link to the following challenges:
Really Reasonable Ribbon - Anything Goes with Ribbon
Colouring in Scrapland - ANYTHING GOES
Color Inspiration Monday - ALWAYS ANYTHING GOES WITH HAND-COLORED IMAGE
Scrapbook Stamp Society Challenge Blog ANYTHING GOES WITH option of USE DIE CUTS OR PUNCHES
613 Avenue Create - Anything Goes w/Optional Twist: Shabby Chic
heARTful Stamping Challenge Anything Goes + a Stamp
Stamping Sensations - Anything Goes
The Corrosive Challenges Always Anything Goes
Craft-Dee BowZ - Always anything Goes with a Handmade Bow
Crafty Awesomeness Always Anything Goes
Dies R Us Challenge - Anything Goes
Happy Little Stampers Dies - Always Anything Goes with Dies 
Love to Craft - Anything Goes
Not Just Cards - Always Anything Goes
Tinker- Dream Anything Goes
Brown Sugar –  Anything Goes
Making Memories Crafting - Anything Goes 
Star Stampz Challenge - Ribbon, Lace, Twine and/or Cord

Thank you for your comments and all of the support you give me - you make blogging such an amazing place to be!! Your encouragement is such a blessing for me - it makes my day! God bless you!

{{{hugs}}} and happy crafting

Tuesday, August 22, 2017

Spellbinders Trailing Hearts Tutorial

Hello friends, I am sharing a tutorial for Spellbinders featuring two of the new Dies by Licensed Designer Marisa Job - and I have to say I am more than happy with the results.  You can see how this card has been created by following along with the Step by Step Tutorial.


1. Add an Adhesive Sheet to the A2 Matting Basics A #6 (#1 being the smallest) and trim to the correct size.
2. Cut/emboss one Trailing Hearts using both green and mauve card stock. 
3. Adhere the mauve Trailing Hearts to the card base, pressing down to adhere it all
4. Add a row of green squares from the green Trailing Hearts from Step 2, along with one row of hearts.  Press firmly to help them stick firmly.

4. Sprinkle glitter into an embossing tray, press down the die cut making sure to press it into all the open spaces in the die cut
5. Pop up the Die cut layer onto the card base using liquid glue

6. Cut/emboss two of the heart die using white card stock.
7. Layer and adhere to the centre of the mauve Trailing Heart card front.
8. Cut two flowers from the Textured Flowers #1 #2 (#1 being the smallest) using patterned paper.  
9. Sand using a Sanding Block.
10. Layer the flowers and colour the centre using a yellow pen. Adhere a large pearl to the centre of the flower.
11. Cut/emboss three leaves using green card stock, curl using a thin paint brush handle.
12. Pop up around the flower using a 3D Foam Square.

13. Trim the Swirls Finesse and adhere either side of the flowers.
14. Adhere computer generated sentiment.

Spellbinders Supplies:
Other Supplies: White, purple and green pink card stock; ImagineMemento Luxe Ink in Wedding Dress;  Want2Scrap: Scrapbook Adhesives by 3L: E-Z Adhesive Runner, 3D Foam Squares; ; 

Thank you for your comments and all of the support you give me - you make blogging such an amazing place to be!! Your encouragement is such a blessing for me - it makes my day! God bless you!

{{{hugs}}} and happy crafting
Monday, August 21, 2017

One of a Kind

Hello friends, today I am sharing a card using some of Spellbinders Matting Basics to created a frame for these gorgeous feathers - also Spellbinders.  I am a great fan of the Matting Basics, they help in a number of ways - first of all - uneven cards and secondly they make layering so easy and these are only two of the great things about them!


I have used the A-2 Matting Basics B Card Creator Etched Dies with the frame being created by using #6 and #7 Dies (#1 being the smallest)  The smaller die has been placed inside the larger die and they are secured using repositional tape, then cut,embossed using the the Platinum 6 Die Cutting and Embossing Machine - 6" and some of the Lovely Layers patterned paper by Anna Griffin inc.

The sentiment is from Kaisercraft and stamped using Imagine Memento Ink in Rhubarb Stalk (one of my favourite reds)  The Shapeabilities Feathers Etched Dies have been cut using scraps from my stash and then lightly sanded using a sanding block.  I have also used   Scrapbook Adhesives by 3L 3D Foam Squares and E-Z Adhesive Runner.

This card is linked to the following challenges:
Simon Says Stamp -  Add a Sentiment
Crafty Friends Challenge - Anything Goes
Imagine That! CreativePlayground - Anything Crafty Goes
Anything Goes with Create With TLC - Always Anything Goes
Artistic Stampers Anything Goes
Crafty Hazelnut's Patterned Paper - Anything Goes with Patterned Paper
Creative Ladybirds Creations - Always Anything Goes
Die Cut Divas Anything Goes
Dies R Us Challenge - Anything Goes
Tinker- Dream Anything Goes
Creative Fingers - Anything Goes  
Paper Shelter Challenge - Punches/Dies
The Crafty Addicts - Anything Goes/Option of Girly
City Crafter Challenge - You Don't Bring Me Flowers (NO Flowers)
Deep Ocean Challenge - Shabby Chic/Vintage

Take card friends and Thank you for your comments and all of the support you give me - you make blogging such an amazing place to be!! Your encouragement is such a blessing for me - it makes my day! God bless you!

{{{Hugs}}} and happy creating

Sunday, August 20, 2017

Want2Scrap Birthday Fabulous

Hello friends - I have a whimsical card to share with you on theWant2Scrap Blog created using one of the fabuloous Silhouettes and some white pearls.


                                           You can see the details and close ups HERE.

Thank you for your comments and all of the support you give me - you make blogging such an amazing place to be!! Your encouragement is such a blessing for me - it makes my day! God bless you!

{{{hugs}}} and happy crafting

Thursday, August 17, 2017

Recycled Birthday Chick

Hello friends, I have a very quick card to share with you today - using a recycled image - how adorable is this little chick - too cute to not be given a 'second chance!'


The chick has been popped up using to the card front using  Scrapbook Adhesives by 3L 3D Foam Squares.  The card front has been created using Chameleon Pens; with splashes of White paint added.  A computer generated sentiment has been added, along with some Want2Scrap Turquoise Baby Bling.


This card is linked to the following challenges:
Pause Dream Enjoy - Birthday
Simon Says Stamp - Add a Sentiment
WordArt Wednesdays - Anything Goes 
Lemon Shortbread - Always Anything Goes
Paper Minutes - Anything Goes
Retarte - Anything Goes 
Scrapbook Stamp Society Challenge Blog - ANYTHING GOES WITH option of USE DIE CUTS OR PUNCHES 
Pile It On 3 Recycle
A Gem of a Challenge - Birthday Wishes
Imagine That! CreativePlayground - Anything Crafty Goes

Take care friends - thank you for your comments and all of the support you give me - you make blogging such an amazing place to be!! Your encouragement is such a blessing for me - it makes my day! God bless you!
{{{Hugs}}} and happy crafting