Pages

Tuesday, December 26, 2017

Spellbinders Four Seasons Tutorial

Hello friends - thank you for stopping by! Today I have a tutorial to share for Spellbinders - I have created these simple but lovely  cards created with the  Four Seasons Silhouettes Etched Dies Four Seasons by Lene Lok.  This set is made up of 5 dies, four seasonal scenes and an outer edge.  The Dies can be used individually or  together on one card - lots of creative license with this Die set.


I have created a set of four cards - one for each season - the instructions are the same for each card - just change the season die and the embossing folder for each - it is as easy as that!!

1. Place Fairmont Labels #3 (#1 being the smallest) into white card stock.
2. Add the Four Seasons Insert and Outline -secure using repostional tape.
3. Cut/emboss using the Platinum 6 Die Cutting and Embossing Machine.
4. Emboss patterned paper using a Spellbinders Embossing Folder.
5. Cut to size and pop up onto slightly larger pre-cut card base sing 3D Foam Squares.

6. Pop up the Fairmont Labels Frame onto the top portion of the card front using 3D Foam Squares.
7. Adhere the Four Seasons Insert onto contrasting card and trim to size.
8. Glue into the centre of the popped up frame.
9. Wind twine around the card front, below the die cuts and secure using co-ordinating buttons.
10. Adhere the computer generated sentiment onto the lower portion of the frame.

Spellbinders Products:
Other Supplies: White card stock; Scrapbook Adhesives by 3L: Extreme Double Sided Tape, 3D Foam Squares; Liquid Glue; computer generated sentiments; twine, buttons; Assorted patterned paper.

Thank you for your comments and all of the support you give me - you make blogging such an amazing place to be!! Your encouragement is such a blessing for me - it makes my day! God bless you!

{{{hugs}}} and happy crafting

Thursday, December 21, 2017

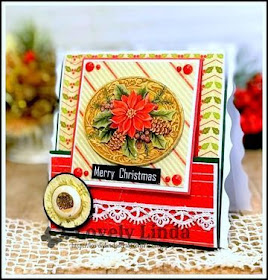
Spellbinders Variation of a Theme #3 - Merry Christmas

Hello friends, thanks for popping in today -  I have the third and final Christmas card created using some extras from my kits - a Variation of a Theme #3.  You can see the full instructions HERE the original gorgeous Joy Fold Card - with a twist!  A photo of the three cards together is further down this post.


1. Cut green card base to 11cm x 16cm - score at 11cm
2. Cut patterned paper to 10.5cm x 15.5cm, the second piece 11cm x 4.5cm
3. Cut a third square of striped patterned paper to 7cm x 7cm
4. Adhere the patterned paper using E-Z Runner - adding lace across the lower panel.


5. Cut red the card to 7.5cm x 15cm - score at 7.5cm. Adhere the striped patterned paper to the top red card flap. 
6. Adhere to the center of the card base using E-Z Runner Permanent Adhesive on the back. Make sure the fold of the smaller flap is facing down.  
7. Stamp the sentiment onto a white card insert 7cm x 7cm and adhere to the red card stock.


8. Cut/emboss one (1) Lacey Circles (#1 being the smallest).
9. Pop up onto the striped patterned paper stock using 3D Foam Squares.
10.Adhere the Poinsettia sticker to the centre of the layered Lacey Circles and small red pearls to each corner of the patterned paper.
11.Cut one small circle in patterned paper and one the next size up in green card
12.Attach the smaller circle to the larger one using double sided tape.
13.Attach 3D foam squares to the lower portion of the circle and adhere to the lower corner of the card slightly over the edge of the smaller flap to keep it closed. Embellish using a recycled button. 
14.Attach layered card front to the pre-cut card base using Fairmont Labels and white card stock.
This card is for the following challenges:
Christmas at Sweet Stampin' - Anything Goes for Christmas
Avenue 613 Create Challenge - Anything Goes optional twist, Christmas
Ike's World - Anything Goes with a twist: Victorian Christmas
Addicted To Stamps Challenge - Seasons Greetings
The Holly and Ivy Christmas Challenge - Anything Christmas Goes
Incy Wincy Designs - RED AND GREEN 
Card Mania - Christmas
The Corrosive Challenge - Anything Goes
Connie Can Crop - 3D Project or Fancy Folds

Thank you for your comments and all of the support you give me - you make blogging such an amazing place to be!! Your encouragement is such a blessing for me - it makes my day! God bless you!

{{{hugs}}} and happy crafting

Tuesday, December 19, 2017

Spellbinders Pieces of Life Layout Tutorial

Hello friends, thank you for stopping by today!  I am have a tutorial for Spellbinders to share with you today - a layout - I love using Spellbinders Dies on layouts - they add so much and definitely help us to personalise our layouts. 


I don't usually like to scrapbook photos of myself but as the 'Memory Keeper' of the family I need to make sure I am included somewhere - and I knew which dies I wanted to use with this photo taken by my DH quite a few years ago - you can see how easy it is as you follow along with the Step by Step Tutorial.

1. Cut/emboss the photo using Matting Basics A Card Creator 
2. Lightly sand around the embossed edges of the photo using a sanding block.
3. Layer the photo onto Corrugated card board using strong tape.
4. Adhere the layered photo to the centre of the card stock using strong tape.
5. Adhere pre-cut pattered paper below the layered photo and tuck under recycled packaging to left videos the corrugated card.

6. Cut/emboss one Untamed Heart Etched Dies using brushed gold card stock.
7. Adhere to the lower right hand corner of the corrugated card.
8. Glue the Cameo to the centre of the heart.

9. Cut/emboss two Textured Flowers Etched Dies #2 and four #1 (#1 being the smallest) using cream card stock paper; followed by two sets of small leaves.
10. Sponge the centre of  the flowers using Golden Glitz Ink; layer the flowers using 3D Foam Squares onto the lower left side of the photo
11. Shape the leaves and glue under the flowers.

12. Use pink cotton on the buttons and glue to the flower centres.
13. Glue some small feathers each side of the flowers.
14. Glue the Prima embellishment to the top left corner of the layered photo.
15. Adhere a thin strip of corrugated card just down from the top right hand corner.
16. Glue a crown above the corrugated card and layer two small flowers below.
17. Trim the Swirls Finesse to size and adhere to both bunches of flowers.

18. Sand the chipboard letters and colour using Chameleon Pens - repeat the layers of colour until you get the depth you are wanting.
19. Apply a coat of Pico Embellisher and allow to dry.  Adhere to the layout above the layered photo.
20. Layer sentiments onto black card stock, trim and adhere to the right side of the corrugated card.
21. Layer the sticker sentiment into black card stock and adhere under the top flowers.
21. Splatter using Imagine

Spellbinders Supplies:
Other Supplies: Cream and Gold card stock; Scrapbook Adhesives by 3L: E-Z Adhesive Runner, 3D Foam Squares; Liquid Glue;  Imagine: Delicata Ink in Golden Glitz, Memento Ink in Espresso Truffle;irRESISTibles Pico Embellisher in Shimmer;  Chameleon Pens; recycled buttons, feathers, handmade embellishment, chipboard letters, corrugated cardboard, computer generated words, recycled prima packaging; resin embellishment; precut patterned paper.

Thank you for your comments and all of the support you give me - you make blogging such an amazing place to be!! Your encouragement is such a blessing for me - it makes my day! God bless you!

{{{hugs}}} and happy crafting

Saturday, December 16, 2017

Spellbinders Baby Bunny - Girl Card

Hello friends!  I am excited to be sharing a tutorial for Spellbinders today using another adorable Die from the Little Red Wagon Collection by Licensed Designer Debi Adams along with some gorgeous Dies  by Becca Feeken.  Baby cards seem to be one of the cards that peopple keep - they are a gift in themselves and are often a keepsake that becomes a treasure.


The card front has been cut /embossed using the Spellbinders Nestabilities Hemstitch Rectangles Etched Dies Venise Lace by Becca Feeken  and Authentique Paper. This has been popped up using Scrapbook  Adhesives BY 3L Crafty Foam Tape.  The card front has been popped up onto the pre-cut card base, also using Crafty Foam Tape.

Next cut/emboss white card stock using both the Filigree Frame and the Outer Layer, along with the Inner Frame Layer using light pink card stock.  Glue the pink Inner Frame onto the centre of the Filigree Frame.  Pop up onto the layered card front using Crafty Foam Tape.


I am sure you would agree that this Shapeabilities Some Bunny Etched Dies My Little Red Wagon by Debi Adamss so-o-o cute - as you follow along you will see how easy it is to put together. Cut emboss one (1) Head, one body and two (2) arms using Kraft card stock and one (1) Bow Tie using patterned paper and the Platinum 6 Die Cutting and Embossing Machine.  Adhere the head and arms to the body using double sided tape.

Colour the eyes using the Chameleon Black Detail Pen before the Die is removed. Add any extra sponging once the Dies are removed eg. the ears and cheeks.  Adhere the Bunny to the centre of the layered die.  Glue a pink double seam binding bow to the left of the filigree frame and a Mulberry Paper rose to the centre of the bow.  Finish by adding trimming Want2Scrap Beautiful Bling Borders and adhering to each corner - also adding white pearls to each corner - as shown in the photo above.


This card is linked to the following challenges:
Crafty Creations - Always Anything Goes
Lemon Shortbread Challenge - Anything Goes
Crafty Gals Corner - Anything Goes
Fab 'n' Funky - Anything But Christmas
Frilly and Funkie - Inspired By a Memorable Gift (vintage/shabby chic)
Through The Craft Room Door  - Always Anything Goes
Pammie's Inky Pinkies Challenges - ALWAYS ANYTHING GOES
The Paper Nest Dolls Challenge - ALWAYS ANYTHING GOES

Thank you for your comments and all of the support you give me - you make blogging such an amazing place to be!! Your encouragement is such a blessing for me - it makes my day! God bless you!

{{{hugs}}} and happy crafting

Wednesday, December 13, 2017

Penny Black Thanks a Bunch

Hello friends, thanks so much for visiting.  Christmas is officially 12 sleeps - it is approaching so fast - are you ready - we are nearly but there is always that last little something that sneaks in and catches you off guard - or is that just me!?! Wink:Wink! 


My card today has been created using a Penny Black Inc. image from the Stitched Flowers clear stamp set - such a pretty floral stamp.  I have stamped the image onto white card stock and coloured it using Chameleon Art Products/Pens - I love the way these pens give such a great variation of colour in the one pen - so quick and easy!


The image has been cut/embossed using a Spellbinders A2 Matting Basics B and the  Platinum 6 Die Cutting and Embossing Machine – 6″ Platform. The Die has been used a s a stencil and sponged inside the cutting edges using Imagine Memento Inks in Summer Sky,  Dandelion and Rockmelon.  The sentiment has been stamped using Imagine Memento Inks in Rhubarb Stalk.


The coloured image has been popped up onto patterned paper cut/embossed using the Spellbinders Nestabilities Hemstitch Rectangles Etched Dies Venise Lace by Becca Feeken, using Scrapbook  Adhesives BY 3L Crafty Foam Tape.  The card front has been popped up onto the pre-cut card base, also using Crafty Foam Tape.


White card stock has been cut/embossed using the long trinket from the Shapeabilities Isadora Trinkets Etched Dies Venise Lace by Becca Feeken.  This has been sponged using  Imagine Memento Inks in Summer Sky,  Dandelion and Rockmelon and a yellow button adhered to the centre.  The Long Trinket has been glued to the top of the image layer.  A double narrow sheer bow has been glued to the bottom left corner of the image layer.

This card is linked to the following challenges:
Color Inspiration Monday - ALWAYS ANYTHING GOES WITH HAND-COLORED IMAGE
heARTful Stamping Challenge - Anything Goes + a Stamp
The Paper Girls - STAMPING FUN
Creates and Makes - Anything Goes
Penny Black and More – Clean &Simple/CAS - this is CAS for me
Scrappers Delights - Anything Goes
Crafting-With-Friends Anything Goes
Craft-Dee BowZ - Anything Goes with a Handmade Bow
Crafty Awesomeness - Challenges Combined
Creative Ladybirds Creations - Always Anything Goes

Thank you for your comments and all of the support you give me - you make blogging such an amazing place to be!! Your encouragement is such a blessing for me - it makes my day! God bless you!

{{{hugs}}} and happy crafting

Tuesday, December 12, 2017

Spellbinders - What's New Pussy Cat? Tutorial

Hello friends, thank you for stopping by today!  I am have a new tutorial for Spellbinders to share with you today - featuring one of the new the adorable Kitty Kat dies.  There's 3 adorable cats in this set all with different poses - lots of possibilities. 


Purrfect for those friends who are cat people and have a special occasion coming up!


1. Fold a piece of white card stock in half and cut/emboss using the A2 Matting Basics A - making sure to place the die inside the cutting edge to create the card base.
2. Cut/emboss the largest die from A2 Matting Basics B using patterned paper.
3. Cut/emboss a square in the centre of three alternating squares on the card front - as shown in the photo above using Squares SML.

4. Cut each of the three cats from the Kitty Kat Die using black card stock.
5. Add a sheet of recycled acetate behind the card front

6. Adhere a cat per 'window'.
7. Add a small yellow star from the Rise 'n Shine Etched Dies to each window, along with a cog from the Industrial 2 Etched Dies.
8. A candle from the Make a Wish Die D-Lites has been cut.embossed and the die used as a stencil, colouring before removing the Die.
9. Adhere the Candle to the middle left hand square
10. Adhere a computer generated sentiment across the candle onto the left hand square.
11. Pop up the finished card front onto a slightly larger white card front using 3D Foam squares.
12. Adhere the layered card front to a pre-cut white card base using E-Z Adhesive Runner.

Spellbinders Products:
Other: White, yellow and black card stock; Scrapbook Adhesives by 3L: E-Z Adhesive Runner, Crafty Foam Tape; Liquid Glue;  Chameleon Pens: Black Detail Pen; DCWV: Patterned Paper; Recycled Acetate.

Thank you for your comments and all of the support you give me - you make blogging such an amazing place to be!! Your encouragement is such a blessing for me - it makes my day! God bless you!

{{{hugs}}} and happy crafting