Pages

Monday, April 30, 2018

Spellbinders Side Floral Panel Tutorial

Hello friends - thank you for stopping by! Today I have a tutorial to share for Spellbinders - sharing a card created using one of the Blooming Garden Collection by Licensed Designer Marisa Job, along with one of the Joyous Celebration Collection by Sharyn Sowell.


I have decided to use neutral and soft colours that co-ordinate beautifully with the soft romantic feel of the card.

1. Cut/emboss one Side Floral Panel Etched Die using cream card stock
2. Cut/emboss the largest Pierced rectangle from the Scored and Pierced Rectangles Etched Dies using cream card stock
3. Trim patterned paper to for just inside the Pierced Rectangles - adhere to the card front using double sided tape.
4. Adhere the Side Floral Panel Etched Die to the left side of the layered card front using liquid glue.

5. Cut/emboss two Swallows from the Swallow and Heart Etched Dies using cream card stock.
6. Sponge the embossed heart using Angel Pink Inks and a sponge dauber while still in the Die.
7. Pop up onto the card front using White Small 3D Foam Squares.
8. Apply a coat of Pico Embellisher in Shimmer to the hearts.

9. Thread Seam Binding through the lower portion of the Side Floral Panel, securing at the back of the card front using double sided tape.
10. Adhere a double seam binding bow onto the left side of the Seam Binding using liquid glue.
11. Adhere a Mulberry Paper Rose using liquid glue.

Spellbinders Products:
Other Supplies:  Cream and kraft card stock; Scrapbook Adhesives by 3L: Extreme Double Sided Tape, 3D Foam Squares; Liquid Glue; Want2Scrap: 250 Count White Pearls, Swirls Finesse - White Pearls -Self Adhesive Imagine: Memento Ink in  Angel Pink, Sponge Daubers; Seam Binding; Mulberry Paper Rose; Patterned Paper

Thank you for your comments and all of the support you give me - you make blogging such an amazing place to be!! Your encouragement is such a blessing for me - it makes my day! God bless you!

{{{hugs}}} and happy crafting

Sunday, April 29, 2018

Dr Who Layout

Hello friends, Thanks for stopping by - I hope you are enjoying your weekend, it goes so fast! It is Sunday night here - not sure where the last 2 days have gone - but they have! LOL!  I have enjoyed a little bit of scrapbooking lately....long overdue I might add!


This layout came about because of those clock hands - my DH came in and said - 'can you use these?' Well - YES!!!  I knew they would be perfect for this Dr Who layout - and yes my son is a DR WHO ADDICT (Whovian - I believe they are called)!! We were thrilled to see this Tardis used for raising money for Cancer and of course had to make sure we called in.


I have cut/embossed the black and white photo using Spellbinders 5x7 Matting Basics B and lightly sanded around the edges using a Sanding Block, for a slightly aged look - I do love this effect on photos. It has been popped up onto the 12x12 paper using Scrapbook Adhesives BY 3L Crafty Foam Tape.  A frame created using negative dies - I love to use up these leftovers.  The Stampin' Up! Tardis has been stamped using Imagine Memento Inks in Danube Blue, fussy cut/hand cut out using scissors and popped up on the bottom right side of the photo using Scrapbook Adhesives BY 3L  3D Foam Squares.

I have hand cut around the image on the second photo and popped it up on the left side of the black and white photo.


The clock hands have been secured using a large brad.  The background has been randomly stamped using the Spellbinders Seth Apter Thunderstorm Stamps and Imagine Delicata ink in Golden Glitz.  Washi Tape has been added underneath the photo along with a cloud from the Shapeabilities Rise 'n Shine Etched Dies My Little Red Wagon by Debi Adams, along with some cogs from the Die D-Lites Gears Etched Dies.


Th sentiment is from the Spellbinders Contour Say It Like You Mean It Steel Rule Dies - such a great size for scrapbooking.

This layout is for the following challenges:
Crafter's Castle Anything Goes+ optional: Dimensional Projects
My Time to Craft - Inspired By A Movie
Aud Sentiments Challenge - Masculine + A Sentiment 
House That Stamps Built - Anything Goes
The Male Room - Anything But a Card 
Simon Says Wednesday - Anything Goes
A Snowflakes Promise - Anything Goes
Scrapping4Fun - Anything Goes

Thank you for your comments and all of the support you give me - you make blogging such an amazing place to be!! Your encouragement is such a blessing for me - it makes my day! God bless you!

{{{hugs}}} and happy crafting

Saturday, April 28, 2018

Sending Love Your Way

Hello friends,  thanks so much for stopping by today - it is Saturday here in the Southern Hemisphere and a beautiful autumn/fall day.  Autumn/fall is a spectacular season here in the Nations Capital - the autumnal colours are divine - God's artwork - you have to love that! 


I am using a negative die from the Spellbinders Shapeabilities Leaves So Very Gorgeous Etched Dies Good Vibes Only Collection by Stephanie Low. I had to smile when I saw that my friend Spellbinders International Ambassador Christine Emberson had a similar idea and has a video HERE on how to create a CAS card using the same Die- she does it so well!  Don't you just love how we can start off with the same product and end up with something so different!


I have cut/embossed the  Leaves So Very Gorgeous Etched Dies Small Leaves using the inner and outer cutting edges and white card stock. NOTE:  Make sure to centre the Die in the centre of the card front.  Next I have cut/embossed the card front using the largest two dies from the Nestabilities Hemstitch Rectangles Etched Dies Venise Lace by Becca Feeken.  All dies have been cut using the  Platinum Die Cutting MachineThe dies have been outlined using Chameleon Pens Detail Pen.

The card front has been popped up onto a pre-cut card base using Scrapbook Adhesives BY 3L 3D Foam Squares.  I have used stamps by both Seth Apter  and Tammy Tutterow to create a mixed media background using Imagine Memento Inks in Rhubarb Stalk, Summer Sky, Bamboo Leaves and Dandelion. 
 Faux Enamel Dots have been added using Imagine irRESISTibles Pico Embellisher in Tuxedo Black. A computer generated sentiment has been popped up using Scrapbook Adhesives BY 3L 3D Foam Squares.

This card is linked to the following challenges:
Crafting With An Attitude - Always Anything Goes
Back To Basics - Matting and Layering
House That Stamps Built - Anything Goes
Simon Says Wednesday - Anything Goes
WordArt Wednesdays - Anything Goes 
A Snowflakes Promise - Anything Goes
Lemon Shortbread - Always Anything Goes
Crafting from the Heart - 203 ANYTHING GOES
Make My Monday - IN THE GARDEN 
Creatalicious Challenges - Anything Goes + Option: Dies and Punches
Create and Inspire Anything Goes + option Dies or Stencils
Mix It Up Challenge Anything Goes + option: Bleaching
The Creative Crafters - Anything Goes 

Thank you for your comments and all of the support you give me - you make blogging such an amazing place to be!! Your encouragement is such a blessing for me - it makes my day! God bless you!

{{{hugs}}} and happy crafting

Friday, April 27, 2018

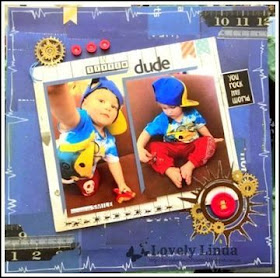
Little Dude Layout

Hello friends, thanks so much for stopping by.  Today I am sharing a layout with you and the star of the layout is my beautiful grandson - who happens to turn three TODAY!  What a wonderful three years it has been - my heart has never been so full, my eyes overflowed so much and my neck had such loving arms around it!  But back to the layout...I had a pile of over fifty photos and have managed to work through quite a few of them.


The photos have been trimmed and layered onto patterned paper that has been popped onto the 12x12 background at an angle.  Spellbinders Shapeabilities Sunburst Etched Dies by Seth Apter has been cut/embossed and the two largest Dies have been glued onto the lower right corner of the layered photos. Die D-Lites Gears Etched Dies have been cut/embossed in gold card stock and layered into the Sunburst Dies. A large red button has been glued to the centre of the Dies.


Gears have been layered onto the top of the photos along with three red buttons.  The sentiment stickers are used to create the sentiment above the photos and the other part of the sentiment is from Cosmo Cricket.  


The ants are Rub Ons, as is the sentiment on the photo.  The Washi Tape is from my stash.White Paint Pen has been used to add a hand drawn border  


This card is for the following challenges:
Simon Says Wednesday - Anything Goes
Aud Sentiments Challenge - Masculine + A Sentiment
Back To Basics - Matting and Layering 
Inspiration Destination -  Always Anything Goes 
The Male Room - Anything But a Card
Tuesday Throwdown Challenge - Anything Goes
Pause Dream Enjoy - Anything But a Card
Die Cuttin' Divas -Happy Birthday
Create and Inspire - Anything Goes + option Dies or Stencils
Die Cut Divas Anything Goes
Not Just Cards - Always Anything Goes
Your Scrapbook Place - Anything Goes

Thank you for your comments and all of the support you give me - you make blogging such an amazing place to be!! Your encouragement is such a blessing for me - it makes my day! God bless you!

{{{hugs}}} and happy crafting

Thursday, April 26, 2018

Want2Scrap Upcycled Boxes

Hello friends - thanks so much for dropping in. I have a new project on the Want2Scrap Blog - an altered project- upcycled, but sadly I forgot to take a photo of the before.  What I can tell you is that it has gone from Pinks and Paris to blues and seaside.  I have used a mixture of Want2Scrap bling, chipboard and trim - I love the way it all works together so well - every time!


You can see the full photos and instructions HERE

Thanks so much for stopping by and the lovely comments you leave - they are appreciated.  I hope you are inspired to get your Want2Scrap on!!  I will be sharing more projects here and hope you will be inspired!

{{{Hugs}}} and Happy Creating

Tuesday, April 24, 2018

Whale Showers

Hello friends, thanks so much for stopping by.  after all of the comments both here and on facebook on the last Whale card I created, I thought I would share the other one I made using the same set - Taylored Expressions Showered with Love stamp set - whimsical is always such a lovely change of pace.


I have stamped the whale using Imagine Memento ink in Teal Zeal, the waves are also in Teal Zeal and the water spout in Tuxedo Black - the hearts have been coloured using Chameleon PensThe cloud is from the Spellbinders Die D-Lites Sun and Clouds Etched Dies - I find that I use this cloud a lot with whimsical images - just the right size!

The card front has been cut using light blue card stock and the Nestabilities Scored and Pierced Rectangles Etched Dies.  This has  been popped up onto a white card base cut/embossed using Nestabilities Fancy Edged Rectangles Etched Dies using Scrapbook Adhesives by 3L 3D Foam Squares. 

The waves have been fussy cut/hand cut using scissors and popped up above the base of the card front also using 3D Foam Squares.  The Whale has been popped up using 3D Foam Squares for dimension.  The water spout has been fussy cut/hand cut using scissors, the hearts coloured and adhered above the whales head using double sided tape.  

The sentiment has been stamped using Tuxedo Black ink and cut/embossed using the tag from the Amazing Paper Grace Vintage Elegance Becca Feeken Giving Occasions Stamp and Die Set.  The die has been used as a stencil and sponged using Summer Sky Ink inside the cutting lines.  This has been popped up using 3D Foam Squares centred below the waves.  Imagine irRESISTibles Pico Embellisher in Shimmer has been used to create faux water drops around the water spout and the hearts have also had a coat added - for that extra shimmer.

This card is linked to the following challenges:
2 Crafty Critter Crazies - Anything Goes with a Critter
Di's Digis Designs - Include an animal
Crafty Animals Always Anything Goes
Simply Create Too - USE DIE CUTS
Create and Inspire - Anything Goes + option Dies or Stencils
Simply Papercraft ANYTHING GOES
Daisy Chain Challenges - Monochrome
The Crafty Addicts Anything Goes
Die Cut Divas Anything Goes
Dare 2B Artzy Challenges - Pastel Colors
heARTful Stamping Challenge - Anything Goes + a Stamp
Lil Patch of Crafty Friends - Always Anything Goes
Crafter's Castle Anything Goes+ optional: Dimensional Projects

Thank you for your comments and all of the support you give me - you make blogging such an amazing place to be!! Your encouragement is such a blessing for me - it makes my day! God bless you!

{{{hugs}}} and happy crafting

Monday, April 23, 2018

Spellbinders Dinosaur Shaker Card Tutorial

Hello friends - thanks so much for stopping by today,  I am sharing a tutorial for Spellbinders - an  interactive card for my grandsons birthday in April - Noah will be three and LOVES Dinosaurs - he loves to roar at us when he visits, in his best (and loudest) voice - so I am pretty sure this card will be a big HIT with him.


There are a number of ways to create a Shaker Card - this way is very easy and can also be made in advance if you just want to sit and play with this technique, as it is a separate item and is adhered to the card front - are you wondering how - follow along with the Tutorial and you will see just how easy it is! 

1. Cut/emboss the Dinosaurs using the Die D-Lites Dinosaurs Dies using three different coloured card stock.
2. Use the die as a stencil and add co-ordinating colours.
3. Cut/emboss one Scored and Pierced Rectangles Etched Dies using patterned paper.
4. Lightly Sand around the embossed edges using a Sanding Block.


1. Cut/emboss the largest Circle from the Standard Circles LG with the #4 (#1 being the smallest), using the reverse side of the patterned paper to create a frame.
2. Cut/emboss the largest circle from the Standard Circles LG in white card stock and one in clear acetate.
3. Place the die cut frame around the edge of  the acetate using strong tape.


4. Cut the foam tape into thin strips and adhere to the back of the layered frame - creating a border with the mounting foam strips;making sure you leave no gaps between the strips where your shaker filling may fall through.
NOTE: Add another row of Foam Tape if you are wanting a higher dome.
5. Add glitter or another filling carefully to the shaker card frame.  Line patterned paper up face down over your frame and press down.  The mounting tape is flexible and easy to form into shape if you remove the backing before adhering it to your frame.
NOTE: To prevent the filler in your shaker cards from sticking to the sides of the mounting tape, just run your embossing buddy along the sides of the tape. The powder makes the sides of the tape "nonstick".  Also rub an Embossing Buddy over the acetate before adding fine glitter. If you don't have an embossing buddy, try a dryer sheet.
6.Add the sequins and micro beads, line up the die cut circle and adhere to the back of the 'shaker'.  Adhere to the card front using  E-Z Adhesive Runner Ultra.
7. Adhere the Dinosaurs to the bottom right of the shaker dome, popping up one for dimension.


8. Cut/emboss the patterned paper using The Largest Die from the Scored and Pierced Rectangles Etched Dies, lightly sand the edges using a sanding block.
9. Create the ground by adhering two pieces of torn and sponged green card stock to the base of the card front and trimming to sizes.
10. Pop up onto a slightly larger pre-cut card base using recycled thin cardboard. Adhere the computer generated sentiment using E-Z Adhesive Runner Ultra
11. Cut/emboss one Banner from the Amused 1 Etched Dies using patterned paper.
12.Pop up on an angle across the top left corner of the banner using small white 3D Foam Squares.
13. Add sticker letters onto the banner with the name
14. Create the sentiment using stickers and adhere the lower portion of the card front.

Spellbinders Products:
Other: Turquoise and white card stock; Scrapbook Adhesives by 3L: E-Z Adhesive Runner, 3D Foam Squares; Small White 3D Foam Squares, Imagine: Memento ink in Summer Sky,Tangerine, Espresso Truffle, Teal Zeal and Bamboo Leaves, Quick Quotes: Double sided patterned paper.

Thank you for your comments and all of the support you give me - you make blogging such an amazing place to be!! Your encouragement is such a blessing for me - it makes my day! God bless you!

                                                          {{{hugs}}} and happy crafting