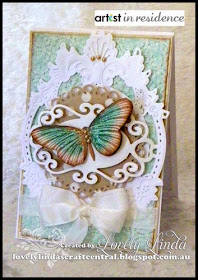
This is my final post for 2013 as an Artist in Residence for IMAGINE Crafts®/Tsukineko® but I am excited to be back on the 2014 Team - there is so much excitement building for the new year - can't wait to share. But first, one of the most popular cards I have made - using IMAGINE Crafts®/Tsukineko® Memento™ Dye Ink.
Spellbinders Products:
Gold Majesty Circles Spellbinders® Imperial Gold Dies
Lacey Circles Nestabilities
Fancy Tags Two Shapeabilities
Dotted Flowers M-Bossabilities folder
Grand Calibur® Die Cutting Machine
Preferred Partners
Imagine Crafts/Tsukineko Memento Dye Ink in Desert Sand and Summer Sky; Sponge Daubers; VersaFine™ Archival Pigment Ink in Vintage Sepia;
IMAGINE Crafts® Sheer Shimmer Spritz™ Craft Spray
Want2Scrap - Baby Bling in cream
Authentique Paper - Glistening Collection 12x12 - "Glitter" "Twinkle"
Other:
Penny Black Inc. - Social Butterfly stamp set
Scrapbook by Adhesives by 3L - Foam Squares, E-Z Runner
Card stock: White card, Kraft card
Seam Binding, 3D Kindy Glitz, Scissors; Chalks/ Pastels
Step 1: Cut white card 30cm x 11cm, score in the center to form a card base of 15x11cm
Step 2: Cut Kraft card 14.5 x 10.5cm. Adhere to the White card base using E-Z Runner.
Step 3: Cut Authentique Papers to approx 14x10cm and emboss using the Dotted Flowers M-Bossabilities folder. Adhere to the Kraft layer.
Step 4: Cut one (1) Gold Majesty Circles in white card, one (1) Lacey Circles in Authentique Paper and one Fancy Tags Three in white card.
Step 5: Layer the Dies using foam squares with the Gold Majestic Circles on the bottom, then Lacey Circles and Fancy Tags Two - centering each die.
Step 6: Adhere the layered Dies to the top of the Card base using E-Z Runner.
Step 7: Stamp two (2) Butterflies using with VersaFine™ in Vintage Sepia, sponge around the edges with the ink, using a dauber and Vintage Sepia.
Step 8: Colour the butterflies wings using Chalks/pastels, layer the wings, gluing in the center, add 3D Kindy Glitz to the top layer of wings, in strokes rather than colouring the whole wing for a more subtle look.
Step 9: Adhere to the center of the layered Dies, as per the photos below.
Step 10: Add 3 small pearls to the body of the butterfly and along the top of the Gold Majestic Circles.
Step11: Add Seam Binding around the lower portion, across the bottom of the Majestic Gold Circles, securing around the back of each side with E-Z Runner
Step 12: Adhere a double bow using liquid glue.
I hope you have been inspired with my Tutorials over the past year. I love the IMAGINE Crafts®/Tsukineko® products and hope that I have enabled you in some way to try them and open up your creative world!
Thank you too for your
comments and all of the support you give me - you make blogging such an amazing
place to be!! Your encouragement is such a blessing for me - it makes my day!
God bless you!
{{{hugs}}}


This is fabulous, thanks for sharing the 'how to'. You ahve isn[pired me to buy the Delicata Gold ink... :-)
ReplyDeleteBlessings
Maxine
I'm doing a cyber happy dance over this tutorial. I have been hoping you would share how you created this unbelievablly gorgeous butterfly but never thought I would actually see a tutorial. It was definitely "love at first flight" when I saw it. Thank you so much! Youve made by day..
ReplyDeletenow I need a bit of extra time out of wrapping and house cleaning to give this a try!.
WOWZERS! This is Gorgeous!!!
ReplyDeleteGorgeous colors and layers. Love it.
ReplyDelete