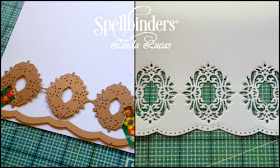
Hello Blog Friends - it is always a pleasure to share a Spellbinders Tutorial - I know I say it often, but this card is so simple to create with the beautiful new Border Strips paired with Borderabilities - the result is very pretty and elegant - as you can see.
Spellbinders Products:
- S4-439 Elizabeth Border Strip Shapeabilities® Strips
- S5-214 A2 Scalloped Borders Three Borderabilities® Card Creator
- EL-004 Imperial M-Bossabilities folder
- GC-001 Spellbinders® Grand Calibur® Die Cutting and Embossing Machine
- GC-012 Grand Calibur Junior Raspberry Spacer Plate 8.5 x 6
Cross Promotional Products:
- Want2Scrap© - Finesse Swirls - White Pearls - Self Adhesive; 72 Count - White Pearls - Self Adhesive; Mulberry Paper Rose in Pink
- May Arts - Ribbon
- Scrapbook Adhesives by 3L® - E-Z Runner
Other: White card stock; Wax Paper; Sanding Block,
1. Cut white cardstock to 15cm x 20cm, score halfway.
2. Place A2 Scalloped Borders Three at the base of the card
3. Elizabeth Border Strip die above as shown in the photo above
4. Cut/emboss through the Grand Calibur
5. Cut pink card 15cm x 10cm
6. Cut/emboss case of the card using A2 Scalloped Borders Three
7. Lightly sand along the embossed edge using a sanding block
8. Adhere to card base - 1cm below the white cardstock.
9. Emboss a 3cm x 14cm piece of pink patterned paper using the Imperial M-Bossabilities Folder
NOTE: Create a sandwich for Spellbinders M-Bossabilities™ folders and other embossing folders using the A Base Plate, M-Bossabilities folder, and Junior Raspberry Plate.
10. Lightly sand using sanding bloc,k.
11. Adhere to the top portion of the front.
12. Adhere double bow to the center of the embossed strip using liquid glue.
13.Adhere Mulberry paper rose using liquid glue
14, Add Finesse Pearls either side o the bow and pearls to the center of each Die Cut Medallion.
Thank you for your comments and all of the support you give me - you make blogging such an amazing place to be!! Your encouragement is such a blessing for me - it makes my day! God bless you


Gorgeous card. Love the borders, just got them, but haven't had time to play with them yet. Thanks for the inspiration, going to make time today! Just lovely.
ReplyDeleteHugs
Sue
fabulous Linda. Love the border stripe.
ReplyDeleteSwoon! This is utterly gorgeous. I pinned it but I had to right click to get the picture and then type the url blog address in a comment. Sometime Pinterest won't let me pin certain photos. https://www.pinterest.com/pin/415386765606464274/
ReplyDeleteOh my! Stunning card, and my style too. Jaw droppingly gorgeous!
ReplyDeleteVery pretty, Linda.
ReplyDeleteWonderful - love the classic elegance of this Linda - thanks for the tutorial too.
ReplyDeleteBlessings
Maxine
Oh darling this is just so lovely.Well done😊
ReplyDeleteGorgeous!
ReplyDeleteSimply gorgeous! Very elegant and timeless! TFS!
ReplyDeleteYou made a beautiful die "beautifuller" with what you've done!
ReplyDeleteWhat a fabulous card you have for us today. Very girly, yet very classy. Thanks for sharing.
ReplyDeleteVery Very pretty! I love the look of pearl.
ReplyDeleteGORGEOUS card Linda!!!
ReplyDeleteWOW - this is an AMAZING die combo!!!
I have this border and it cuts beautifully. Even with wax paper, though, I'm having a problem with the release. I guess I have to "break it in" more. I totally love your card!
ReplyDeleteSuch a beautiful card! I have this die thank you for the inspiration.
ReplyDeleteRegards Liz.