Hello friends, thanks so much for stopping by. I am sharing a tutorial for Spellbinders using the Charming Round Tag from the Charming Christmas Collection designed by Becca Feeken. I've chosen to use Joy and the ornate insert inside the ornament, also the reindeer and mittens as you will see when you follow along with the tutorial below.
'Shapeabilities Charming Round Tag Etched Dies A Charming Christmas Collection by Becca Feeken is a set of nine dies includes four insert pieces and an insert cutting rim to create many design to the tag shape. Also two charms and an ornament topper to complete the set.' - Spellbinders
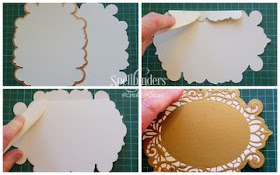
1.Cut/emboss one Victoriana Crest using both the Filigree
and the cutting edge Dies and Brushed Gold card stock. Remove the extra pieces
using the Tool N One.
2.Cut/emboss two Victoriana Crest Cutting Edge only using
cream card stock. Turn side on and score
one Die Cut at 1.5cm, fold forward and apply double sided tape. Attach the second Victoriana Crest, making
sure to line up the edges to form card base.
3.Adhere the Brushed Gold Victoriana Crest to the card case adding a layer of 5cm wide patterned paper across the centre of the card front, trimming the edges with scissors.
4. Cut/emboss one (1) Oval Insert in cream card stock, adhere to the centre of the card front.
5. Cut/emboss one Ornament , one cutting rim, along with on Decorative and Word inserts. Place the dies onto white card stock in the order just listed and hold in place with repostional tape.6.Cut/emboss one (1) Ornament (outer rim only) using red card stock.
7. Glue the white decorative Ornament to the red die cut backer.
8. Pop up onto the top portion of the cream Oval Insert on the layered card front.
9. Cut/emboss one Reindeer using Kraft card Stock, adding eye and nose details before removing from the Die.
10. Pop up onto the right side of the Oval Insert using double sided tape on the front half of the Reindeer and small 3D Foam Squares on the second half.
11. Cut/emboss two (2) Mittens using Kraft card stock, sponge the open portions of the Mittens before removing from the Die.
12. Adhere the first Mitten using double side tape onto the left Side of the Oval, popping up the second using 3D Foam Squares on the left side, slightly overlapping onto the first Mitten and the portion with no Foam Squares onto the Oval Insert.
13. Create a large double sheer bow, wrapping red twine around the knot several times.
14. Thread the twine through a recyced button, securing the button by tying a bow with the twine.
15. Use the ends of the red twine to thread through the top of the Bauble, trim and glue the bow down.
16. Adhere bling to the Bauble as shown in the main photo.
Spellbinders Products:
- S4-692 Shapeabilities Charming Round Tag Etched Dies Etched Dies A Charming Christmas Collection by Becca Feeken
- S6-125 Shapeabilities Victoriana Crest Etched Dies Venise Lace by Becca Feeken
- T-001 Tool 'n One
Other: White, gold, kraft and red card stock; Scrapbook Adhesives by 3L: E-Z Adhesive Runner, 3D Foam Squares; Authentique Paper: patterned paper; liquid glue; Imagine: Memento Inks in Rhubarb Stalk, Sponge Daubers; Button, Red Twine; Want2Scrap Beautiful Bling Borders, Baby Bling - Red Pearls; recycled button; Wide Sheer Ribbon


What a beautiful bauble Linda - love your colours and the gorgeous bow finished it to perfection
ReplyDeleteBlessings
Maxine