}

Saturday, June 30, 2018

Birdsong Blues

Hello friends, thank so much for stopping by.  It is the last day of June here in the Southern Hemisphere - hard to believe the first half of the year is gone! Today I have a shabby chic card to share with you, I do love this style and could not resist this beautiful palette - inspired by the beautiful Prima products I have used.  One of the great things about sorting your stash is finding things that get put away and overlooked...I will say no more on that! Wink:wink! 


The card front has been cut/embossed using the second largest die from the Spellbinders A2 Curved Matting Basics A Card Creator Etched Dies and the Platinum 6 Die Cutting and Embossing Machine - 6" Platform and the Prima Marketing Inc. Princess Collection. . This has been layered onto a slightly larger scalloped  layer that has been cut/embossed using the cutting edge only from the Card Creator Emmeline Treillage Etched Dies Venise Lace by Becca Feeken. using using Scrapbook Adhesives BY 3L Crafty Foam Tape.  Next the layers gave been popped up onto a pre-cut card base using the largest die from the A2 Curved Matting Basics A Card Creator Etched Dies.


The Pocket from the Shapeabilities Amazing Paper Grace Flourish Frame Pocket Etched Dies has cut/embossed using both the insert and the frame, it has then been trimmed to fit the card front and the edges sponged using Imagine Memento Ink in Espresso Truffle.  White Seam Binding has been threaded through the Flourish Frame Pocket and glued glued at the backIt has been popped across the lower portion of the card front using Scrapbook Adhesives BY 3L E-Z Adhesive Runner Ultra.

A flower from the Little Birdie Crafts the Vincy Ceram Collection has been glued into the left of the pocket. The Want2Scrap Swirls Finesse - White has been trimmed and adhered to the right side of the flower, cross the pocket and Seam Binding. The Heart Swirl from the Shapeabilities Swirl Tags Etched Dies Romancing the Swirl Becca Feeken has been cut/embossed and adhered to the top two corners, a medium White Pearl has been adhered to the centre of each swirls, along with the bottom right corner.


This card is linked to the following challenges:
Simon Says Wednesday - Anything Goes
House That Stamps Built - Anything Goes
Sisterhood of Crafters - Up in the Sky
Sunny Day Crafting - Any Animal 
Creates and Makes  - Anything Goes
Get Creative Challenges MONOCHROMATIC

Thank you for your comments and all of the support you give me - you make blogging such an amazing place to be!! Your encouragement is such a blessing for me - it makes my day! God bless you!

{{{hugs}}} and happy crafting

Friday, June 29, 2018

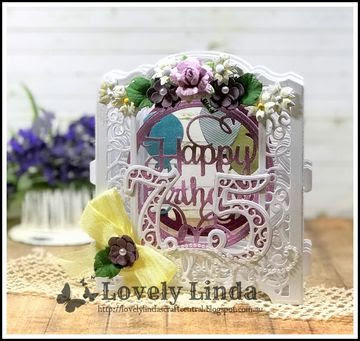
Happy 75th Birthday

Hello friends - thanks so much for visiting.  I have a special card to share with you today - my Mother-in-Law turned 75 and I wanted her to have a special card - I am pretty sure this one qualifies. I have used one of the Amazing Paper Grace® Collection by Spellbinders called 3D Vignettes - how beautiful are these Dies - and not as hard as they look to assemble - which is great don't you think!


It is easier for you to follow if I type the instructions in steps. 

1. Cut.emboss six (6) Shapeabilities Grand Cabinet 3D Card Etched Dies Elegant 3D Vignettes by Becca Feeken pieces using the Grand Cabinet Outline and Inlay together, along with the Inner Cabinet Outline using the Platinum Die Cutting Machine
2 I have cut/emboss both the Happy Birthday and Balloon Inserts from the Shapeabilities Layered Happy Birthday Etched Dies Elegant 3D Vignettes by Becca Feeken using purple shimmer card stock
along with separate balloon in Teal.  These have been adhered over the purple balloons for contrast.
3. Carefully trim the tabs off the sides of two of the 'open' Grand Cabinet Frame, using scissors or a paper trimmer - these two are for the front and back of the 3D Vignette.  Adhere the Happy Birthday to the centre of the second layer and the Balloon Insert to the fifth.


4. Cut/emboss two (2) Side Panels using both the frame and the insert.  The score lines run vertically.  Fold the scored tabs forward and adhere Strong Tape on each tab - on both Side Panels.
5 Lay the side panel down, tape side up, Lay the first TABLESS frame on the left side of it, making sure the tab is right up next to the frame with no overlap. Peel the backing off the tap and line up - once you are sure they are even, adhere to the frame.
6. Line up the tab with the slot on the side panel, pull the tab through, noting there is a small slot at the bottom of each tab, gently pull these down to lock the layer into place- the bottom of each frame needs to be lining up.
11. Working from the back to the front, repeat this process. For the Grand Cabinet front - in the same way as the back, line up the TABLESS frame with panel, adhere the front to the side panel.
12.  For the other side - flip the inserts out of the way - and repeat the process with the other side of the card. Make sure each layer is locked in and straight across the bottom to prevent buckling once the layers are in place.
13. Adhere the front to the card in the same manner as the back, starting with the right side - if everything is in place it will just fall into place perfectly


14. Cut/emboss the number seven and number five from the Shapeabilities Filigree Numbers Etched Dies Elegant 3D Vignettes by Becca Feeken.  Use both the outline and the inset to cut one white filigree layer of each and purple shimmer paper using only the outline die for the backer.  Glue the white filigree layer to the backer and adhere to the front of the card - on either side of the insert.
15. Adhere Little Birdie Flowers to the top of the Grand Cabinet Frame.  Adhere a yellow double seam binding bow to the bottom left corner of the card using glue, adhering one Little Birdie Crafts Khloe Mulberry 16pcs to the centre of the bow.
16. Trim the Swirls Finesse to the desired length and attach each side of the bow. 

Note:  Where do you write? I have cut a Grand Cabinet outline without any inserts in white card stock for the back, trimming of the tabs.  We wrote on the back before adhering it to the back of the card.

You can find Becca's Tutorial HERE.

This card is linked to the following challenges:
Moo-Mania & More - Favorite Colors (MIL's favourite colours)
Word Art Wednesday - Anything Goes
Crafty Creations Challenge - Anything Goes
Crafty Catz - ANYTHING GOES WITH OPTION OF BEAUTIFUL BLOOMS
The Crafty Addicts Challenge - Anything Goes (opt Flowers)

Thank you for your comments and all of the support you give me - you make blogging such an amazing place to be!! Your encouragement is such a blessing for me - it makes my day! God bless you!


{{{hugs}}} and happy crafting

Thursday, June 28, 2018

Beautiful Roses and Butterflies

Hello friends, thanks for stopping by.  Today I have a pretty card to share with you - using Spellbinders Dies along with some gorgeous Anna Griffin Inc embellishments and more.


The card front has been cut/embossed using the Spellbinders Nestabilities Romantic Rose Etched Dies cut/embossed using the Platinum 6 Die Cutting and Embossing Machine - 6" Platform  This has been popped up onto cream card stock using Scrapbook Adhesives BY 3L 3D Foam Squares.


The beautiful roses and sentiment tag are from Anna Griffin Inc. and have been layered onto the card front  using Scrapbook Adhesives BY 3L 3D Foam Squares.


 Want2Scrap Swirls Finesse in White have been trimmed and  added along the top of the sentiment banner.  The butterfly is a hand made embellishment and has been glued above the top left corner of the tag.


This card is linked to the following challenges:
Simon Says Wednesday - Anything Goes
Crafty Creations - Always Anything Goes 
Crafty Gals Corner - Anything Goes
The Crafty Addicts Anything Goes/Optional flowers
WordArt Wednesdays - Anything Goes
A Snowflakes Promise - Anything Goes
Crafty Sentiment Designs -  Anything Goes
 Creates and Makes - Anything Goes
Die Cuttin' Divas - Add a Butterfly
Ike's World - Anything Goes with a twist: Song Inspiration (Only You)
CropStop Challenge - ANYTHING GOES
Dragonfly Dreams - Anything Goes
The Corrosive Challenges Always Anything Goes
The Library Challenge - The Rose Garden
Challenge Up Your Life - Polka Dots
Crafty Catz - ANYTHING GOES WITH OPTION OF BEAUTIFUL BLOOMS

Thank you for your comments and all of the support you give me - you make blogging such an amazing place to be!! Your encouragement is such a blessing for me - it makes my day! God bless you!

{{{hugs}}} and happy crafting

Wednesday, June 27, 2018

Hearts and Flowers with Love

Hello friends, thanks so much for visiting today.  I hope you are easing into your week - for us here in the National Capital winter has truly set in - the days are cool but still a bit sunny - but the night - #ohmygiddyaunt - they are freezing - thankfully the homes are built to cope with the extremes.  But enough about that.....


I have been trying to sort through things in The Studio - 'faux cleaning' really LOL!  I came across a box of handmade embellishments I had made and decided I had better use them.   The card front has been created using Kaisercraft  All that Glitters Collection that has been cut/embossed using the Nestabilities Fancy Edged Rectangles Etched Dies and the Platinum Die Cutting MachineThis has been adhered to a pre-cut pink card base.

The hearts have been cut using Nestabilities Classic Scalloped Heart Etched Dies and some of my scraps of paper, including Graphic 45 The Secret Garden Collection - way to pretty to throw any away!!  These have been paper pierced down the centre and glued to the card front.  The flowers are Little Birdie Crafts Beaded Blooms - Pastel PaletteThe sentiment is computer generated and has been popped on on the right hand side using Scrapbook Adhesives BY 3L Small White 3D Foam Squares.

This card is linked to the following challenges:
A Snowflakes Promise - Anything Goes
Cuttlebug Mania - Summer  
Lemon Shortbread - Always Anything Goes
UnstampaBelles - FLOWERS AND MORE FLOWERS
Dragonfly Dreams - Anything Goes
Crafty Catz - ANYTHING GOES WITH OPTION OF BEAUTIFUL BLOOMS
QKR Stampede - ANYTHING GOES
Pammie's Inky Pinkies - Anything Goes
Word Art Wednesday - Anything Goes

Thank you for your comments and all of the support you give me - you make blogging such an amazing place to be!! Your encouragement is such a blessing for me - it makes my day! God bless you!

{{{hugs}}} and happy crafting

Tuesday, June 26, 2018

Spellbinders - Hello Beautiful

Hello friends, thanks so much for stopping by!  I have been catching up with a few Video Tutorials, there are so many good ones out there and we can never learn too much!  I was particularly taken with THIS ONE on partial die cutting by Jennifer McGuire - such a fun technique.


I have used the Partial Die Cutting Technique, on an angle using the Spellbinders Floral Mandala Die.  I have cut/embossed the top portion of the Die angled onto the left corner of white card stock three (3) times - to layer together - this adds so much dimension, alternatively you can use Craft Foam and Adhesive Sheets.


The bottom portion of the card front has been embossed using Spellbinders Wedding Ring Stitch Em-bossing Fold'ers Quilt It by Lene Lok, this has been adhered onto the lower portion of the Partial Die Cut portion, with a computer generated sentiment adhered between the two portions.

The front of the white card base has been coloured by sponging with Imagine Radiant Neon Inks in Electric Yellow, Electric Orange and Electric Pink using a Sponge Dauber.  This is very effective and so easy to achieve.  Don't forget to check out Jennifer McGuire's VIDEO TUTORIAL - she explains it so clearly.


This card is linked to the following challenges:
Simon Says Wednesday - Bright and Cheerful
Dare 2B Artzy Challenges - Bright Colors
The Corrosive Challenges -  Always Anything Goes
Crafter's Castle Anything Goes + option: More Than 1 fold
Crafting-With-Friends - ALWAYS ANYTHING GOES
Creative Fingers - ANYTHING GOES
4 Crafty Chicks - Dry Embossing Delight
As You Like It Challenge - Favourite Types Of Embossing (I love the dimension it adds)
Crafty Girls Creations Challenge - Always Anything Goes
Creatalicious Challenges - Anything Goes + Option: Flowers
WordArt Wednesdays - Anything Goes 
Artistic Inspirations - ANYTHING GOES
CropStop Challenge - ANYTHING GOES
UnstampaBelles - FLOWERS AND MORE FLOWERS 

Thank you for your comments and all of the support you give me - you make blogging such an amazing place to be!! Your encouragement is such a blessing for me - it makes my day! God bless you!

{{{hugs}}} and happy crafting

Monday, June 25, 2018

Spellbinders Swirl Happy Birthday Frame Tutorial

Hello friends, thanks so much for stopping by.  I have a new tutorial for Spellbinders to share with you - using the Swirl Happy Birthday Frame by the amazingly talented Marisa Job - Marisa's Dies are well known for the beautiful swirls and flowers - so much detail - and such a pleasure to use.


'Shapeabilities Swirl Happy Birthday Frame Etched Dies is a set of three dies includes an intricate birthday sentiment with a beautiful designed frame to nest around it. Blooming Garden Collection by Marisa Job brings sweet floral designs in many forms from accents to boxes to frames. Perfect for special occasions such as weddings, showers or as a lovely gift.' - Spellbinders

1. Cut/emboss one large frame using patterned paper.
2. Pop up onto a pre-cut cream card base, with rounded corners using Crafty Foam Tape.
3. Cut/emboss one Rectangle using co-ordinating patterned paper and pop up onto the centre of the card front using 3D Foam Squares.
4.Add a strip of cream Seam Binding over the rectangle section of the card front.

4. Cut/emboss the Happy Birthday Frame from the Swirl Happy Birthday Frame Etched Dies using pink card stock.
5. Add a strip of black card stock behind the sentiment only.
6. Adhere the Happy Birthday Frame across the centre of the layered card front using a 3D Foam Square at each end of the frame.
7. Glue a sheer bow at the top of the card, add a fussy cut/cut out using scissors, bunch of roses from the patterned paper.
8. Attach white pearls to the card front as shown in the photo.


Spellbinders Products:
Other:  Cream, pink and black card stock; Scrapbook Adhesives by 3L: E-Z Adhesive Runner, 3D Foam Squares; Small White 3D Foam Squares; Anna Griffin Inc: Lovey Layers Patterned Paper, Want2Scrap: Baby Bling - white pearls; Seam Binding

Thank you for your comments and all of the support you give me - you make blogging such an amazing place to be!! Your encouragement is such a blessing for me - it makes my day! God bless you!

                                                          {{{hugs}}} and happy crafting

Sunday, June 24, 2018

Baby Boy

Hello friends - thanks so much for stopping by.  Today I am sharing another adorable little baby card using the images from Kaisercraft - that I could not resist when I popped into the Outlet a little while ago.  You can see the first card HERE


My card base has been created using the Spellbinders Nestabilities Scored and Pierced Rectangles Etched Dies.  Two of the largest size Die has been cut and embossed using the Platinum 6 Die Cutting and Embossing Machine - 6" Platform and white card stock.  Score one Scored and Pierced Rectangle at 1.5cm and fold forward. Adhere the second Scored and Pierced Rectangles Etched Die, making sure to line up the sides - this forms the card base.

Cut/emboss some patterned paper using the second Die from the Nestabilities Scored and Pierced Rectangles Etched Dies and adhere to the card base using Scrapbook Adhesives BY 3L E-Z Adhesive Runner Ultra.  Pop up the Birth Record layer onto the card front using Scrapbook Adhesives BY 3L 3D Foam Squares.  Adhere a strip of blue lace to the layered card front, secure on the front left side, tucking under the Birth Record.


Layer the Blue Bird onto the left corner of the Birth Record, The Die Cut 'Baby' sentiment across the Birth Record using liquid glue.  Pop up the baby image onto the second smallest die from the Nestabilities Fancy Edged Circles Etched Dies and onto the card front, using double sided tape on the portion that overlaps onto the Birth Record and 3D Foam Squares on the lower portion - so the image sits evenly on the layered card front.  Adhere three small Want2Scrap Turquoise Rhinestones to the centre of the top layer and Beautiful Bling Borders above the top ff the Birth Record layer.


This card is linked to the following challenges:
Simply Create Too - FOR A MALE
Simply Papercraft - ANYTHING GOES
Crafter's Cafe - For a Child
Crafts Galore Encore - Always Anything Goes
Daisy Chain Challenges For the Boys/Men
Eclectic Ellapu Anything Goes
Love to Craft - Anything Goes
Scribbles Designs Challenge - Anything Goes
Fab 'n' Funky - Monochrome

Thank you for your comments and all of the support you give me - you make blogging such an amazing place to be!! Your encouragement is such a blessing for me - it makes my day! God bless you!

{{{hugs}}} and happy crafting