}

Monday, November 28, 2016

Cyber Monday Blog Hop with Flourishes LC and Imagine Crafts

Hello and welcome to the Flourishes LC and Imagine Crafts Cyber Monday Blog Hop - our first blog hop together, we are excited to share with you our designer’s creativity using each company’s products and each designers unique style. If you have come from RoniJohnsons Blog - you are in the right place.  Make sure to leave a comment on each designer’s blog as we will be giving prizes away randomly from two of the designer’s blogs.


I have created the following card:
  

Product List

Flourishes LC: Winter Birds Stamp Set; Hour Glass Die Set
Imagine Crafts: Creative Medium iridescent in Green; iRESISTibles Pico Embellisher in Shimmer; Memento Luxe in Wedding Dress, Memento in Tuxedo Black, Teal Zeal and Desert Sand, Sponge Daubers; Memento Markers
Other: Authentique – Designer Paper; Scrapbook Adhesives by 3L: 3D Foam Squares; Liquid Glue; Wreath Die Cuts; White cardstock; Spatula; Liquid Glitter; White Gel Pen

xxxx


 Using Creative Medium iridescent in Green and a Spatula, apply to patterned paper and  allow to dry.  Once dry, sponge the stenciling using Memento Luxe Ink; Memento Teal Zeal and a sponge dauber,


Adhere the wreath Die Cuts to the top portion of the stenciled paper. The Winter Bird image has been stamped onto Flourishes Classic White card stock using black ink and coloured using Memento Inks and sponge daubers.  Highlights added using Memento Markers.  The Chickadee has been fussy cut/hand cut using scissors popped up onto the die cut wreath using 3D Foam Squares.

The sentiment has been stamped onto Flourishes Classic White card stock using black ink and cut/embossed using the Perfectly Pierced Classic Hourglass Die Set #2 Die (#1 being the smallest).  The Die has been used as a stencil, sponging inside the Die using Teal Zeal and a Sponge Dauber.  The Sentiment has been removed and popped up using 3D Foam Squares. 

Your next step on the Blog Hop is DaviLong. Don't forget to leave a comment on the Designers Blogs - someone has to win and it could be you!!

Flourishes L.C

*** Comments will be accepted until Wednesday, November 30th at 6:00 am and then we would be choosing two winners randomly from the comments ***

More good news from Flourishes LC -  there is 30% off all products in the store - Code is cybermonday and if you buy new stamps that have been released since since June 2016 you will get one free!!

Thank you for your comments and all of the support you give me - you make blogging such an amazing place to be!! Your encouragement is such a blessing for me - it makes my day! God bless you!


{{{hugs}}} and happy crafting

Friday, November 25, 2016

Want2Scrap A Song to Sing Sneak Peek

Hello friends, I am excited to be sharing a project over on the Want2Scrap Blog - using Rhinestones - not a pearl in sight! LOL - you can see it all HERE.


Thank you for your comments and all of the support you give me - you make blogging such an amazing place to be!! Your encouragement is such a blessing for me - it makes my day! God bless you!

{{{hugs}}} and happy crafting

Flourishes LC Fridays Free for All Blog Hop In Flanders Fields - Red as a Poppy

Hello Flourishes Friends! Welcome to another Flourishes LC November  Free for All Challenge  - I hope you are ready for more inspiration today. Thank you for the lovely comments you made - each one was read and appreciated!  This week Tricia has challenged us  with 'In Flanders Fields - Red as a Poppy'  If you have come from Beverly's Blog you are in the right place, if not, please go to the Flourishes Blog and start from the beginning.  


I have used the Year in Flower 2  illustrated by Beverly Cole.


  I have stamped the Poppy onto Flourishes Classic White card stock using black ink and coloured it using Chameleon Art Pens. It has been fussy cut/ hand cut out and popped up on to layered Diecuts. 


Red Seam binding has been pleated onto double sided tape across the Dies before the poppy is adhered. The sentiment has been stamped, trimmed and layered onto green cardstock.  Nest it is adhered, at an angle to the base of the flowers and a red and gold button adhered.


LeCreme Swirls Finesse has been trimmed to size and adhered each side of the button.  The layered Dies are popped up onto embossed designer paper, followed by a pre-cut cardbase.  White pearls have been added to the corners.

Be sure to visit the other designers' pages today, your next stop is Naomi's Blog, then go shopping at Flourishes! 

Linda Lucas - you are here

Thank you for your comments and all of the support you give me - you make blogging such an amazing place to be!! Your encouragement is such a blessing for me - it makes my day! God bless you!


{{{hugs}}} and happy crafting
                                   

Wednesday, November 23, 2016

Bird Queen Birthday

Hello friends, I am popping in to share a card with you - I have been working on projects that I cannot show you as yet, but will be able to share soon.  In the meantime....


I have been playing around with embossing and inks/paints and love the effect that it can give.  In this case I have used the Spellbinders Cabbage Rose Embossing Folder - I think it would be one of my favourite 'go to' folders.  It has been sponged with Imagine Crafts Memento Ink in Bamboo.Leaves.

The bird and frame image have also been stamped using Bamboo Leaves and cut out using Spellbinders Classic Ovals SML and the Platinum 6 Die Cutting and Embossing Machine - 6" Platform and popped up onto a backing layer using using Scrapbook Adhesives by 3L E-Z Dots® Permanent Refillable DispenserWant2Scrap Beautiful Bling Borders has been trimmed and added to the top corners and along the lower portion of the layer and popped up onto a backing layer using using Scrapbook Adhesives by 3L 3D Foam Squares.  The layers are all popped up into a precut card base using Scrapbook Adhesives by 3L E-Z Dots® Permanent Refillable Dispenser.

                                        This card is linked to the following challenges:
Artistic Inspirations -  Always Anything Goes
Critters and Creatures Always Anything Goes with a Critter/Creature
Aud Sentiment Challenge - Anything Goes with a Sentiment
Sweet Stampin - Happy Birthday
Jo's Scrap Shack -  Use Brown, Green & Yellow
Morgan's Art World Challenge - Use an Article From Your Stash
WordArt Wednesdays - Anything Goes 
Anything Goes link-up Anything Goes
Artistic Stampers November - Autumnal
Brown Sugar Challenge - Anything Goes

Take care friends and Thank you for your comments and all of the support you give me - you make blogging such an amazing place to be!! Your encouragement is such a blessing for me - it makes my day! God bless you!

                {{{Hugs}}} and happy creating     
             

Monday, November 21, 2016

Spellbinders Lovely Day Tutorial

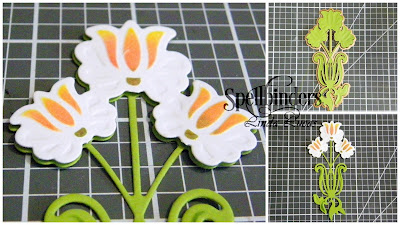
Hello friend - I have a new tutorial for Spellbinders to share with you today using  the Art Nouveau Florals by Licensed Designer Stacey Caron,  Last time I used this set I created a frame using one of the smaller dies - you can see it HERE.  This time I am using this gorgeous flower that deserves to be showcased on it's own!!


Other:
Scrapbook Adhesives by 3L: E-Z Adhesive Runner, 3D Foam Squares;Want2Scrap: 72 Count - pink rhinestones - self adhesive; Imagine Crafts: Memento Ink in Bamboo Leaves, Sponge dauber; Paper Doily; Computer generated sentiment


4. Cut/emboss two (2) flower strips from the Art Nouveau Florals using green cardstock.
5. Use the Die as a Stencil and sponge the flowers using Dandelion Tangelo and a touch of Bamboo Leaves using a Sponge Dauber.


4. Cut/emboss two (2) flower strips from the Art Nouveau Florals using green cardstock.
5. Use the Die as a Stencil and sponge the flowers using Dandelion Tangelo and a touch of Bamboo Leaves using a Sponge Dauber.


6. Emboss Floral Embossing Folder using white cardstock
7. Using a Brayer - apply ink to the Floral Folder - pattern side up.
8. Place ink side down onto white cardstock and use the brayer to make sure every area is covered,
9. Adhere to the precut cardbase using liquid glue.
10, Trim a Doily and adhere to the layered card base using liquid glue.
11.Adhere the completed Art Nouveau Floral using liquid glue.
12. Adhere the computer generated sentiment as shown in the photo above.
13 Adhere small self adhesive pearls around the doily.

Take care friends and Thank you for your comments and all of the
 support you give me - you make blogging such an amazing place to be!! Your encouragement is such a blessing for me - it makes my day! God bless you!

{{{Hugs}}} and happy creating

Sunday, November 20, 2016

Want2Scrap and Quick Quotes Card Sneak Peek

Hello friends, I am excited to be sharing another project over on the Want2Scrap Blog - we have joined with Quick Quotes Scrapbook Company for an Inspiration Week - I am sharing a card today - you can see it all HERE.


Thank you for your comments and all of the support you give me - you make blogging such an amazing place to be!! Your encouragement is such a blessing for me - it makes my day! God bless you!

{{{hugs}}} and happy crafting

Friday, November 18, 2016

Flourishes LC Friday Free for All Blog Hop - Non Traditional Colours

Hello Flourishes Friends! Welcome to another Flourishes LC November Challenge  - I hope you are ready for more inspiration today. Thank you for the lovely comments you make - each one was read and appreciated!  This week Beverley has challenged the Snr. Designers to use non traditional colours.


 I don't know about you, but I have never seen a yellow Christmas Cactus - they may exist but nowhere near me.


I have stamped the image from the Flourishes LC Winter Blooms onto Flourishes LC Classic White card stock using VersaMark and white embossing powder - and of course used a heat tool.  It is then coloured using Chameleon Pens and popped up onto a layered precut card base.  The layers have been created using Swirl Bliss Corner Dies on each corner to create a frame, a circular frame has been adhere using double sided tape.


A double seam binding bow and vintage button has been added to the left side of the circle.

Be sure to visit the  designers' pages today, to see their cards.

Linda Lucas - you are here

I am looking forward to seeing you at our next Friday, as a part of a weekly Flourishes LC Friday Hop - so much inspiration and you are going to LOVE what each Designer is sharing!

Feel free to leave us comments – we love to hear from you, each comment is read and appreciated!
Have fun hopping and enjoy the scenery along the way!
{{{Hugs}}} and happy creating         
                             

Thursday, November 17, 2016

Spellbinders Floral and Flutters Sneak Peek

I have a post on the Spellbinders Blog today - using Dies by Licensed Designer Stacey Caron - what is not to love with these Dies!  You can check it out HERE


Thank you for your comments and all of the support you give me - you make blogging such an amazing place to be!! Your encouragement is such a blessing for me - it makes my day! God bless you!
{{{Hugs}}} and happy crafting

Sneak Peek of Want2Scrap and Quick Quotes Art Journal

Hello friends, I am excited to be sharing a project over on the Want2Scrap Blog - we have joined with Quick Quotes Scrapbook Company for an Inspiration Week - I am sharing not one, but two pages of  my Art Journal - you can see it all HERE.


Thank you for your comments and all of the support you give me - you make blogging such an amazing place to be!! Your encouragement is such a blessing for me - it makes my day! God bless you!

{{{hugs}}} and happy crafting

Wednesday, November 16, 2016

Botanical Strip Elegance

Hello friends, I am sharing a very quick card tonight - but definitely with the WOW Factor - wouldn't you agree!?  I just love the Spellbinders Die Strips - they are so versatile and so easy to use - using just the filigree insert adds such an elegance to a card - a beautiful focal point.  This card would be suitable for so many occasions.


Cut/emboss the filigree insert only of the Stacey Caron Holiday Holiday Botanical Strip on to lower portion of the gold card stock.  Remove excess pieces using Tool 'n One.

Score the gold card stock and 1/2'" intervals - scoring from the back. Adhere narrow lace between scoring lines - secure at the back using double sided tape. Pop  the old card stock up onto a  pre-cut card base using Scrapbook Adhesives by 3L E-Z Dots® Permanent Refillable Dispenser

Add a stamped sentiment, popping it up onto the rows of lace using 3D Foam Squares; followed by a double seam binding bow and Mulberry paper rose.  Finish by adding Want2Scrap white pearls along the top of the filigree pattern.


This card is linked to the following challenges:
Word Art Wednesday - Anything Goes
Anything Goes link-up - Anything Goes
Eclectic Ellapu - "Anything with a Bow",
Happy Little Stampers - Always Anything Goes with Dies 
Crafty Friends Challenge - For Someone Special
Paradise of Stamps Anything Goes
Pearly Sparkles Challenge - must use Pearls) Anything Goes
Lemon Shortbread - Always Anything Goes
Retarte - Anything Goes
613 Avenue Create Challenge - Anything Goes

Take care friends and Thank you for your comments and all of the
 support you give me - you make blogging such an amazing place to be!! Your encouragement is such a blessing for me - it makes my day! God bless you!

                {{{Hugs}}} and happy creating