}

Friday, March 31, 2017

Spellbinders Baby Boy

Hello friends - there is something about making baby cards - is it the fact that they are one of the cards people seems to keep, along with Wedding cards?  I do love the create them and adding lots of special details.  This may be the only time that you can make cards for males pretty and even add a bow! LOL!


I have cut/embossed the card base using Spellbinders Romantic Rectangles 2 and Platinum 6 Die Cutting and Embossing Machine - 6" Platform..  The patterned paper has been cut to size and popped up onto the card base using  Scrapbook Adhesives by 3L 3D Foam Squares.


The image is from my stash and has been coloured using Chameleon Pens.  This has been fussy cut/hand cut using scissors and adhered to a Standard Circle LG using Scrapbook Adhesives by 3L E-Z Adhesive Runner, then popped up onto a Die from  Spellbinders Fleur de Elegance and frame from the Silhouette Die D-Lite.


The sentiment is from the Darkroom Door  Hello Baby stamp set and stamped using Imagine Crafts Memento Ink in Tuxedo Black.  This has been cut and layered onto a strip of the patterned paper and then onto the layered card base.  The gorgeous sheer double bow is created using May Arts Ribbon.

This card is linked to the following challenges:
Simon Says Stamp - Anything Goes
Crafty Sentiments Challenge - Anything Goes
As You Like It Challenge - Favourite Colouring Medium (and Why) Chameleon Pens - self blending and so many colours in one pen.
Aud Sentiments Challenge - Any Sentiment Except For Birthday
Die Cuttin' Divas - Anything Goes
The Paper Nest Dolls Challenge - Always Anything Goes
Dare 2B Artzy Challenges - Lots of Layers
heARTful Stamping Challenge - Anything Goes + Stamp
Brown Sugar – Anything Goes
Jo's Scrap Shack - Anything Goes
Making Memories Crafting - Add Some Layers

Take care friends - thank you for your comments and all of the support you give me - you make blogging such an amazing place to be!! Your encouragement is such a blessing for me - it makes my day! God bless you!

{{{Hugs}}} and happy crafting

Wednesday, March 29, 2017

Happy Happy Birthday

Hello friends, I hope you have had a restful weekend - and the week is being kind to you!  I have a card to share with you today using a 3D Stamp by Spellbinders. I love colouring these images, they give such great dimension.


The image has been stamped using Imagine Memento Ink in Tuxedo Black ink and coloured using Chameleon Pens.  It has been fussy cut/hand cut.


The background stamp is from Penny Black Inc. It has been stamped onto kraft card and sponged using Imagine Memento ink in Teal Zeal and popped up onto a pre-cut card base using Scrapbook Adhesives by 3L 3D Foam Squares.  Corrugated card has been torn and adhered to the lower portion of the brickwork.  A Die cut frame from my stash has been adhered to the layered card base.

The image has been tucked into the frame and dimension added using Scrapbook Adhesives by 3L 3D Foam Squares.  I have finished off by adhering a computer generated sentiment.


This card is linked to the following challenges:
Brown Sugar Challenge - Anything Goes
Artistic Inspirations - Always Anything Goes
Color Inspiration Monday - Always Anything Goes with hand-colored image
The Corrosive Challenge - Anything Goes
Incy Wincy Designs - Happy Birthday
Scrapbook Stamp Society Challenge Blog Anything goes with option Use Kraft Paper 
613 Avenue Create - Anything Goes w/Optional Twist: Stamping (no digis)
HeARTful Stamping Challenge - Anything Goes
Dare 2B Artzy Challenges - Lots of Layers
Stamping Sensations - Close to Nature
4 Crafty Chicks - Punches Or Dies
House That Stamps Built - Anything goes
Ike's World Challenge - Anything Goes - twist - In The Garden
Creates and Makes Challenge - Anything Goes - option, Springtime
STAMPlorations -  Never-Ending -Anything Goes Challenge


Take care friends - thank you for your comments and all of the support you give me - you make blogging such an amazing place to be!! Your encouragement is such a blessing for me - it makes my day! God bless you!

{{{Hugs}}} and happy crafting

Monday, March 27, 2017

Spellbinders Stacey Caron's Tuscany Strip Tutorial

Hello friends, I have a new tutorial for Spellbinders to share today - using one of the new Dies by Licensed Designer Stacey Caron - her style is always elegant and Stacey has a flair for the dramatic which shows in everything she puts her hands to.


Spellbinders Products
Other : Liquid Glue;  Scrapbook Adhesives by 3L: E-Z Adhesive Runner, 3D Foam Squares; Turquoise and white card stock; 


1. Cut/emboss one Stacey Caron Renaissance Jubilee Tuscany Strip using Turquoise card stock.
2. Use the Die as a stencil, sponge the open areas using Teal Zeal Ink and a Sponge Dauber.

3. Emboss white card stock using Embossing Folders Tammy Tutterow Designs Horsehair.
4. Trim to size and layer onto pre-cut card base.

5. Cut/emboss Cinch N Go Flowers #1, #2, #3 #4 (#1 being the smallest) using White card stock
6. Create the flowers as shown in Becca Feekens tutorial HERE.
7. Adhere the Tuscany Strip to the lower portion of the embossed card front using liquid glue.
8.Glue the Cinch N Go flower to the centre of the Tuscany Strip
9. Cut/emboss Foliage Dies #6 (#1 being the smallest) using green card stock
10. Use the Die as a stencil, sponge the open areas on the leaves using Bamboo Leaves Ink and a Sponge Dauber.
11. Trim off three leaves and pop them up underneath the flower as soon in the photo above.
12. Glue a button to the centre of the Cinch N Go flower, add a pearl to the centre/
13. Apply liquid glue around the pearl - allow to dry.

Take care friends - thank you for your comments and all of the support you give me - you make blogging such an amazing place to be!! Your encouragement is such a blessing for me - it makes my day! God bless you!
{{{Hugs}}} and happy crafting

Saturday, March 25, 2017

Dear Friend

Hello friends, I have a nostalgic card to share with you today - using one of the Spellbinders Christmas Dies differently - I love to find more than one way to use a Die or any product for that matter,


My card base has been cut using the Spellbinders  A-2 Matting Basics A Card Creator Etched Dies And The Platinum 6 Die Cutting and Embossing Machine - 6" Platform.  The A2 Filigree Delight designed for Spellbinders by Licensed Designer Becca Feeken has been cut/embossed using black card stock and adhered to the card base using liquid glue.


The Reindeer from the Shapeabilities Reindeer And Sleigh Etched Dies has had a little makeover and become a deer - just by removing the antlers - love that!!  It has been adhered to recycled corrugated card (from the outside of a coffee cup) using liquid glue.  This has all been layered onto the card base.


A Kaisercraft pre-cut doily has been trimmed and popped under the corrugated card and a Mulberry Paper Rose added. Finishing with a row of beautiful white roses and a Want2Scrap Swirls Finesse.  The sentiment is from a retired set from Layers of Color.


This card is linked to the following challenges:
4 Crafty Chicks - 3 Punches Or Dies
Simon Says Stamp - More than One Die or Punch
Aud Sentiments Challenge - Any Sentiment Except For Birthday
Craft Rocket Challenges - Make It Feminine
Retarte - Anything Goes
Inky Chicks Flowers - stamped or embellishment
the Crafty Addicts Challenge - Anything Goes - Twist - Add a Sentiment
Come and Get It Anything Goes
The House That Stamps Built - Anything Goes
Dare 2B Artzy Challenges - Lots of Layers
The Corrosive Challenges - Anything Goes
Artistic Inspirations - Always Anything Goes

Take care friends - thank you for your comments and all of the support you give me - you make blogging such an amazing place to be!! Your encouragement is such a blessing for me - it makes my day! God bless you!

{{{Hugs}}} and happy crafting

Thursday, March 23, 2017

The Beach

Hello friends, I hope you are all enjoying the change of season - whatever it may be for you.  In the Southern Hemisphere we are going from summer to Autumn/fall and it is a spectacular time here in Australia,  I thought I would pop in a beach card before it becomes a distant memory!


I have used bits and pieces that have gathered on my desk, from projects I have finished - or started and left them aside for one reason or another.  The stamp set is from JustRite Papercraft  - it is an older set but still a goodie.


I have stamped the sentiment using Imagine Memento Ink in Espresso Truffle and the shells in Dandelion and Espresso Truffle. This has been layered onto a Spellbinders Die using Scrapbook Adhesives by 3L 3D Foam Squares and onto Spellbinders A2 Valiant Honor Card Creator Die also using 3D Foam Squares.  The layers have been adhered to the pre-cut card base using  Scrapbook Adhesives by 3L E-Z Adhesive Runner.  I have finished off by tying raffia around the lower portion of the stamped layer and secured it using a button - I had to add a touch of blue as it was for the beach! Wink:wink!


This card is linked to the following challenges:
Simon Says Stamp - More than One Die or Punch
Mustard Seed Faith Challenges - Use any Shade of Yellow
Retarte - Anything Goes
Tuesday Throwdown -  Add Dimension
the Crafty Addicts Challenge - Anything Goes - Twist - Add a Sentiment
Come and Get It Anything Goes
The House That Stamps Built - Anything Goes
Dare 2B Artzy Challenges - Lots of Layers
Creative Moments Challenge - Anything Goes
Stamping Sensations - Close to Nature
Crafty Creations Challenge - Anything Goes
The Corrosive Challenges - Anything Goes
Artistic Inspirations - Always Anything Goes
The Crazy Challenge - Masculine 

Thank you for your comments and all of the support you give me - you make blogging such an amazing place to be!! Your encouragement is such a blessing for me - it makes my day! God bless you!
{{{hugs}}} and happy crafting

Monday, March 20, 2017

Spellbinders Owl by Stephanie Low Tutorial

Hello friend, I am excited to be sharing a tutorial for Spellbinders today using one of the newly released stamp and die sets by Licensed Designer Stephanie Low.  I love these co-ordinating sets and will be playing with them all - they are not only fabulous but also addictive!!


Spellbinders Products:
Other : Chameleon Pens: White card stock; Kaisercraft patterned paper;   72 Count - White Pearls - Self Adhesive; Scrapbook Adhesives by 3L 3D Foam Squares, Computer generated sentiment; sanding block

1. Stamp the owl and two feathers onto white card stock
2. Cut/emboss using co-ordinating Dies.
3. Colour the images using Chameleon Pens.

4. Cut/emboss white card stock using A2 Matting Basics A, making sure the fold is inside the cutting edge of the Die to form card base.
5. Cut/emboss the patterned paper using a slightly smaller Spellbinders  A-2 Matting Basics A.
6. Lightly sand around the edges with a sanding block.
7. Pop the patterned paper up onto the card base using 3D Foam Squares.
8. Cut one Standard Circles LG Etched Dies using white card stock
9. Adhere the owl to the centre of the circle using 3D Foam Squares.
10. Pop up the feathers randomly either side f the owl, also using 3D Foam Squares.
11. Adhere computer generated sentiment below the owl.
12. Randomly add small silver rhinestones to the patterned paper.

Thank you for your comments and all of the support you give me - you make blogging such an amazing place to be!! Your encouragement is such a blessing for me - it makes my day! God bless you!

{{{hugs}}} and happy crafting

Saturday, March 18, 2017

Flourishes lc Wishing You Eternal Love

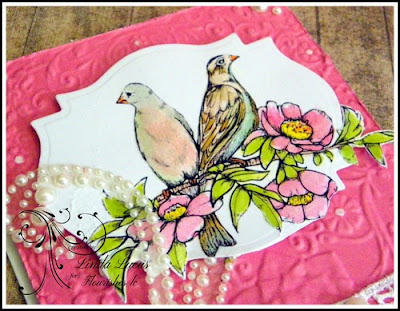
Hello friends, today I have a card to share using the beautiful birds from the Flourishes lc  Endearing Rose stamp set - such a pretty image. 


The birds image has been stamped onto Flourishes Classic White card stock using black ink and coloured using Chameleon Pens.  


It has been  cut/embossed using Spellbinders Labels Eighteen  popped up using Scrapbook Adhesives by 3L  3D Foam Squares, onto an embossed background, this Spellbinders Folder is now retired.

A row of lace has been added, along with a double seam binding bow and Mulberry Paper rose and buds.  The beautiful pearl flourish is from  Want2Scrap (of course!)  The sentiment is from the Flourishes lc Camellia.


This card is linked to the following challenges:
WordArt Wednesdays - Anything Goes 
Alphabet Challenge - A for Anything With Wings
Colour Crazy Challenge - Anything Goes
Crafting-With-Friends Anything Goes
Crafty Catz - Anything Goes with a twist: Touch Of Pink
Fussy and Fancy Springtime
Making Memories Crafting - Add Some Layers
Pattie's Creations - Image has to have anything with wings
Art Impressions Stamp Challenge - Spring-y Cards 
Cardz 4 Galz  - Pretty In Pink 
Craft Rocket Challenges - Make It Feminine 
Crimbo Crackers - Die Cuts 
Hannah & Friends - Spring
Star Stampz Challenge - Add Gems and/or Pearls
Sisterhood of Crafters - Celebrating Women 
Use Your Stuff - Dry Embossing

Take care friends - thank you for your comments and all of the support you give me - you make blogging such an amazing place to be!! Your encouragement is such a blessing for me - it makes my day! God bless you!
{{{Hugs}}} and happy crafting