}

Monday, February 18, 2019

Spellbinders Layered Adventure Awaits Tutorial

Hello friends - welcome and thanks so much for visiting.  Today I am excited to be sharing a card I created using the Spellbinders Amazing Paper Grace® Collection - using the new Shadowbox Dies The possibilities with these dies are endless - I had a little bit of fun creating this card - as you will see as you follow along with the tutorial.


'Shapeabilities Layered Adventure Awaits Children Scene Etched Dies Shadowbox by Becca Feeken is a set of four die that includes three layering pieces for a dimensional adventurous scene and the phrase 'Enjoy the Ride.' Also works with S6-138 Grand Arch 3D Card Etched Dies Set.' - Spellbinders

1. Cut/emboss one each of the Adventure and Scene Dies, using with the outer cutting edge die and white card stock.
2. Cut/Emboss one Enjoy sentiment using white card stock.

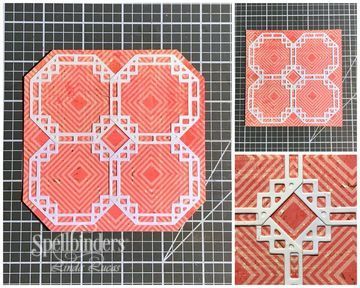
3. Cut/emboss one Callista Rectangle Shadowbox Frame adding the cutting edge Die from the Adventure Awaits Etched Dies to the centre using pink patterned paper - secure using low tack tape.
4. Remove the centre die cut, creating an aperture on the card front.

5. Create a top folding card base using pink and white striped patterned card stock. 
6. Centre the cutting edge Die from the Adventure Awaits Etched Dies to the centre - secure using low tack tape.
7. Lay the card base open and flat, cut/emboss the front only using the Platinum Die Cutting Machine.
8. Remove the centre die cut, creating an aperture on the card front.
9. Pop up the Callista Rectangle Shadowbox Frame onto the card base using 3D Foam Squares. making sure to line up the aperture.

10. Pop up the Scenic layer onto the pink and white striped insert, adhere to the inside of the card base - making sure to line up through the aperture.
11. Next repeat the process using the Adventure Awaits layer.
NOTE:  If the paper is too snug a fit, lightly run your scissors around the inside edges to distress - this will make the opening slightly larger.


12. Glue inserts from the top and bottom of the Callista Rectangle Shadowbox Frame across the top of each corner.
13.Adhere the sentiment above the frame.
14.Attached a narrow row of white lace across the bottom of the Callista Rectangle Shadowbox Frame
15. Glue a double white seam binding bow to the left of the lace - careful to line up so it does not intrude onto the aperture
18. Cut/emboss the smallest two layers from the Cinch and Go IV Etched Dies using white card stock.
19. Sponge the centre of the flowers using pink ink and shape with a Stylus.
20. Layer the flowers and secure using a heart brad, glue onto the knot of the double bow.
21.Finish by adding white pearls to each corner.

Spellbinders Products


Other: Mustard, Green and white card stock;  Scrapbook Adhesives by 3L: E-Z Adhesive Runner, 3D Foam Squares; liquid glue; Imagine Memento Inks in Angel Pink; Anna Griffin Inc. Lovely Layers Collection 5" x 7"; White Seam Binding; White Lace, Want2Scrap: 250 Count White Pearls - Self Adhesive.

Thank you for your comments and all of the support you give me - you make blogging such an amazing place to be!! Your encouragement is such a blessing for me - it makes my day! God bless you!

  {{{hugs}}} and happy crafting
                                                        

Sunday, February 17, 2019

Happy Birthday my Friend

Hello friends, welcome and thanks so much for stopping by.  I am back to share my last card created  using Stickers - there have been eight in total and I can't believe I am saying this - I really enjoyed using them and won't hesitate to use stickers again - depending on what they are of course!!  I have also use pre-cut and recycled Spellbinders Dies from Workshop Kits and pieces of bling that are left sitting on my desk.  I have really enjoyed the challenge of using them to create pretty and quick cards - I hope they have inspired you to look at your stash and see what you can create with....


The patterned paper is from my stash, a strip of pink spotted patterned paper had been adhered across the centre of the card front, along with an orange spotted border across the centre of the card front.   Next it has been cut/embossed using the Spellbinders Nestabilities Scored and Pierced Rectangles Etched Dies and the Platinum Die Cutting Machine and popped up onto a slightly larger pre-cut white card base using Scrapbook Adhesives BY 3L E-Z Adhesive Runner Ultra. 


The sticker is also from my stash and has been adhered to a small die-cut oval, it has been popped up using Scrapbook Adhesives BY 3L 3D Foam Squares, onto the smallest frame from the Spellbinders Nestabilities Romantic Rose Etched Dies using pink card stock and the Platinum Die Cutting Machine Want2Scrap Nestabling has been trimmed and adhered at the top of the die cut. oval.   A double pink bow has been glued to the base of the floral sticker. 


This card is linked to the following challenges:
Craft-Dee BowZ - Anything Goes with a Handmade Bow
Creative Fingers - Anything Goes
Crafty Hazelnut's Patterned Paper Anything Goes with Patterned Paper
Creations in Pink - Anything Goes in Mainly Pink
Sweet Stampers - Stitched (Real or Faux)
World Wide Open Design Team Challenge - Always Anything Goes
Cut it Up - INSPIRED BY A LOVE SONG (You Don't Bring Me Flowers Anymore)
Jo's Scrap Shack - ALWAYS ANYTHING GOES
QKR Stampede ALWAYS ANYTHING GOES
CCEE Stampers - Birthday Card
Crafting With An Attitude - Always Anything Goes
Word Art Wednesdays Anything Goes 
Lemon Shortbread - Always Anything Goes

Thank you for your comments and all of the support you give me - you make blogging such an amazing place to be!! Your encouragement is such a blessing for me - it makes my day! God bless you!

                                                          {{{hugs}}} and happy crafting

Friday, February 15, 2019

Emerson - Seen It All

Hello friends, welcome and thanks so much for stopping by!  Friday is always a good day for a little humour - as I have mentioned before, I love these Emerson Quillin ladies - and have brought them out to see the light of day!  This sentiment just makes me laugh - not even going to go there!!  Wink:wink. 


The image has been stamped onto white card stock using Imagine Memento ink in Tuxedo Black and coloured using Chameleon Pens.  It has then been fussy cut/hand cut using scissors and popped up onto a chipboard frame from my stash.


Next the layers have been popped up on a card front that has been created using two different Kaisercraft patterned papers that have been cut/embossed using the largest die from the Spellbinders A2 Curved Matting Basics A Card Creator Etched Dies and the Platinum Die Cutting Machine. and adhered to a slightly larger pre-cut white card base.  A strip of Want2Scrap Glitter Washi Tape has been adhered across the centre of the card front.


Next the layered image has been popped up into the centre of the card front using  Scrapbook Adhesives By 3L 3D Foam Squares.  Little Birdie Crafts Beaded Blooms have been added below the image and a row of Want2Scrap Beautiful Bling Border added along the lower edge of the card front with Baby Bling Rhinestones added to the swirls.


This card is linked to the following challenges:
DL ART Thankful Thursday - Pink and/or Red
Lemon Shortbread Challenge - Anything Goes
Crafty Creations - Always Anything Goes 
Ellibelle's Crafty Wednesday - Dies/Punches or Hearts
Through The Craft Room Door - Anything Goes
A Place To Start - Use an inspirational die or stamp
Scrapy Land Challenges  - Always Anything Goes with Die Brand SL sells
Artistic Inspirations Challenge - Anything Goes, Opt, Love it Up
The Crafty Addicts - Anything Goes
Word Art Wednesdays  Anything Goes
Get Creative Challenge - Anything Goes, twist, Use Lots of Red
Not Just Cards - Anything Goes
The Paper Nest Dolls Challenge - ALWAYS ANYTHING GOES 
Digi Choosday Challenge - Anything Goes
613 Avenue Create Anything Goes w/Optional Twist: Critter
Angie's Digital Stamps - Anything Goes w/Optional Twist: Love
Stamping Sensations - All Things Bright and BEAUTiful
Crafty Hazelnut's Patterned Paper Anything Goes with Patterned Paper

Thank you for your comments and all of the support you give me - you make blogging such an amazing place to be!! Your encouragement is such a blessing for me - it makes my day! God bless you!

                                                          {{{hugs}}} and happy crafting

Wednesday, February 13, 2019

Elegantly Yours

Hello friends, welcome and thanks so much for stopping by.  Today I have an elegant card to share with you created using the gorgeous Spellbinders Flourish Stitch Em-bossing Fold'ers Quilt It by Lene Lok - I do love the way am Embossing Folder adds not only amazing texture but also instant elegance.


The embossed layer has been cut/embossed using the Spellbinders A2 Curved Matting Basics A Card Creator Etched Dies and adhered to a slightly larger pre-cut white card base.


The silhouette image from my stash bas been adhered to a Kaisercraft Collectibles Frame and popped up onto the top section of the layered card base.  Liquid Glitter drops have been added around the frame.  Adhere 3 co-ordinating flowers to the top of the frame, adding Want2Scrap 250 Count Le Creme Pearls onto the centre of the flowers and to each side.

The sentiment from the 100% Sweet Sentiments clear stamp set onto white card stock using black ink.  Cut/emboss using the smallest die from the A-2 Matting Basics B Card Creator Etched Dies, use the Die as a stencil, sponging inside the cutting edges using Imagine Memento Ink in Rich Cocoa.  Remove from the die and pop up across the lower portion of the card front using  Scrapbook Adhesives BY 3L 3D Foam Squares.


This card is linked to the following challenges:
Always Fun Challenges - LOVE-VALENTINES
Crafting from the Heart - ANYTHING GOES
The Corrosive Challenge - Anything Goes
CuteNCrafty Challenge Blog - VALENTINE;S DAY/LOVE 
Scrapbook Stamp Society Challenge Blog ANYTHING GOES  OPTION BIRTHDAY
Crafts Galore Encore Challenge - Anything Goes 
Digi Choosday Challenge - Anything Goes
A Perfect Time To Craft - Always Anything Goes
Crafty Hazelnut's Patterned Paper Anything Goes with Patterned Paper
LeAnn’s World 101 - Anything Goes

Thank you for your comments and all of the support you give me - you make blogging such an amazing place to be!! Your encouragement is such a blessing for me - it makes my day! God bless you!

                                                          {{{hugs}}} and happy crafting
                              

Monday, February 11, 2019

Spellbinders Chinese Knot Frame Tutorial

Hello friends - welcome and thank you for stopping by! I am delighted to be sharing a tutorial for Spellbinders using another Die from the Spellbinders Destination China Collection by Lene Lok.  I am mixing it up a little with both the Dies and the colours and am very happy with the outcome.  


'From detailed frames to intricate accents to beautiful lanterns, Destination China Collection by Lene Lok is a wonderful grouping of Asian inspired elements to bring an exotic flair to your projects.' -Spellbinders

1.Cut/emboss four Chinese Knot Frame Etched Dies using the both the second largest die, along with the insert and white card 
2.Adhere two dies together using by overlapping the inlaid rectangles on one side.  Repeat this with the remaining two dies.
3.Glue the two sets of die cuts together in the same way as above.

4. Adhere to patterned paper, trim abut the edges leaving approx 1/4cm around each edge.
5. Trim each corner diagonally leaving 1/4cm border of patterned paper.
6. Pop up onto a slightly larger white pre-cut card base using 3D Foam Squares.


7. Hand cut four (4) lanterns from the patterned paper, going around the edges using the Wink of Stella in Gold.
8. Adhere the larger lantern onto the centre of the left side of the card using double sided tape, followed by the smaller lantern using 3D Foam Squares - as shown in the photos above. 
9. Repeat on the right side, next sure a gold gel pen to draw string from each lantern to the  inside of the white patterned frame - as shown in the photos above.
10. Stamp the sentiment from the 100% Sweet Sentiments Clear Stamps onto white card stock using black ink.
11. Cut/emboss using the smallest die from the A-2 Matting Basics B Card Creator Etched Dies.
12. Use the Die as a stencil, sponging inside the cutting edges using Sea Breeze Ink.
13. Remove from the die and pop up across the lower portion of the Chinese Knot Frame using 3D Foam Squares.
14. Randomly add faux enamel dots using the Pico Embellisher in Shimmer.

Spellbinders Products:
Other:  White, Black and Gold card stock; Kaisercraft  Konechewha patterned paper;Scrapbook Adhesives by 3L: E-Z Adhesive Runner, 3D Foam Squares; liquid glue; Imagine: VersaMagic ink in Sea Breeze, irRESISTibles Pico Emebllisher in Shimmer; Gold Gel Pen; Wink of Stella - Gold; 

Thank you for your comments and all of the support you give me - you make blogging such an amazing place to be!! Your encouragement is such a blessing for me - it makes my day! God bless you!

                                                          {{{hugs}}} and happy crafting

Saturday, February 9, 2019

Flutter Wing Shadowbox Butterfly

Hello friends - welcome and thanks so much for stopping by.  Happy Saturday to you. I have been having a lot of fun working on tutorials and articles for publication, but every now and then I just head to The Studio to create for creating sake - I am sure you know what I mean - for the sheer enjoyment of it- I also try and use of some of the things gathering between projects....and I may have been slightly distracted by the gorgeous new Chickens we got yesterday - they are the sweetest things and so happy for us o pet them - we love that!


I started by using patterned paper and the negative Die from the Spellbinders Die D-Lites Amused 1 Etched Dies.  This has been backed using Teal card stock and layered onto a card front created using two different Kaisercraft patterned papers that have been glued to card stock and cut/embossed using the  Spellbinders A2 Curved Matting Basics A Card Creator Etched Dies and adhered to a slightly larger pre-cut white card base.  

The Banner layer has been popped up onto the centre of the card front using Scrapbook Adhesives by 3L 3D Foam Squares. The Small Wing Butterfly from from the Shapeabilities Flutter Wing Shadowbox Butterflies Etched Dies Shadowbox by Becca Feeken has been cut/embossed using the Platinum Die Cutting Machine and adhered under the Banner, using liquid glue on the body only.

A die-cut tag has been adhered below the butterfly and a threaded button glued to the centre. Scalloped white lace had been adhered along the lower edge of the card front and Want2Scrap large LeCreme pearls adhered to the lace and small LeCreme pearls between each pennant.

This card is linked to the following challenges:
Alphabet Challenge - W IS FOR WINGS
Cut it Up - INSPIRED BY A LOVE SONG (The Wind Beneath my Wings)
QKR Stampede - ALWAYS ANYTHING GOES
Krafty Chicks - Lots of Layers 
Ellibelle's Crafty Wednesday - Dies/Punches or Hearts
Scrapy Land Challenges  - Always Anything Goes with Die Brand SL sells
Word Art Wednesdays  - Anything Goes
Lemon Shortbread - Always Anything Goes
Crafting from the Heart - ANYTHING GOES
613 Avenue Create - Anything Goes w/Optional Twist: Critter

Thank you for your comments and all of the support you give me - you make blogging such an amazing place to be!! Your encouragement is such a blessing for me - it makes my day! God bless you!

                                                          {{{hugs}}} and happy crafting