}

Tuesday, February 20, 2018

Want2Scrap The Shortest Distance - Art Journal

Hello friends, thanks so much for stopping by!! I have a new Art Journal Page on the Want2Scrap Blog - I just love this photo - recycled from a card - it makes me smile every time I see it!  Lots of gorgeous bling, chipboard, charms and lace!


  You can see the details in full HERE.

Thank you for your comments and all of the support you give me - you make blogging such an amazing place to be!! Your encouragement is such a blessing for me - it makes my day! God bless you!

{{{hugs}}} and happy crafting


Monday, February 19, 2018

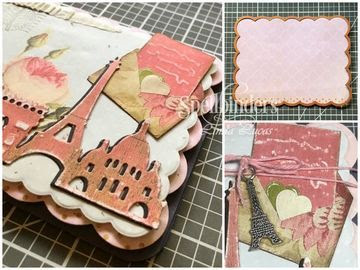
Spellbinders To Paris with Love Tutorial

Hello friends - thank you for visiting!  Today I am sharing a tutorial for Spellbinders using a beautiful die by Licensed Designer Stacey Caron, What is not to love about this fabulous skyline with famous icons of Paris.  It worked perfectly with one of the new Die D-Lites as you can see as you follow along with this tutorial.


The Ooh La La Collection by Stacey Caron has many elements that would be found if you were walking the streets of Paris - fleur de lis, scroll designs, flourish motifs and even the Eiffel Tower! Add them in your project for that French touch - Spellbinders 

1. Cut/emboss one  Paris Skyline using black card stock and one using patterned paper.
2. Lightly sand the patterned Die Cut using a Sanding Block.
3. Adhere the patterned Die cut to the black, slightly offsetting to form a shadow.
4. Cut/emboss patterned paper using Floral Panel outer frame edge.
5. Adhere the layered Paris Skyline to the card front using liquid glue.

6. Cut/emboss Love Letters envelope and latter using double sided paper.
7. Lightly sand the letter and insert into the envelope - add a drop of glue inside the envelope to sop the letter moving.
8. Cut/emboss the medium heart once using green card stock and once using cream.
9. Lightly sand the hearts and tuck them into the envelope - securing with a drop of glue.

10. Adhere to the top right corner of the card front at a slight angle.
11. Cut/emboss one Emmeline Treillage using patterned paper.
12. Pop up the card front onto the Emmeline Treillage using 3D Foam Squares.
13. Pop up the layered card front onto the pre-cut card base, using 3D Foam Squares.

14.Randomly stamp some postmarks using Espresso Truffle ink.
15. Adhere a small piece of torn white corrugated card to the top left corner, lightly sponge using brown ink,
16.Glue the wooden embellishment to the card front - near the top.
17. Wind Twine around the card front twice.
18.Secure to the right of the Eiffel Tower with a bow and attach an embellishment.
19. Attach the sentiment sticker.

Spellbinders Products:
Other Supplies: White, black and pink card stock; Scrapbook Adhesives by 3L: Extreme Double Sided Tape, 3D Foam Squares; Liquid Glue; Sanding block, patterned paper; Kaisercraft Wooden Embellishment, twine, stamps; small strip of corrugated card

Thank you for your comments and all of the support you give me - you make blogging such an amazing place to be!! Your encouragement is such a blessing for me - it makes my day! God bless you!

{{{hugs}}} and happy crafting

Sunday, February 18, 2018

Scrapbook Adhesives BY 3L - Your Own Kind of Beautiful

Hello friends, I am honoured to be sharing a card on the Scrapbook Adhesives by 3L Blog - if you know me, you would know how much I LOVE their products - they are part of my staple creative die and have been for years - they have the HUGE responsibility of 'holding everything together' and more!!


You can find the full tutorial HERE!

Thank you for your comments and all of the support you give me - you make blogging such an amazing place to be!! Your encouragement is such a blessing for me - it makes my day! God bless you!

{{{hugs}}} and happy crafting

SB Purrr-fect Birthday

Hello friends - thanks so much for dropping in!  and created a card using the adorable Spellbinders Christmas Kitten Holiday 3D Shading Stamp.  Don't let the name limit you - this gorgeous kitten could be used for many occasions.


The image has been stamped using Imagine Versafine Ink in Vintage Sepia and lightly coloured the ribbon and decorations using Chameleon Pens.


The card front has been cut/embossed using the black card stock and the Spellbinders Amazing Paper Grace A2 Filigree Delight Card Creator Etched Dies and the Platinum Die Cutting Machine. This has been glued to a slightly larger white card base. The Christmas Kitten has been cut/embossed using the Oval Die from the  A2 Filigree Delight and adhered to the centre of the Filigree die. A thin strip of pleated patterned paper has been adhered below the kitten and the sentiment adhered onto it using strong tape.

A double white Seam Binding Bow has been adhered below the image and a Mulberry Paper flower glued to the knot and Want2Scrap Swirls Finesse - LeCreme has been trimmed and added to each side of the bow. A small pink paper flower has been glued to the knot of the bow.


This card is linked to the following challenges:
Crafty Catz - Anything Goes option/Use Some Pretty Ribbon
Creative Fingers - Anything Goes
Cardz 4 Galz - Stamping (No Digis)
Star Stampz Challenge - Make It GIRLY
2 Crafty Critter Crazies - Anything Goes with a Critter
Craft-Dee BowZ - Anything Goes with a Handmade Bow.
Crafty Animals Always Anything Goes
Hannah & Friends Favourite Stamp
Papercraft Business Challenge - Anything Goes + option of Love / Valentine's Day
The Creative Crafters Anything Goes 
World Wide Open Design Team Challenge - Always Anything Goes
 Lemon Shortbread - Always Anything Goes

Take care friends - thank you for your comments and all of the support you give me - you make blogging such an amazing place to be!! Your encouragement is such a blessing for me - it makes my day! God bless you!
{{{Hugs}}} and happy crafting

Saturday, February 17, 2018

Want2Scrap Sneak Peek - Family are Forever Layout

I am sharing a little sneak peek of a layout I will be sharing on the Want2Scrap© Blog - using one of the fabulous Overlays that  Want2Scrap© have available. 


Thank you for your comments and all of the support you give me - you make blogging such an amazing place to be!! Your encouragement is such a blessing for me - it makes my day! God bless you!

{{{Hugs}}}
Follow on Bloglovin

Spellbinders Inspirational Bookmark

Hello friends, I am so glad you have dropped in. Happy Saturday to those in the Southern Hemisphere - and to everyone else - hang on - the weekend is nearly here!   Today I am sharing a quick and easy book mark with you - it is always lovely to add something extra in a card and this bookmark is definitely in that category and very easy to mass produce but still have each one unique!


I am using the Spellbinders Sing unto God Stamps Bible Journaling by Joanne Fink. I sponged the bookmark towards the centre using Imagine Memento Ink in Summer Sky and a sponge dauber.  This has been lightly spritzed with water and allowed to dry.  


The sentiment has been stamped using Imagine Memento Ink in Tuxedo Black.  The little bird has been stamped to the right of the sentiment and the main image below it.  The adorable birds have been coloured using Chameleon Pens and a White Gen Pen used for details.

The bookmark is trimmed to approx 14cm x 5cm.  I have hand drawn around the edge using a Chameleon Pen, then randomly and lightly, spritzed with light blue and white paint,  The Bookmark has been layered onto slightly larger light blue card stock - it is as easy as that!


This is linked to the following challenges:
Aud Sentiments Challenge - For A Friend 
Crafts Galore Encore - Always Anything Goes
Crafty Awesomeness - Anything Goes?
Eclectic Ellapu Anything Goes
Love to Craft - Anything Goes
One Crazy Stamper Anything Goes
Paper Creator's Crafts - Anything Goes
Sweet Stampers - Things with Wings
WordArt Wednesdays - Anything Goes
Simply Papercraft - Anything Goes

Thank you for your comments and all of the support you give me - you make blogging such an amazing place to be!! Your encouragement is such a blessing for me - it makes my day! God bless you!

{{{hugs}}} and happy crafting

Thursday, February 15, 2018

Spellbinders From Me to You

Hello friends, thanks so much for dropping by. It is a beautiful day here in the Nations Capital - I am grateful for the weather being slightly cooler - only 32 Celsius today - I am happy to be able to have the time in The Studio and creating.  Today I have upcycled a card I made some time ago (you can find it HERE) - but I have decided that it is definitely a case of 'More is More!' Wink:Wink.


I have basically deconstructed the card and added back some elements and changed others.  I have kept the base (created using theRomantic Rectangles Nestabilities) and original card front, but added some sponging around the negative Die (from the Asters and Poppies Spellbinders® Shapeabilities® Die D-Lites™) using Imagine Radiant Neon Ink in Electric Neon.  I have also added a Postmark using Imagine Ink in Rhubarb Stalk - this stamp is a permanent feature on my desk - it comes in very handy!

I have added a pre-cut sentiment from the Kaisercraft Mint Wishes Collection and popped it up onto the smallest Die from the Nestabilities Royal Circle Etched Dies - cut/embossed using white card stock and the  Platinum 6 Die Cutting and Embossing Machine – 6″ Platform, using  Scrapbook Adhesives by 3L 3D Foam Squares.

Finishing off by adding some Want2Scrap bling to the card - the Beautiful Bling Borders - Fancy That! have been trimmed and added to the top and bottom of the Die-Cut layer to form a frame - Baby Bling - Turqouise Rhinestones have been added along the Beautiful Bling Borders. With this sentiment - it is perfect for any occasion - including Valentines - although it has now passed in Australia! Ooops! Wink:Wink!

This card has been added to the following challenges:
Craftaholics R Us - Use Red on Your Card
Digi Chooseday Week - Anything Goes
Crafting By Designs - Valentine
Lemon Shortbread Challenge - Anything Goes
Moo-Mania & More - Love/Valentines 
Pause Dream Enjoy - Anything Goes
Deep Ocean Challenge - Love Is All Around 
UnstampaBelle's Challenge - Anything Goes - twist - using something new (the Kaisercraft Collection)
Die Cuttin' Divas - Valentine's Day*
Retarte - Anything Goes 
Unicorn Challenge - Love/Valentines
CropStop Challenge - Anything Goes using products that CropStop carries (Spellbinders Dies)

Thank you for your comments and all of the support you give me - you make blogging such an amazing place to be!! Your encouragement is such a blessing for me - it makes my day! God bless you!

{{{hugs}}} and happy crafting

Wednesday, February 14, 2018

Penny Black - As Sweet as Honey

Hello friends, thanks so much for visiting.  I am stopping in quickly to share a card created using this adorable Penny Black Inc image - I usually stamp off a few when I am working on something and as much as I tried I could not resist any longer- but who can blame me!  My original card can be found HERE.


 Now for a little change of pace - and this adorable bee from Penny Black Inc. -  cute as a bug! clear stamp set.  I have stamped the image onto white card stock using Imagine Memento Ink in Tuxedo Black and coloured it using Chameleon Art Products/Pens - so quick and easy!


The image has been cut/embossed using A2 Curved Matting Basics B Card Creator Etched Dies and the  Platinum 6 Die Cutting and Embossing Machine – 6″ Platform. The card front has been popped up onto the cut/embossed insert only from the Card Creator Emmeline Treillage Etched Dies Venise Lace by Becca Feeken, using Crafty Foam Tape, after the edges have been trimmed.  The layered card front has been popped up onto the pre-cut card base using Scrapbook Adhesives by 3L E-Z Adhesive Runner Ultra

 I have randomly used the honeycomb stencil to create a background for this adorable little bee.   The sentiment from the happy snippets transparent stamp set has been stamped using Imagine Memento Inks in Tuxedo Black directly onto the card front.  Add a cream Seam Binding double bow to the lower left hand corner of the card and lace flower and a pink button to thecentre of the .bow.


This card is linked to the following challenges:
Always Fun Challenges - ANYTHING GOES
Artistic Inspirations - ANYTHING GOES W/OPTIONAL BE MY VALENTINE THEME
Color Inspiration Monday - ALWAYS ANYTHING GOES WITH HAND-COLORED IMAGE
CropStop Challenge - Anything Goes using products that CropStop carries
Get Creative Challenges USE RIBBON OR WASHI TAPE
Pammie's Inky Pinkies Challenges - ALWAYS ANYTHING GOES
The Crazy Challenge - GIRL POWER 
The Paper Nest Dolls Challenge ALWAYS ANYTHING GOES 
Craft-Dee BowZ Anything Goes with a Handmade Bow
One Crazy Stamper Anything Goes
Paper Creator's Crafts - Anything Goes
The Flower Challenge - must use flower 
Fashionable Stamping - One for the Girls
Stamping Sensations - Flowers
The Corrosive Challenges Always Anything Goes

Thank you for your comments and all of the support you give me - you make blogging such an amazing place to be!! Your encouragement is such a blessing for me - it makes my day! God bless you!

{{{hugs}}} and happy crafting

Tuesday, February 13, 2018

Spellbinders Your Time to Shine

Hello friends, I have a whimsical card to share with you today using the Spellbinders Wink Wink Love Set Match by Debi Adams Stamp and Die Set. Such a cute set and I am looking forward to using it more. 

'Quirky fun phrases and shapes are all captured into the Love Set Match Collection by Debi Adams' - Spellbinders


I have cut/embossed the Nestabilities Celebrations Pierced Rectangles Etched Dies #5 #6 (#1 being the smallest) using white card stock and the Platinum 6 Die Cutting and Embossing Machine – 6″ Platform. The Die has been used as a stencil, sponging inside the cutting edges using Imagine Radiant Neon's using Electric Yellow and a sponge dauber.


I have stamped three light bulbs using Imagine Tuxedo Black ink and have been coloured using Chameleon Pens. These have been cut/embossed using the co-ordinating die.

The sentiment has been stamped onto the die cut card front using Tuxedo Black and lightly sponged using Radiant Neon Electric Yellow.  The computer generated sentiment has been adhered above the stamped sentiment. The light bulbs have been popped up onto the card front using Scrapbook Adhesives BY 3L 3D Foam Squares.


                   Imagine irRESISTibles Pico Embellisher in Black has been randomly added.


This link is for the following challenges:
WordArt Wednesdays - Anything Goes
Crafts Galore Encore Always Anything Goes
Crafty Awesomeness - Anything Goes?
Create and Inspire - Anything Goes
Eclectic Ellapu Anything Goes
Mix It Up Challenge - Anything Goes + option: CAS
One Crazy Stamper Anything Goes
heARTful Stamping Challenge - Anything Goes + a Stamp
Lil Patch of Crafty Friends - Always Anything Goes
Creative Fingers - Anything Goes
Simply Papercraft - Anything Goes
Crimbo Crackers - Anything Goes 

Thank you for your comments and all of the support you give me - you make blogging such an amazing place to be!! Your encouragement is such a blessing for me - it makes my day! God bless you!

{{{hugs}}} and happy crafting