}
Showing posts with label Sharyn Sowell Johnson. Show all posts

Monday, April 1, 2019

Spellbinders Lets All Party Tutorial

Hello friends, welcome and thank you for stopping by.  I am sharing a tutorial for Spellbinders using one of the gorgeous Silhouette Dies by Licensed Designer Sharyn Sowell.  It has to be asked  - 
What makes you happy? Everyday moments and special occasion are brought together through this Happy Collection by Sharyn Sowell in her beautiful signature silhouette designs.


'Shapeabilities Let's All Party! Etched Dies Happy by Sharyn Sowell is a set of seven dies includes five woodland animals with party hats, a cake with candles and a tree with a bird perched on it. This set creates a unique party guests to celebrate with! Spellbinders Shapeabilities cut, deboss, emboss and stencil with a single etched die template.' - Spellbinders


1. Cut and emboss the tree using white card.
2. Colour the tree using chameleon pens.


3.Adhere A 6 x 4” sheet of craft foam two white card,
4. Cut the bear, the deer, dog, rabbit, bird and the cake from the white card stock with the foam backing.
5. Remove the die cut figures from the foam backed sheet using The Tool N One where needed.
6. Colour die cuts using chameleon pens and added shading as desired.


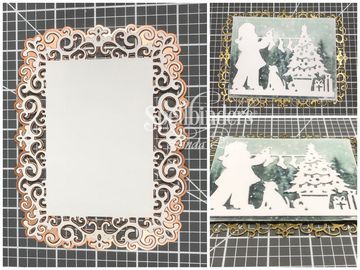
7. Cut and emboss the pattern paper using the cutting edge only from the Emmeline Treillage etched Dies.
8. Add more depth to the colour using Radiant Neon inks and a sponge dauber.
9. Add white paint splatter onto the sky portion of the card front - and allow to dry.
10.Pop up onto a white card base the same size as the card front, with rounded corners; using 3D Foam Squares.
11. Glue the coloured tree onto the right side of the card front.
12.Arrange the animals to create a scene. Peel off the backing paper and secure onto the card front.


Spellbinders Products:


Other: White card stockScrapbook Adhesives by 3L: E-Z Adhesive Runner, 6x4 Foam Sheets, ;Liquid Glue;  Imagine: Radiant Neon Ink in Electric Coral and Electric Purple; Chameleon Art Pens; White Paint

Thank you for your comments and all of the support you give me - you make blogging such an amazing place to be!! Your encouragement is such a blessing for me - it makes my day! God bless you!

                                                          {{{hugs}}} and happy crafting
                                

Monday, October 22, 2018

Spellbinders Love and Cookies Tutorial

Hello friends, thanks so much for stopping by.  I am sharing a tutorial for Spellbinders using the Shapeabilities Love and Cookies Etched Dies A Sweet Christmas by Sharyn Sowell.  This die depicts not only baking for Christmas but any time a family gather in the kitchen to bake something - and definitely makes a 'easy to create' card - as you will see when you follow along with the tutorial below.


'Shapeabilities Love and Cookies Etched Dies A Sweet Christmas by Sharyn Sowell is a set of four etched dies that depicts a sweet moment of baking either for the holidays or just every day'- Spellbinders

1. Adhere an Adhesive Foam Sheet 6x4" to Black card stock.
2. Cut/emboss the Making Cookies Die from the Love and Cookies Etched Dies using black card stock and the  Platinum Die Cutting Machine.
3. Cut/emboss patterned paper using the Scored and Pierced Rectangles Etched Dies to create the card front.

4. Adhere a row of Seam Binding across the centre of the card front using double sided tape.
5. Peel the backing off the Making Cookies Die and adhere to the card front, slightly to the right.
6. Cut/emboss the sentiment using red card stock and glue to the top of the card front.
7. Glue a double seam binding bow to the left of the card front, into the seam binding ribbon.
8/ Glue a Mulberry Paper Rose to the knot of the bow.

Spellbinders Products:
Other:  Cream, gold and green card stock; Scrapbook Adhesives by 3L: E-Z Adhesive Runner, 3D Foam Squares; ; liquid glue; Imagine: irRESTIBLES Pico Embellsher in Shimmer; Authentique Paper: Patterned Paper; Seam Binding; Mulberry Paper Rose; liquid glue.

    Thank you for your comments and all of the support you give me - you make blogging such an amazing place to be!! Your encouragement is such a blessing for me - it makes my day! God bless you!

    {{{hugs}}} and happy crafting

Monday, October 1, 2018

Spellbinders Be Merry Tutorial

Hello friends, thanks so much for stopping by.  I am sharing a tutorial for Spellbinders using the Mistletoe Gatefold Etched Dies A Sweet Christmas by Sharyn Sowell, along with a sentiment from one of the other sets in this Collection.  The Mistletoe Gatefold Etched Die is a feature even when not used in the traditional form - and definitely makes a 'easy to create' Christmas Card - as you will see when you follow along with the tutorial below.


'A Sweet Christmas Collection by Sharyn Sowell reflects her amazing cut paper technique through etched dies and stamps. Sharyn Sowell fans can recreate them in their projects be it holiday or every day.' - Spellbinders

1. Cut/emboss one Mistletoe Gatefold Etched Dies using green card stock and the Platinum Die Cutting Machine.
2. Sponge the berries using red ink and the leaves using green ink to add some extra details.

3. Cut/emboss one 5 x 7 Matting Basics A Card Creator using the second largest die and cream card stock to form the card front.
4. Glue the Mistletoe Gatefold Etched Die lengthwise onto the card front.
5. Use White Paint pen to add details to the Cherries - allow to dry.
6. Add Pico Embellisher in Shimmer to each berry and allow to dry.
7. Cut/emboss the sentiment from the From Our Home to Yours Etched Dies and adhere above the Mistletoe Gatefold Etched Die.
8. Pop up the card front onto a slightly larger pre-cut card base using 3D Foam Squares.


Spellbinders Products:
Other:  Cream, gold and green card stock; Scrapbook Adhesives by 3L: E-Z Adhesive Runner, 3D Foam Squares; ; liquid glue; Imagine: Memento Inks in Rhubarb Stalk and Bamboo Leaves;  irRESTIBLES Pico Embellsher in Shimmer; White paint pen.

    Thank you for your comments and all of the support you give me - you make blogging such an amazing place to be!! Your encouragement is such a blessing for me - it makes my day! God bless you!

    {{{hugs}}} and happy crafting

Friday, September 28, 2018

From Our House to Yours

Hello friends, thanks for dropping in and the comments you leave  I always love to know you have visited.  It is Friday here and a lovely 23 degrees Celsius - once I have finished in The Studio I am hoping to get some time in the garden - I am also puppy sitting my DD1s new puppy - so that will be interesting - she has so much energy!


In the meantime I have a Christmas Card to share with you - using one of the Spellbinders A Sweet Christmas Collection by Licensed Designer Sharyn SowellHow adorable are these silhouette images - so easy to use and so many options.  I have used the Shapeabilities From Our Home to Yours Etched Dies A Sweet Christmas by Sharyn Sowell.  It has been cut/embossed using white card stock and the Platinum Die Cutting Machine,


To colour the image I have used an ombre effect using Imagine Memento Ink in Rhubarb Stalk - my all time favourite red link.  I have started at Santa's feet with a fully loaded Sponge Dauber and worked my way to the top with the ink lightening on the way up.  Like I said - so easy and so effective!!  The image has been popped up onto a Die cut Banner using Scrapbook Adhesives BY 3L.


The layered image has been popped up onto patterned paper that has had a strip of gold spotted paper adhered across the centre and then been die cut using Spellbinders  Nestabilities Scored and Pierced Rectangles Etched Dies and the Platinum Die Cutting Machine, then popped up onto a pre-cut slightly larger white card base using Scrapbook Adhesives By 3L 3D Foam Squares. 

Next a sentiment sticker has been layered onto a larger circle using liquid glue and adhered to the image layer.  Scrapbook Adhesives By 3L Small 3D Foam Squares in white have been added underneath the part of the sentiment that is overlapping onto the card front and a coat of Imagine irRESISTibles Pico Embellisher in Shimmer has been added and allowed to dry completely.


The date has been stamped using a BoBunny stamp set and Imagine Memento Ink in Rhubarb Stalk and cut out using a small circle punch.  These have been popped up onto the lower right corner of the white Banner using 3D Foam Squares and a coat of Imagine irRESISTibles Pico Embellisher in Shimmer has been added and allowed to dry completely. Alpha stickers have been used to finish the date.  Lastly I have added Gold Photo Corners from Scrapbook Adhesives By 3L.


This card is linked to the following challenges:
Aud Sentiments Challenge Use A 2 Word Sentiment 
Crimbo Crackers  Anything Goes 
Christmas at Sweet Stampin' - Anything Goes Christmas
Crafting By Designs - Christmas
House That Stamps Built - Anything Goes
Simon Says Wednesday - Anything Goes
WordArt Wednesdays Anything Goes
Creative Moments - Always Anything Goes
Crafty Hazelnut's Patterned Paper Anything Goes with Patterned Paper
Create and Inspire - Anything Goes + option of inspired by a song (Santa Claus is Coming to Town)
Lil Patch of Crafty Friends -  Always Anything Goes
The Corrosive Challenges Always Anything Goes

Thank you for your comments and all of the support you give me - you make blogging such an amazing place to be!! Your encouragement is such a blessing for me - it makes my day! God bless you!

{{{hugs}}} and happy creating

Monday, July 9, 2018

Spellbinders Hanging Stockings Tutorial

Hello friends - thanks so much for stopping by!! Today I am sharing a tutorial for Spellbinders using one of the dies from the A Sweet Christmas Collection by Sharyn Johnson Sowell to create a nostalgic Christmas Card.  Lots of layering to create this card front - I love the !  You can see how easily it is created by following along with the tutorial.


Shapeabilities Hanging Stockings Etched Dies A Sweet Christmas by Sharyn Sowell is a sweet silhouette of Santa hanging stockings on the fireplace with a happy furry companion to help! Spellbinders Shapeabilities cut, deboss, emboss and stencil with a single etched die template. - Spellbinders

1. Cut/emboss the patterned paper using the second largest Fancy Edged Rectangles Etched Dies.
2. Lightly sand/distress around the edges using a Sanding Block.

3. Adhere a sheet of white card stock to Adhesive Sheet 6x4; cut/emboss one Hanging Stockings Etched Die .
4. Adhere an Adhesive Sheet 6"x4" to white Craft Foam; cut/emboss using Hanging Stockings Etched die.
5. Peel the backing off the back of the white card stock and adhere to the front of the die cut craft foam.
6. Peel the backing off the back of the White Craft Foam and adhere to the front of the die cut patterned paper.

7. Cut/emboss one 8. Cut/emboss one Swirl Happy Birthday Frame Etched Dies using gold card stock.s using gold card stock.
8. Pop up the layered card front onto the gold Swirl Happy Birthday Frame Etched Die using 3D Foam Squares.


9. Cut/emboss one Hemstitch Rectangles Etched Dies using the largest two dies and patterned paper.  NOTE: Secure using Masking tape to avoid the Dies moving.
10. Cut/emboss one Coralene's Chemise Layering Frame Large Etched Dies using white card stock.  Adhere to a slightly larger pre-cut mauve card base.
11. Adhere the Hemstitch Rectangles Etched Dies to the layered card base using 3D Foam Tape.
12. Pop up the layered Hanging Stocking image to the layered card base, also using 3D Foam Squares,

13. Cut/emboss one second smallest Open Scallop Edge Circles using white card stock. 
14. Adhere the sentiment from Misty Wishes using double sided tape. 
15. Pop up the sentiment onto the top right corner of the image layer using 3D Foam Squares on the right side of the sentiment to keep it level.
16. Glue a double Seam Binding Bow to the left side of the card and a gold Poinsettia onto the knot of the bow.

Spellbinders Products:
Other:  Purple, gold and white card stock; Scrapbook Adhesives by 3L: E-Z Adhesive Runner, 3D Foam Squares; Adhesive Sheets 6x4, Kaisercraft: Mint Wishes Collection; May Arts Ribbon: Sheer Ribbon; Little Birdie Crafts: Gold Poinsettia

Thank you for your comments and all of the support you give me - you make blogging such an amazing place to be!! Your encouragement is such a blessing for me - it makes my day! God bless you!

                                                          {{{hugs}}} and happy crafting