}
Showing posts with label Celebra'tions. Show all posts

Wednesday, July 6, 2016

Sing a Song

Hello friends, it feels like forever since I have shared something with you - it is not that I have taken a break - quite the opposite infact!! I have been busy working on posts and tutorials for while I am away on the Australian Mixed Media Roadshow...it has come around so quickly - infact I leave  tomorrow for Sydney and on Friday the international artists arrive - so exciting - cannot wait to see them all again!!  I will share as many photos as I can and post along the way..


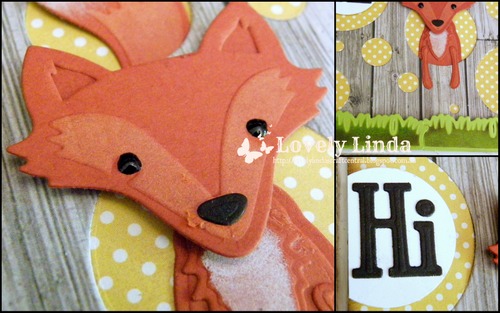
In the meantime I have a card to share - a little bit Mixed Media, a bit shabby - an eclectic mix of wonderful products!  The darling image is from Dina Wakley  and has been coloured using Imagine Crafts Radiant Neon Inks.  The image has been fussy cut and layered onto the Spellbinders Floral Ovals.  For this layer I have used Celebra'tions paper and randomly smeared white paint across it - once it has dried I stamped the Quietfire Designs sentiment using Tuxedo Black Ink.

The Spellbinders Amazing Paper Grace Flourish Frame has been layered onto Delightful Daisy cardstock, all layers have been adhered to a precut card base,  Scrapbook Adhesives by 3L E-Z Adhesive Runner and 3D Foam Squares have been used on this card. The beautiful bling is from from Want2Scrap.


 This card has been linked to:
Double D Challenges - Simply Gingham (Photo Inspiration)


Inspiration Destination - Always Anything Goes
Ooh La La Creations Challenge - Anything Beginning with F - Feathers
Mod Squad Challenge - Lazy Days of Summer
Deep Ocean Challenge - Colors of Summer
Lemon Shortbread - Always Anything Goes 
Retarte - Anything Goes
Artistic Inspirations - Anything Goes 
Crafty Cardmakers - Shabby Chic
The Corrosive Challenges - Lots of Layers
We Love 2 Create  - Always Anything Creative/Mixed Media Goes
 
Take care friends and Thank you for your comments and all of the support you give me - you make blogging such an amazing place to be!! Your encouragement is such a blessing for me - it makes my day! God bless you!

{{{Hugs}}} and happy creating

Tuesday, May 3, 2016

Grow Where You Are Planted

Hello friends today I'm sharing another card created using one of the newly released Spellbinders Die D-lites called Succulent Garden - this time I am using the actual succulent as opposed to the Aloe Vera and Cactus


I have cut and embossed the succulents and popped and popped it up using Scrapbook Adhesives by 3D Foam Squares on to a Classic Oval large. This is being layered onto a larger Classic Oval.


 I have adhered it to this to the patterned paper on which I've drawn a border and added paint dots to add to the garden feel of this card.


The layered image has been popped up onto yellow matting and adhered to a pre-cut cardbase.


The sentiment is from Inky Antics stamps set designed by my friend Trudy Sjolander and works perfectly with these dies.  I have used Imagine Crafts featuring Tsukineko Momento ink in Tuxedo Black. I have also added some postmarks to the Classic Oval.

This card is linked to the following challenges:
Craft It Up & Link It Up Linky Party by Craftin Desert Divas - In the Garden
Not Just Cards - Always Anything Goes
Craft for the Craic - Anything But a Card
Morgan's Art World - Anything Goes
Little Miss Muffet Challenges - Anything Goes
Fresh Brewed Designs - Anything Goes
WordArt Wednesdays - Family Friendly/Anything Goes 

Take care friends - thank you for your comments and all of the support you give me - you make blogging such an amazing place to be!! Your encouragement is such a blessing for me - it makes my day! God bless you!
{{{Hugs}}} and happy crafting

Sunday, May 1, 2016

Birthday Cactus


Hello friends today I'm sharing a card created using one of the newly released Spellbinders Die D-lites called Succulent GardenSucculents are trending at the moment and this die is perfect for cards for every occasion. When I die-cut I normally cut a few extra which are great to have on hand for a quick card.


I have cut and embossed the succulents and popped and popped it up using Scrapbook Adhesives by 3D Foam Squares on to a Classic Oval large then  adhered to a pre-cut cardbase and patterned paper - cut/embossed using the Spellbinders A2 Curved Matting Basics A Card Creator.   Scrapbook Adhesives by 3L: E-Z Adhesive Runner and 3D Foam Squares have been used on this card and the bling is from Want2Scrap.


This card is linked to the following challenges:
Artbymiran Challenge Anything Goes
Morgan's Art World - Anything Goes
Crafting With An Attitude - Always Anything Goes 
TIME OUT Challenges - Celebrations with the Optional Twist of Die Cuts/Fussy Cutting
 Simon Says Stamp - Anything Goes
Sisterhood of Crafters  - Birthdays 
Retarte - Anything Goes

Take care friends - thank you for your comments and all of the support you give me - you make blogging such an amazing place to be!! Your encouragement is such a blessing for me - it makes my day! God bless you!
{{{Hugs}}} and happy crafting

Monday, March 28, 2016

Flight of the Butterfly

Hello friends, I hope you have had/are having an amazing Easter - I have been absent from my Blog by choice, spending time with the family over this special weekend. I did manage to have a little creative time in The Studio, using Negative Dies - we throw these away too often, but I am determined to use them more often - I am more than happy with the result.


The Negative Dies are from this card HERE created using the newly released by Spellbinders - Take Flight Shapeabilities by Licensed Designer Seth Apter of The Altered Page.  Love Seth's Grunge style Die, it certainly is versatile.


I have layered it onto a card base and added a frame that is also a Negative Die - from the same card created using  Imagine Crafts 'featuring' Tsukineko Memento Inks in Dandelion, Tangerine and Bamboo Leaves applied with a Sponge Dauber to a Stencil cut using the Grate Effect Card Creator Die to white cardstock.  This has then been cut using  the Celebra'tions Pierced Rectangles and popped up onto a pre-cut cardbase.  I have also used Scrapbook Adhesives by 3L: E-Z Adhesive Runner and 3D Foam Squares on my card.


A hand made paper clay butterfly has been coloured using inks and had Kindy Glitz added for some shimmer.  A line of ricrac is added below the butterfly and buttons added to the left side of the Negative Die,  I have used a pink pen to join the pierced edges - creating faux stitching.


This card is for the following challenges:
Amusing - Anything Goes
Crafty Friends Challenge - anything goes 
Little Claire's - anything goes
2 Creative Chicks - Anything Goes
Paper Creator's Crafts - Spring Colors
The Sisters of Craft - Always Anything Goes
Alphabet Challenge - B for Beautiful Butterflies
Artbymiran Challenge Anything Goes
Creative Fingers - Anything Goes
Morgan's Art World - Anything With Wings
WordArt Wednesdays - Anything Goes 
Die Cuttin' Divas - Buttons
Everybody-Art-Challenge- Anything Goes
Critters and Creatures Always Anything Goes with a Critter/Creature
Our Crafty Corner - Always Anything Goes

Thank you for your comments and all of the support you give me - you make blogging such an amazing place to be!! Your encouragement is such a blessing for me - it makes my day! God bless you!
{{{Hugs}}} and happy creating!

Tuesday, March 22, 2016

Take Flight

Hello friends, I hope you are having a good week.  I have managed to have a little creative time in The Studio, using Dies and stamps.  I love to colour but do not do it often enough but plan on changing that very soon.


The dies are newly released by Spellbinders - Take Flight Shapeabilities by Licensed Designer Seth Apter of The Altered Page.  Although this is a Grunge style Die, it certainly works well with other styles - so I had a little fun...


 The image is from the Tim Holtz Stampers Anonymous Bird Crazy  - how adorable are these - and the sentiment that goes with it.  The image has been coloured using Imagine Crafts 'featuring' Tsukineko Memento Inks and Sponge Daubers - my favourite way to colour and so effective!


My background is created using  Imagine Crafts 'featuring' Tsukineko Memento
Inks in Dandelion, Tangerine and Bamboo Leaves applied with a Sponge Dauber to a Stencil cut using the Grate Effect Card Creator Die to white cardstock.  This has then been cut using  the Celebra'tions Pierced Rectangles and popped up onto a pre-cut cardbase.  I have also used Scrapbook Adhesives by 3L: E-Z Adhesive Runner and 3D Foam Squares on my card.


This card is linked to the following challenges:
Colouring in Scrapland - Anything Goes
Critters and Creatures Always Anything Goes with a Critter/Creature
Eureka Stamps - Anything Goes
613 Avenue Create - Anything goes with optional twist: Use a Bird
Come and Get It Add Stitching
Let's Color Saturday Linky Party - anything goes with something colored - always  
QKR Stampede – Add a Sentiment
Jade's Sparkling Butterflies Anything Goes/Use Die-Cuts or Punches
Craft Rocket Challenges - Anything Goes
Crimbo CrackersAnimals

Thank you for your comments and all of the support you give me - you make blogging such an amazing place to be!! Your encouragement is such a blessing for me - it makes my day! God bless you!
{{{Hugs}}} and happy creating!

Monday, November 16, 2015

International Ambassadors Unofficial Whimsical Woodland Blog Hop


We so excited that you arjoining us on the International Ambassadors Unofficial Blog Hop - I hope you are enjoying them as much as we are and are finding a lot of inspiration - each of us has our own style and I am sure there is something to inspire everyone. This month we are sharing our projects with you - using the Woodland Collection - these whimsical Dies take adorable to the next level as you will see.


We love it that so many of you hop along with us - I hope you enjoy what we are sharing today!!


Spellbinders Products: 
Preferred Partner Products:
Other: Black Marker, Rust Cardstock; Green Cardstock; black permanent marker


1. Cut/emboss Woodland Fox using rust cardstock
2. Using the Die as a Stencil, sponge inside the open areas of the die using Electric Orange and Wedding Dress ink and a sponge dauber


3. Cut/emboss the paper using Confetti Plate
4. Adhere the fox through the holes as shown in the photo above, popping the head and the end of the tail up for dimension.
5. Trim off excess body
6. Adhere patterned paper behind the confetti plate using double sided tape


7. Layer into slightly larger white cardstock using double sided tape
8. Wrap green linen thread around the top of the card and tie a knot
9 Adhere to precut green card base
10 Cut/emboss sentiment from black cardstock and adhere to precut circle that has been trimmed
11 Adhere to card using 3D Foam Dots
12 Cut/emboss two (2) grass from the Mushrooms using green cardstock
13 Attach to the base of the card using 3D Foam Squares

hope you have enjoyed my tutorial, make sure you pop in and visit the other International Ambassadors - these girls are amazing - each one is picked to be an Ambassador for their country because they are seasoned designers and so inspiring, they also stand as talented designers in their own right - as you will see!!!  The list of International Ambassadors is below, in case you get lost along the way.

Christine Emberson - England
  Linda Lucas - Australia (you are here)
Yvonne van de Grijp - Netherlands

Thank you for your comments and all of the support you give me - you make blogging such an amazing place to be!! Your encouragement is such a blessing for me - it makes my day! God bless you!
{{{Hugs}}} and happy crafting

Wednesday, November 11, 2015

Back to Basics with Sock Monkey

Hello Blog friends - I am going back to basics here - very basic - but I could not resist creating this card when I found this paper tucked away deeply in my RAKs container - from my days of being on Splitcoast Stampers and in the Twisted Sistah's - anyone else remember the Sock Monkey??


Seemed to be the perfect paper for a baby boy card - the sentiment is from Darkroom Door and the twine from Spellbinders - it really did not need more (in my opinion) - the monkeys are doing all of the work on this one LOL!  I have cut the card base and patterned paper using the A2 Curved Matting Basics Spellbinders® Nestabilities® Card Creator and the  Platinum Die Cutting and Embossing Machine.     I have also used Scrapbook Adhesives by 3L Crafty Foam Tape and E-Z Adhesive Runner.

I have to give you a close up of the Teddy Bear embellishment - a lovely RAK from Camilla Sheridan.  I have painted it and tried to give it a rustic look - how cute is it - it has a very high chance of being used on a layout with my Grandson on it - no surprises there!


This card is linked to the following challenges:
2 Creative Chicks - Anything Goes
Animal Friends Challenge - Hat, scarves or gloves
Not Just Cards Challenge - Anything Goes
Country View Crafts' Challenge - The Colour Blue
Karleigh Sue Challenge - One for the Boys
Crafty Hazelnut's Patterned Paper - Anything goes with Patterned Paper
Just Keep On Crafting - Anything Goes

Thank you for your comments and all of the support you give me - you make blogging such an amazing place to be!! Your encouragement is such a blessing for me - it makes my day! God bless you!
{{{Hugs}}} and happy creating!