}

Sunday, August 14, 2016

Uniquely You

Hello friends - been a while between posts - but I assure you I am working away behind the scenes and will share it all as I can.  My card today is quick and easy, using some of the gorgeous stamps, dies and embossing folders by Spellbinders Licensed Designer Donna Salazar - and I have to say - I love her style!!


I have used the beautiful Medallion Embossing folder for my background paper; it has been lightly sanded after embossing.  The focal image is from the Donna Salazar Always Remember Stamp and Die Set and has been coloured using Imagine Memento Markers.  This has been layered onto the #2 Die from the Fleur de Elegance Nestabilities (#1 being the smallest)

I have also used: recycled lace; sentiment stickers; flowers from my stash and a flourish from the Spellbinders Cinch and Go Flower Dies by Becca Feeken.  Scrapbook Adhesives by 3L E-Z Adhesive Runner and 3D Foam Squares have been used on this card. The beautiful bling is from from Want2Scrap.

This card is linked to the following challenges:
613 Avenue Create Anything Goes w/Optional Twist: Anything Goes
Brown Sugar Challenge - Anything Goes
Amusing Anything Goes (running until Sept 4)
Great Impressions - August - Anything Goes
The Pencil Case - Anything Goes  
Cut it Up Summertime Memories
Crafty Girls Challenge - Anything Goes
The Crafty Addicts Anything Goes/Emboss It!!
C.R.A.F.,T. Challenge - Anything goes
Retarte - Anything Goes
Crafty Boots - Use A Stamp

Take care friends and Thank you for your comments and all of the support you give me - you make blogging such an amazing place to be!! Your encouragement is such a blessing for me - it makes my day! God bless you!

{{{Hugs}}} and happy creating

Friday, August 12, 2016

Spellbinders Flourish Frame Tutorial

Hello friends, I am sharing a tutorial for Spellbinders today combining elegant dies with whimsical butterflies - don't you love the effect.  One of the things I love about Spellbinders is the way the dies work so fabulously together - the combinations are endless - and we love that - don't we!?


Spellbinders Products:
Other : Liquid Glue; Scrapbook Adhesives by 3L: E-Z Adhesive Runner, 3D Foam Squares; Want2Scrap: Swirls Finesse - White Pearls - Self Adhesive   Imagine Crafts:  Delicata in Golden Glitz, Sponge Daubers;  Vintage button; Seam Binding; sentiment stamp

1. Stamp sentiment using black ink onto Cream cardstock.
2. Cut/emboss using Flourishes Frame Oval Insert.
3. Use Die as a stencil and sponge around the inside edges using Golden Glitz Ink and a sponge dauber.

4. Cut/emboss one(1) Flourish Frame using cutting edge and decorative insert using Sea Spray.
5. Cut/emboss Cascading Butterflies using patterned paper.
6. Remove the Butterflies from the Die.

7.  Layer small butterflies inside the larger Cascading Butterflies using 3D Foam Squares on the wings and glue in the center.

8. Adhere the die cut sentiment to the Flourished Frame using 3D Foam Squares.
9. Attach double Seam Binding bow to the lower portion of the sentiment using liquid glue.
10. Adhere vintage button to the center of the bow
11. Cut Swirls Finesse to the required length and attach each side of the button.
12. Adhere layered butterflies around the Flourished Frame as shown in the main photo.
13. Adhere bling to the body of each butterfly.
14. Attach Die cut layers to the precut card base using double sided tape.
15. Adhere large white pearls around the Flourish Frame.


Thank you for your comments and all of the support you give me - you make blogging such an amazing place to be!! Your encouragement is such a blessing for me - it makes my day! God bless you!

{{{Hugs}}} and happy crafting


Tuesday, August 9, 2016

Spreading my Wings

One of the things I love about this creative journey we are all on, is the evolving - growing and learning and coming to the place where we feel free to do 'it'.  'It' being the ability to step out of our comfort zones, from doing that thing that we can do so easily and while it is fabulous, we have the inner knowledge that there is more....so much more to be discovered.


My signature style is Shabby Vintage/Vintage and I love it - it will always be a strong part of me and what I create. I have had an inner battle about labeling what I do - not so much for me but to have an answer when people ask what I do and expect me to label myself...for someone who predominantly creates cards and 'dabbles' with scrapbooking and some altered art, I have never needed a label to justify what I 'do' but more to have an answer for people who ask.

xxxx Relics and Artifacts Rising Spirit IV with Wood Support


I am very grateful to have input and encouragement from my dear friends Seth Apter and John Creighton Petersen, the 'other men in my life'  Three years ago while in Phoenix I was able to get some clarity - Seth told me, 'I have seen what you do with paper - you are an artist!' Later that day the amazing Linda Moldern Peterson added, 'you are an artist - maybe not a fine artist, but an artist'  This was a moment of 'clarity' for me - and I am so grateful to both Seth and Linda for their input.


My very dear friend John Creighton Petersen - my 'brotherfromanothermother' was always been there encouraging me to 'spread my wings' - pushing me when I got too comfortable and encouraging me in new things.  It was during one of John's Workshops on the Australian Mixed Media Roadshow that I decided to 'spread my wings' and create something very different for me - but so comfortable too.


I have used the Relics and Artifacts Rising Spirit IV with Wood Support, along with lots of Finnibair paints and product, under the great guidance of John, who showed me how to use the products and then let me 'do my thing - and I was in my element.  I don't think John was quite prepared for the freedom I felt - it was a great feeling when he came past and exclaimed 'Linda!! Where did that come from!?!'  I have to say, it was always there - definitely a part of me, that just needed encouraging to surface.


If you have any questions about product - please feel free to leave them here and I will ask John (LOL) I was too busy using them to take notes - but I do know there was black gesso - love that stuff.

I could not finish this post without thanking all those who have been part of my journey - and continue to do so - especially Sallianne McClelland, my dear friend, dynamo and Sistah who has believed in me and given me the most amazing opportunities - enabling me in every way!!  To Andrea Mantus DeMeng, Michael DeMeng and Kecia Frazee Deveney - you guys are amazing and I am so grateful for your friendship love and support - you have inspired me to reach further and not to be afraid to try anything - I {{{heart}}} you all!!  Love my #artfamily!!

Take care friends - thank you for your comments and all of the support you give me - you make blogging such an amazing place to be!! Your encouragement is such a blessing for me - it makes my day! God bless you!


{{{Hugs}}} and happy crafting

Sunday, August 7, 2016

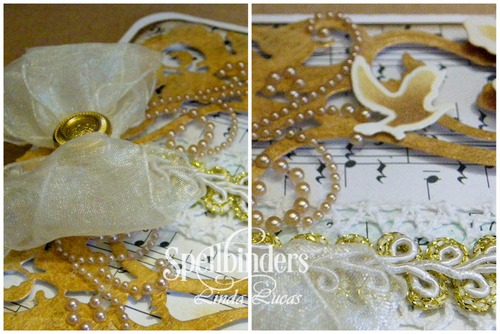
Spellbinders Renaissance Christmas Frame

Hi everyone, it is Linda here with a tutorial for Spellbinders using one of the gorgeously elegant Dies from the Renaissance Collection - these Dies are a statement in themselves and help create the most stunning cards - perfect for Christmas with its joyful opulence or any occasion for that matter.


Spellbinders Products:
Other : Liquid Glue;  Gold Cardstock; Scrapbook Adhesives by 3L: E-Z Adhesive Runner, 3D Foam Squares; Want2Scrap: Swirls Finesse - Le Creme Pearls - Self Adhesive   Imagine Crafts:  Delicata in Golden Glitz, Sponge Daubers; Music Sheet; Gold Braid, KaiserCraft: White Lace; Gold Button; May Arts Ribbon: Sheer cream ribbon; Corner Rounder


1.Cut/emboss one (1) Renaissance Christmas Frame using Gold Cardstock. 
2. Cut/emboss two (2) Poinsettia flowers using cream cardstock.
3. Using the Die as a Stencil, sponge inside the Die using Golden Glitz and a Sponge Dauber.
4. Cut/emboss one (1) set of Holly Leaves, along with two (2) birds
5. Using the Die as a Stencil, sponge inside the Poinsettias and  Birds using Golden Glitz and a Sponge Dauber.


6. Adhere white lace onto a pre-cut music sheet using liquid glue.
7. Glue gold/white braid across the center of the lace.
8. Adhere the frame onto pre-cut sheet music using 3D Foam Squares.
9. Adhere the layers onto cold cardstock cut slightly larger using double sided tape.
10. Attach all layers onto pre-cut card base using double sided tape.
11. Pop Poinsettias into the frame (top and bottom) using 3D Foam Squares.

12. Adhere Swirls Finesse to the center of each side of the frame.
13. Glue the double sheer bow, to the left hand side of the frame,
14. Adhere the button to the center of the bow using liquid glue.
14. Adhere the birds to each side of the Poinsettia using liquid glue.


Take care friends - thank you for your comments and all of the support you give me - you make blogging such an amazing place to be!! Your encouragement is such a blessing for me - it makes my day! God bless you!

{{{Hugs}}} and happy crafting

Thursday, August 4, 2016

Australian Mixed Media Roadshow

Hello friends, I have been trying for weeks to get this blog post done and ironically we are almost t the end of the Australian Mixed Media Roadshow and I am on my first post!!!  This alone tells you how busy it has been.  I will start with our first stop....

Perth

What an amazing journey is has been this past week as the International Artists have arrived from both Canada and America....so wonderful to see these 'peeps' again, with the addition of John Creighton Peterson...and what a talented bunch...after a few days in Sydney our trip to Perth started with a 4am pick up.


On arrival we had the pleasure of having lunch at Andrew and Gail Sanderson at Chittering Acres.  What an amazing way to start our time in Perth...especially with an opportunity to feed the joeys, some of them as young as 6 weeks old.  


The joy was easy to see on every face.


So very grateful to Gina Sanderson and her husband Michael for the amazing welcome to Western Australia...awesome!!  We were spoiled by a feast prepared by Gina and Andrew in the most beautiful surrounds - the views were spectacular to say the least.  We got to see Gina's amazing Studio...the envy of many artists and a place of inspiration.


An exciting day for all...and special thank you to Anne, Andrews Mum for the kangaroo feeding. Anne is associated with WIRES and does such an amazing job.


A trip to Mandurah beach was welcomed by all....the sunset was amazing, the water a little too fresh...


And the company second to none - the fabulous John Creighten Petersen.


What can I sat to this...Sallianne' Seth, Michael and Shirley.


- special moment of reflection with my very dear friend Sallianne - the heart behind the Australian Mixed Media Roadshow.


Take care friends and Thank you for your comments and all of the support you give me - you make blogging such an amazing place to be!! Your encouragement is such a blessing for me - it makes my day! God bless you!

                                                      {{{Hugs}}} and happy creating

Friday, July 29, 2016

Spellbinders Beaded Frame Tutorial

Hello friends - for my Spellbinders Tutorial today I am sharing an adorable little card today using one of the new Die D-Lites - how adorable is this Beaded Square - and so perfect for a smaller card.  I am so impressed how this little Die can add so much to a card and will definitely be using it again!


Spellbinders Products:
Other: Liquid Glue; Scrapbook Adhesives by 3L: E-Z Adhesive Runner, 3D Foam Squares;  red cardstock; image and sentiment stamps; Imagine Crafts: Memento Markers; Memento Ink in Tuxedo Black. Red/White Twine; blue button; handmade patterned paper.

1. Cut/emboss Beaded Squares #3 (#1 being the smallest) using Sea Spray cardstock.
2. Stamp and colour image.
3. Pop up image onto the center of the Beaded Squares using 3D Foam Tape.

4. Adhere a strip of patterned paper across the Sea Spray cardstock using double sided tape.
5. Cut/emboss using Pierced Squares #5#6  (#1 being the smallest).
6. Cut/emboss card base using Pierced Squares #5 #6 and white cardstock - make sure the fold is inside the cutting edge.  Card base will measure approx 4"x 4".
7. Pop up Die cut patterned paper onto card base.

8. Wrap twine around the card front.
9. Thread both ends through a medium button and tie in a knot to secure.
10. Pop Up layered image onto the center of the card base using 3D Foam Squares.
11. Stamp sentiment using black ink.
12. Adhere onto red cardstock using double sided tape.
13. Pop under right side of the Beaded Square using 3D Foam Squares

Take card friends and Thank you for your comments and all of the support you give me - you make blogging such an amazing place to be!! Your encouragement is such a blessing for me - it makes my day! God bless you!

{{{Hugs}}} and happy creating


Friday, July 22, 2016

SB Renassiance Acanthus Leaf Tutorial

Hello everyone, I am sharing a tutorial for Spellbinders using one of the Card Creator Dies Inspired by Licensed Designer Stacey Caron.  It is no secret I am a BIG fan of Stacey and her work - her designs have amazing detail and enable us to create elegant cards with so much detail in the easiest way - as you will see in my tutorial.


'Classic motifs of florals, naturalistic elements, swags, medallion pattern and form inspired Stacey Caron in her Renaissance Collection. These designs will be an instant classic and favorite with crafters and maker alike.'

Spellbinders Products:
Other: Liquid Glue; Scrapbook Adhesives by 3L: E-Z Adhesive Runner, 3D Foam Squares; Imagine Crafts: Sponge Daubers; Memento Ink in Bamboo Leaves, Rockmelon; Memento Luxe in Rose Bud; Seam Binding; Ribbon Pearl Slider; Braid

1. Cut/emboss one (1) Renaissance Acanthus Leaves #1 #2 (#1 being the smallest) using white cardstock.
2. Use Tool 'n One to remove excess pieces.

2. Before removing Die, sponge the  flowers using Rose Bud and Rockmelon.
3. Sponge the leaves and stems using Bamboo leaves.
4. Adhere to slightly larger white pre-cut card base using E-Z Runner.
5. Adhere white braid on lower portion of the card using liquid glue.
6. Attach green seam binding double bow and pearl slider to left hand end of the braid.

It does not get much easier than this to make a pretty, detailed card - I hope you are inspired to get out your Dies and create your own 'works of the heart!'

Thank you for your comments and all of the support you give me - you make blogging such an amazing place to be!! Your encouragement is such a blessing for me - it makes my day! God bless you!
{{{Hugs}}} and happy crafting
                                     

Friday, July 15, 2016

International Ambassadors Unofficial Tags Blog Hop

Hello everyone - a very warm welcome to the International Ambassadors Unofficial Tag Blog Hop.  As always a BIG thank you to those who Hop along with us each month and leave a comment - we really appreciate you joining in with us.  This month's Hop  is all about tags  I hope you can hop along with us and see what each of the International Ambassadors has for you!


Spellbinders Products:

Other : Liquid Glue;  Scrapbook Adhesives by 3L: E-Z Adhesive Runner, 3D Foam Squares; Want2Scrap:  Swirls Finesse - White - Self Adhesive; Imagine Crafts:  Delicata in Golden Glitz, Sponge Daubers; Graphic 45: patterned paper; Kaisercraft: Lace; Black cardstock; Resin Embellishment


1. Cut/emboss one (1) Art Deco Astoria Decorative Elements using white cardstock.
2. Use Tool'n One to remove the excess pieces.
3. Use Die as a stencil and sponge around the inside edges using Golden Glitz Ink and a sponge dauber.


4.Cut/emboss one Art Deco Astoria Labels #  (#1 being the smallest) using black cardstock.
5. Adhere the Die-cut Decorative Elements to the Astoria Labels using liquid glue.
6. Handcut flowers from patterned paper, adhere to tag base using double sided tape along the base and the sides.
7. Adhere to tag - creating a 'hidden' pocket.  Adhere lace below the flowers.
8. Cut image from patterned paper and tuck into the pocket, securing with double sided tape.


9. Cut/emboss one Shortie Tabs using Black cardstock.
10. Hand-cut sentiment from patterned paper and adhere to right side of the Shortie Tab.
11. Fold on scoreline and adhere to the tag using double sided tape.
12.  Adhere Swirls Finesse to the top of the tag.
13. Attach Resin flowers using liquid glue.
14.  Adhere pearls along the lace.


Make sure you pop in and visit the other International Ambassadors - these girls are amazing - each one is picked to be an Ambassador for their country because they are seasoned designers and so inspiring, they also stand as talented designers in their own right - as you will see!!!  The list of International Ambassadors is below, in case you get lost along the way.
Christine Emberson - England
  Linda Lucas - Australia (you are here)
Yvonne van de Grijp - Netherlands

Take care friends - thank you for your comments and all of the support you give me - you make blogging such an amazing place to be!! Your encouragement is such a blessing for me - it makes my day! God bless you!
{{{Hugs}}} and happy crafting