}
Showing posts with label Card Creator. Show all posts

Sunday, November 18, 2018

In Sympathy

Hello everyone, I am sharing a tutorial for Spellbinders using one of the Card Creator Dies Inspired by Licensed Designer Stacey Caron.  It is no secret I am a BIG fan of Stacey and her work - her designs have enable us to create elegant cards with so much detail in the easiest way.


Cut/emboss one (1) Renaissance Acanthus Leaves #1 #2 (#1 being the smallest) using white card stock.  Use Tool 'n One to remove excess pieces.  Colour the flowers using Chameleon Pens. Sponge the leaves and stems using Imagine Memento Ink in Bamboo leaves. 

Adhere to a slightly larger yellow pre-cut card base using Scrapbook Adhesives BY 3L E-Z Runner. Adhere yellow braid on lower portion of the card using liquid glue.  Adhere a flower to the left hand end of the braid, along with a computer generated sentiment.

It really is this easy to make a pretty, detailed card - I hope you are inspired to get out your Dies and create your own 'works of the heart!'

This card is linked to the following challenges:
Crafts Galore Encore Always Anything Goes
Jo's Stamp Shack - Anything Goes
Creatalicious Challenges - Anything Goes + Option: Layer it Up
Creative Fingers Challenge - Anything Goes
Create With TLC - Anything Goes 
Die Cut Divas Anything Goes
Digistamps 4 Joy Anything Goes + optional : add ribbon or lace
A Perfect Time To Craft - Anything Goes
DL.Art Linky Challenge - Anything Goes
LeAnn’s World 101 - Anything Goes
Not Just Cards - Always Anything Goes
Papercraft Business Challenge Anything Goes + option of Christmas Animal
World Wide Open Design Team Challenge - Always Anything Goes 
A Gem of a Challenge - Anything Goes
Di's Digis Designs - Include A Sentiment 
Crafty Catz - ANYTHING GOES W/OPTIONAL SOMETHING WITH WINGS

Thank you for your comments and all of the support you give me - you make blogging such an amazing place to be!! Your encouragement is such a blessing for me - it makes my day! God bless you!
{{{Hugs}}} and happy crafting

Thursday, August 18, 2016

Celebrate Today

Hello friends - I have been busy trying to clean my desk - but it has become a matter of 'faux' cleaning - you know what that is don't you - where we start off with every good intention of cleaning, but then get distracted by what is on there and end up 'faux'cleaning' - cleaning by using up the things lying around - LOL - still cleaning though - right!! Wink:wink


I have used a leftover piece of patterned paper that was just too 'happy' to throw out - this has been paired with some handmade patterned card stock and cut/embossed using Spellbinders A2 Modern Stationery Card Creator Die. Co-ordinating patterned paper has been cut into strips and added - as shown above.


For the background paper I have stamped using images from Seth Apters Faded Fragments Stamp set and added some splatters and white paint.


The embossed image is from my stash and has been sponged using Imagine Radiant Neon Inks  and popped up onto the card base using Scrapbook Adhesives by 3L 3D Foam Squares.  The computer is computer generated and has also been popped up using Scrapbook Adhesives by 3L 3D Foam Squares.  

Quick and easy and leaves my desk just a little bit clear - but only just!!

This card is linked to:
Crafting By Designs - August Anything Goes
Creative Moments - Always Anything Goes
Mod Squad Challenge - The Die's The Thing
Paper Shelter Challenge - Birthday Wishes 
Lemon Shortbread Challenge - Anything Goes
The Crafty Addicts - Anything Goes/Use Die-cuts
Oh La La Challenge - Three Embellishments (Die-cut, paint splatters, paper banner)
WordArt Wednesdays - Anything Goes 
(Love To Scrap Challenge - Anything Goes
Retarte - Anything Goes 

Take care friends and Thank you for your comments and all of the support you give me - you make blogging such an amazing place to be!! Your encouragement is such a blessing for me - it makes my day! God bless you!

{{{Hugs}}} and happy creating

Friday, July 22, 2016

SB Renassiance Acanthus Leaf Tutorial

Hello everyone, I am sharing a tutorial for Spellbinders using one of the Card Creator Dies Inspired by Licensed Designer Stacey Caron.  It is no secret I am a BIG fan of Stacey and her work - her designs have amazing detail and enable us to create elegant cards with so much detail in the easiest way - as you will see in my tutorial.


'Classic motifs of florals, naturalistic elements, swags, medallion pattern and form inspired Stacey Caron in her Renaissance Collection. These designs will be an instant classic and favorite with crafters and maker alike.'

Spellbinders Products:
Other: Liquid Glue; Scrapbook Adhesives by 3L: E-Z Adhesive Runner, 3D Foam Squares; Imagine Crafts: Sponge Daubers; Memento Ink in Bamboo Leaves, Rockmelon; Memento Luxe in Rose Bud; Seam Binding; Ribbon Pearl Slider; Braid

1. Cut/emboss one (1) Renaissance Acanthus Leaves #1 #2 (#1 being the smallest) using white cardstock.
2. Use Tool 'n One to remove excess pieces.

2. Before removing Die, sponge the  flowers using Rose Bud and Rockmelon.
3. Sponge the leaves and stems using Bamboo leaves.
4. Adhere to slightly larger white pre-cut card base using E-Z Runner.
5. Adhere white braid on lower portion of the card using liquid glue.
6. Attach green seam binding double bow and pearl slider to left hand end of the braid.

It does not get much easier than this to make a pretty, detailed card - I hope you are inspired to get out your Dies and create your own 'works of the heart!'

Thank you for your comments and all of the support you give me - you make blogging such an amazing place to be!! Your encouragement is such a blessing for me - it makes my day! God bless you!
{{{Hugs}}} and happy crafting
                                     

Friday, May 27, 2016

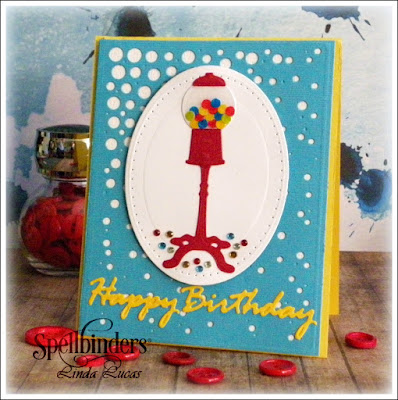
SB Gumball Birthday Tutorial

Hello friends, I am sharing a Spellbinders Tutorial today and have a fun card to share - I love the new Dies that have been recently released and am loving the variety. Don't you just love this Gumball Machine - I have memories of them as a child - what a treat it was - we weren't allowed to chew gum too often - so that made it even more special. 


Spellbinders Products:
Other: Liquid Glue; Scrapbook Adhesives by 3L: E-Z Adhesive Runner, 3D Foam Squares; Want2Scrap:  Baby Bling Rhinestones in red, turquoise, brown and silver; Imagine Crafts: Memento Markers; Red and Yellow Cardstock; Dimensional Magic


1. Cut/emboss one (1) Cascade Dots #1#2 using Sea Spray Cardstock
2. Cut white card slightly smaller and adhere to the back of the Cascade Dots.
3. Attach to yellow card-base, cut lightly larger, using 3D Foam Squares


4. Cut/emboss Pierced Ovals #3 #4 (#1 being the smallest)
5. Adhere to the Cascade Dots just down from the top using 3D Foam Squares.


6. Cut/emboss Gumball Machine - stand, machine and lid using red cardstock,
7. Cut/emboss Gumball Machine - circle and gum using white cardstock.
8. Adhere all pieces together except the gum
9. Colour gum using Memento Markers; adhere to the circle.


10. Adhere the Gumball Machine to the Pierced Oval using liquid glue.
11. Cut/emboss sentiment using yellow cardstock.


12. Adhere the sentiment below the image using liquid glue,
13. Add a layer of Dimension Magic over the Circle - allow to dry.
14.  Add Baby Bling in assorted colours around the base of the Gumball Machine.

Don't you just love it - I hope you are inspired today, to create something using your Dies - we are only limited by our imaginations.

Take care friends - thank you for your comments and all of the support you give me - you make blogging such an amazing place to be!! Your encouragement is such a blessing for me - it makes my day! God bless you!
{{{Hugs}}} and happy crafting

Sunday, May 22, 2016

Spellbinders Basic Scrapbooking with Dies Tutorial

My Spellbinders tutorial today is very quick and easy - sharing how to start using Dies on your layouts/scrapbook pages - nothing too hard but definitely effective! Scrapbooking is such a wonderful way to be the 'Memory Keeper' in the family, recording those precious times for the generations to look back on.  There are so many wonderful Scrapbookers around - it can be daunting for those of us starting out...


Spellbinders Products:
Other: Liquid Glue; button; Scrapbook Adhesives by 3L: E-Z Adhesive Runner, 3D Foam Squares; Sanding Block; Washi Tape; Cosmo Cricket: Alpha Stickers; Corrugated Cardboard; May Arts Ribbon - Sheer ribbon; 2 x 4"x6" photos (portrait); 12 x 12 Patterned paper.


1. Cut/emboss the photos using Pierced Rectangles #5 #6 (#1 being the smallest) using the Platinum Die Cutting and Embossing Machine.
NOTE:  Make sure you use Respositional Tape - or Washi Tape to hold the Dies in place so the spacing is even.


2. Using a Sanding Block and circular motion, lightly sand around the pierced edges, you can see this adds the impression of another layer and makes the photos a little nostalgic - or distressed.
3 Cut patterned paper approx 10" x 6", adhere to patterned paper.  Attach a strip corrugated cardstock across the base of the blue paper using double sided tape.
4. Layer the distressed photos onto a panel of patterned paper, angling each one towards the outside edge.
5. Adhere double sheer bow to where the photos join, adhere a button and heart using liquid glue.
6. Randomly add Washi Tape to the corners of the layout - making each piece a different length and making sure you tear not cut the tape.
7. Add the sentiment stickers above the lower portions of Washi Tape.
8. Add various size buttons using liquid glue, finishing with name and date.

It is as simple as that - and the results are sure to make you more than happy with your layouts - Spellbinders has so many different Dies that help display your memories so beautifully.

Take care friends - thank you for your comments and all of the support you give me - you make blogging such an amazing place to be!! Your encouragement is such a blessing for me - it makes my day! God bless you!
{{{Hugs}}} and happy crafting

Thursday, May 12, 2016

Spellbinders Donna Salazar Designs - Always Remember Tutroial

Hello friends, it is always lovely to know you have stopped by.  I am sharing a tutorial for Spellbinders and have to say I am excited to be using one of Licensed Designer Donna Salazar's new Stamp and Die sets, called Always Remember - I don't know about you - but I just love using sets like this - follow along with the tutorial and you will see why....


Spellbinders Products:
Other: Liquid Glue; Scrapbook Adhesives by 3L: E-Z Adhesive Runner, 3D Foam Squares; Imagine Crafts 'featuring' Tsukineko: Memento in Tuxedo Black; Mulberry Paper Flower; Want2Scrap Beautiful Bling Borders - Fancy That! by Nina Brackett, Baby Bling - Turquoise Rhinestone; Patterned paper; teal seam binding; sentiment stickers

1. Cut/emboss one (1) A2 Valiant Honor using patterned paper,

2. Cut/emboss four (4) Swirl Bliss using both Corner Insert and Border and white cardstock.
3. Adhere A2 Valiant Honor Die-cut patterned paper to pre-cut card base.
4. Adhere the Swirl Bliss Corners using liquid glue, slightly over lapping - as shown in the photo above.

5. Stamp Always Remember onto white cardstock using Black Ink and colour flowers using Markers.
6. Cut/emboss using co-coordinating Die.
7. Cut leaves using Teal cardstock. 
8. Adhere a teal double seam binding bow to the left side of the label,
9. Adhere a paper rose to the center of the bow and tuck the leaves underneath, using liquid glue.

10. Add sentiment stickers to the label.
11. Attach Want2Scrap Beautiful Borders to the top and bottom of the label and Baby Bling as shown in the photo.


I hope you are inspired by my project today - you can see the rest of Donna Salazar's Collection for Spellbinders by clicking HERE.   Thank you for your comments and all of the support you give me - you make blogging such an amazing place to be!! Your encouragement is such a blessing for me - it makes my day! God bless you!
{{{Hugs}}} and happy crafting

Saturday, January 16, 2016

International Ambassadors Informal Favourite Seasons Blog Hop

Welcome to the first International Ambassadors Unofficial Blog Hop for 2016 - I hope you had a lovely Christmas and that 2016 is a good year for you all. We have really enjoyed the Blog Hops and this year our goal is to bring you lots of inspiration using bother older and new Dies; we hope you are enjoying stopping by each Blog as much as we love seeing you and are and are finding a lot of inspiration - each of us has our own style and I am sure there is something to inspire everyone. This month we are sharing our projects with you - the theme is favourite season...which for me is Spring!


Spellbinders Products:
Preferred Partner Products:
Other: Liquid Glue; Black cardstock; vintage music sheet; script music sheet; patterned paper; mulberry paper flower; 

1. Cut/Emboss A2 Divine Eloquence using patterned paper
2. Adhere A2 Divine Eloquence to black cardstock cut slightly larger

3. Adhere layers to precut white card base measuring 4.5" x 5.5"
4. Cut/emboss the sentiment using Sea Spray cardstock.
5. Cut.emboss Birds on a Wire using black cardstock.
6. Adhere smaller script layer to the layered card base using double sided tape.
7. Adhere smaller vintage music sheet to the script layer using double sided tape. 
8. Attach Bird on a Wire using liquid glue.
9. Adhere mulberry paper rose to the left of the birds.
10. Adhere sentiment to the center of the Vintage Music Sheet using liquid glue.
11. Cut/emboss the Silhouette frame, cut in half and adhere to the A2 Divine Eloquence, making sure to tuck the ends in under the script layer. 

hope you have enjoyed my tutorial, make sure you pop in and visit the other International Ambassadors - these girls are amazing - each one is picked to be an Ambassador for their country because they are seasoned designers and so inspiring, they also stand as talented designers in their own right - as you will see!!!  The list of International Ambassadors is below, in case you get lost along the way.

Christine Emberson - England
  Linda Lucas - Australia (you are here)
Yvonne van de Grijp - Netherlands

Thank you for your comments and all of the support you give me - you make blogging such an amazing place to be!! Your encouragement is such a blessing for me - it makes my day! God bless you!
{{{Hugs}}} and happy crafting

Friday, January 15, 2016

Those Who Dare

Hello friends - I have a few cards to share over the next few days - infact I have made many, editing and blogging are a whole 'nother show! LOL!  Today's card has been created using Spellbinders Dies - but you knew that - didn't you! 


My image is Dear Daffodil by Darkroom Door and has been stamped using Imagine Crafts ‘featuring’ Tsukineko Memento Inks.  This has then been cut/embossed using A2 Matting Basics A Spellbinders® Nestabilities® Card Creator  and the Platinum Die Cutting and Embossing Machine.


The sentiment is by Dina Roedel Kowal for Impression Obsession, Inc. - this is definitely a sentiment I will be using a lot.  I have stamped the sentiment using  Imagine Crafts ‘featuring’ Tsukineko Memento Ink in Tuxedo Black.  This has been layered onto corrugated card, followed by orange cardstock; cut lightly larger; using  Scrapbook Adhesives by 3L.  Adhere all of the layers to a precut card base using Crafty Foam Tape.


Ink a small and medium circle; cut using Standard Circles LG  # 2 #3 (#1 being the smallest).  Layer using liquid Glue an finish with a yellow button and white thread tied in a bow.

This card is linked to the following challenges:
Crafting With An Attitude - Anything Goes
Southern Girls - One For The Girls (W2 of 2)
Through the Purple Haze - Anything Goes
Crafty Gals Corner - Buttons and bows
Sisterhood of Crafters  - Something Old, Something New (Cardboard  is old, stamp is new)
WordArt Wednesdays - Anything Goes 
Everybody-Art-Challenge - Text is the motive
Pile It On - Your First Initial (L = Layers)
Sweet Stampin - flowers

Thank you for your comments and all of the support you give me - you make blogging such an amazing place to be!! Your encouragement is such a blessing for me - it makes my day! God bless you!
{{{Hugs}}} and happy creating!