*** This card will stay at the top of the Blog during the Blog Hop
Please scroll down for new posts ***
Welcome to the International Ambassadors Unofficial Upcycling Blog Hop - we are excited to be back and to share our UPCYCLED projects with you. The International Ambassadors love to get together and create - and love it that so many of you hop along with us - I hope you enjoy what we are sharing today!!


This Blog Hop is purely for fun and inspiration, totally unofficial and an opportunity for you to get to know us (and our styles) more.
Spellbinders Products:
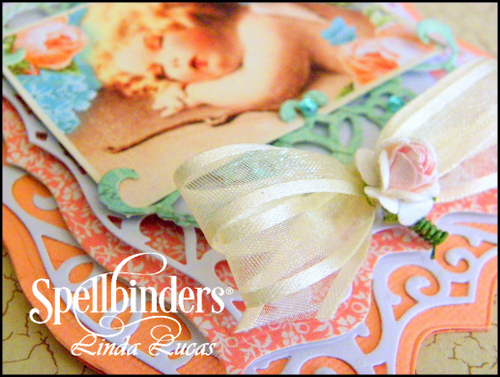
- S5-086 Bitty Blossoms
- S5-171 A2 Curved Matting Basics
- GC-200 Grand Calibur Die Cutting and Embossing Machine
Preferred Partner Products:
Cosmo Cricket: Tiny Text Stickers
Imagine Crafts 'featuring' Tsukineko: Memento Ink in Rhubarb Stalk; StazOn Opaque in Wedding Dress; Sponge Dauber
Mat Arts: Ribbon
Want2Scrap: Baby Bling - White Pearls; Beautiful Bling Borders! by Nina Brackett
Other: Sanding Block, Patterned Paper; Tin for altering; Frozen Charlotte; Metal Wing embellishments; Handmade Resin Embellishments;

1. Cut/emboss patterned paper using A2 Matting Basics # (#1 being the smallest)
2. Lightly sand the embossed edges using a Sanding Block
3. Cover the tin using E-Z Runner

4. Attach the Die Cut paper to the tin, making sure the edges are well attached
5. Attach Ribbon around the edges of the tin using double sided tape
6. Cut/emboss patterned paper using A2 Matting Basics # (#1 being the smallest)
7. Adhere to the inside of the tin lid and base
8. Sponge the edges of the tin using StazOn Opaque in Wedding Dress and a Sponge Dauber
5. Attach Ribbon around the edges of the tin using double sided tape
6. Cut/emboss patterned paper using A2 Matting Basics # (#1 being the smallest)
7. Adhere to the inside of the tin lid and base
8. Sponge the edges of the tin using StazOn Opaque in Wedding Dress and a Sponge Dauber

9. Cut/emboss Bitty Blossoms, roll and glue, sponge with colour and add some shimmer
10 Adhere to the lower portion of the base of the tin using liquid glue
11 Adhere wings to the Frozen Charlotte using liquid glue, allow to dry, adhere to the tin base as shown in the photo applying a little pressure as it dries
12 Attach roses onto the inside corner of the lid, along with Swirls Finesse
13 Add sentiment using stickers
14 Adhere embellishments to the front using liquid glue, add sentiments.

I hope you have enjoyed my tutorial, make sure you pop in and visit the other International Ambassadors - these girls are amazing - each one is picked to be an Ambassador for their country because they are seasoned designers and so inspiring!! The list of International Ambassadors is below, in case you get lost along the way.
Linda Lucas - Australia (you are here)
Yvonne van de Grijp - Netherlands
Christine Emberson - England
Christina Griffiths - England
Thank you for your comments and all of the support you give me - you make blogging such an amazing place to be!! Your encouragement is such a blessing for me - it makes my day! God bless you!
{{{Hugs}}}