Hello friends - welcome and thanks so much for visiting. Today I am excited to be sharing a card I created using the Spellbinders Amazing Paper Grace® Collection - using the new Shadowbox Dies. The possibilities with these dies are endless - I had a little bit of fun creating this card - as you will see as you follow along with the tutorial.
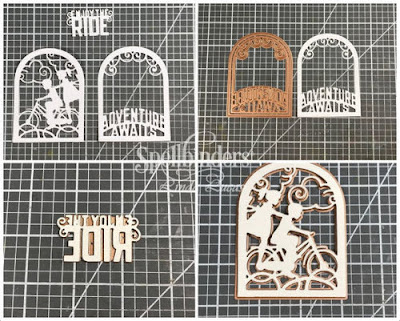
'Shapeabilities Layered Adventure Awaits Children Scene Etched Dies Shadowbox by Becca Feeken is a set of four die that includes three layering pieces for a dimensional adventurous scene and the phrase 'Enjoy the Ride.' Also works with S6-138 Grand Arch 3D Card Etched Dies Set.' - Spellbinders
1. Cut/emboss one each of the Adventure and Scene Dies, using with the outer cutting edge die and white card stock.
2. Cut/Emboss one Enjoy sentiment using white card stock.
3. Cut/emboss one Callista Rectangle Shadowbox Frame adding the cutting edge Die from the Adventure Awaits Etched Dies to the centre using pink patterned paper - secure using low tack tape.
4. Remove the centre die cut, creating an aperture on the card front.
5. Create a top folding card base using pink and white striped patterned card stock.
6. Centre the cutting edge Die from the Adventure Awaits Etched Dies to the centre - secure using low tack tape.
7. Lay the card base open and flat, cut/emboss the front only using the Platinum Die Cutting Machine.
8. Remove the centre die cut, creating an aperture on the card front.
9. Pop up the Callista Rectangle Shadowbox Frame onto the card base using 3D Foam Squares. making sure to line up the aperture.
10. Pop up the Scenic layer onto the pink and white striped insert, adhere to the inside of the card base - making sure to line up through the aperture.
11. Next repeat the process using the Adventure Awaits layer.
NOTE: If the paper is too snug a fit, lightly run your scissors around the inside edges to distress - this will make the opening slightly larger.
12. Glue inserts from the top and bottom of the Callista Rectangle Shadowbox Frame across the top of each corner.
13.Adhere the sentiment above the frame.
14.Attached a narrow row of white lace across the bottom of the Callista Rectangle Shadowbox Frame
15. Glue a double white seam binding bow to the left of the lace - careful to line up so it does not intrude onto the aperture
18. Cut/emboss the smallest two layers from the Cinch and Go IV Etched Dies using white card stock.
19. Sponge the centre of the flowers using pink ink and shape with a Stylus.
20. Layer the flowers and secure using a heart brad, glue onto the knot of the double bow.
21.Finish by adding white pearls to each corner.
Spellbinders Products
- S4-982 Shapeabilities Cinch and Go IV Etched Dies Shadowbox by Becca Feeken
- S4-988 Shapeabilities Layered Adventure Awaits Children Scene Etched Dies Shadowbox by Becca Feeken
- S5-389
Shapeabilities Callista Rectangle Shadowbox Frame Etched Dies Shadowbox by Becca Feeken
- T-001 Tool 'n One
- T-003 Stylus Tips for Tool n' One
- PL-001 Platinum Die Cutting Machine
Other: Mustard, Green and white card stock; Scrapbook Adhesives by 3L: E-Z Adhesive Runner, 3D Foam Squares; liquid glue; Imagine Memento Inks in Angel Pink; Anna Griffin Inc. Lovely Layers Collection 5" x 7"; White Seam Binding; White Lace, Want2Scrap: 250 Count White Pearls - Self Adhesive.
Thank you for your comments and all of the support you give me - you make blogging such an amazing place to be!! Your encouragement is such a blessing for me - it makes my day! God bless you!
{{{hugs}}} and happy crafting


No comments:
Post a Comment
Thank you for your comment, I read and appreciate each one - you make my day! All comments are moderated and spam deleted.
Those leaving a comment on any post on this blog do so in the knowledge that their name and blog link are visible to all who visit this blog and by providing the comment, they have published their own personal details on this blog.{{hugs}}}