}

Wednesday, May 30, 2018

Cut and Emboss - Botanical Frame

Hello friends, thanks so much for dropping in.  I have had withdrawal from the new Cut and Emboss folders released by Spellbinders - I hope you are being inspired by the cards I have been sharing using these wonderful folders. This one called Botanical Frame Cut and Emboss Folder.
.

have run the folder through the Platinum6 using pink card stock, trimmed the edges and adhered  it onto slightly larger deep pink card stock - I love the way the pink is behind the flowers - so pretty.  The layered card front has been popped up onto a white card base.

The beautiful rose is from Anna Griffin Inc and has been popped up onto the centre of the card front using Scrapbook Adhesives by 3L 3D Foam Squares. A double pink Seam Binding Bow has been adhered to the lower stems on the rose and a pink threaded chipboard button from Want2Scrap has been glued to the know of the bow.card front 


I have sponged the the top and bottom of the of embossed card front using white paint and a sponge dauber to soften the look and make it more 'shabby'.  Medium pearls from the Want2Scrap 250 count White Pearls have been adhered to the card front as shown in the main photo.


This card is linked to the following challenges:
Lil Patch of Crafty Friends - Always Anything Goes
Jo's Scrap Shack - ANYTHING GOES
Pattie's Creations - FLOWERS
As You Like It Challenge Flora or Fauna (&why) - roses are beautiful and so aromatic.
Little Red Wagon - Under the Sun
Moo-Mania & More - Flowers 
WordArt Wednesdays - Anything Goes
Craft-Dee BowZ - Anything Goes with a Handmade Bow
Create and Inspire - Anything Goes + option Springtime
Creative Craft Cottage Challenges - Dies and/or Punches
Papercraft Business Challenge Anything Goes + option of Mother's Day

Thank you for your comments and all of the support you give me - you make blogging such an amazing place to be!! Your encouragement is such a blessing for me - it makes my day! God bless you!

{{{hugs}}} and happy crafting

Tuesday, May 29, 2018

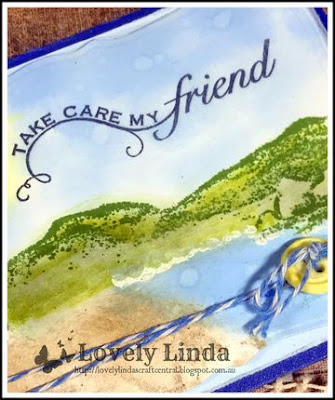
Take Care my Friend

Hello friends, thanks so much for stopping by!  I have working hard to complete deadlines but have managed to have a little time in The Studio, pottering and enjoying the process and this card is the outcome. It is handy having a few stamped off images on my desk, ready for a moment like this - often later at night - ok the early hours of the morning. Wink:wink!


This is such a serene scene using the Spellbinders Lighthouse 3D Shading Stamps.  I have stamped the image using Imagine Memento Ink in London Fog, for a slightly softer look.  It has been coloured using Memento Inks in Summer Sky, Desert Sand, Bamboo Leaves and Dandelion using Sponge Daubers.  


As I have mentioned before I do love to colour using the Daubers, they give such a great look - even when the colours are softer - like these. You can get a lot of detail using the sides of them - you should give it a try!


The image has been cut.embossed using the Spellbinders Nestabilities Curved Rectangles Etched Dies using the  Platinum 6 Die Cutting and Embossing Machine - 6" Platform.  It has been layered onto a slightly larger blue background using Scrapbook Adhesives BY 3L 3D Crafty Foam Tape, followed by a white card base using double sided tape.


The sentiment is from Hero Arts and has been stamped using Imagine Memento Ink in Danube Blue - the curve in the sentiment fits this scene so well.  Blue and white twine has been wrapped around the card front and tied through a yellow button, which has then been glued to hold it in place.

This card is linked to the following challenges:
Simon Says Wednesday - Use More than One stamp
Stamping Sensations - Close to Nature
Crafter's Castle Anything Goes+ optional: Share Your Favorite Technique
Crafty Friends Challenge - Letter B is for... beach
QKR Stampede - ANYTHING GOES
Polkadoodles Craft - Anything Goes
Aud Sentiments Challenge - Summer + A Sentiment
heARTful Stamping Challenge - Anything Goes
House That Stamps Built - Anything Goes
Word Art Wednesday - Anything Goes
Little Red Wagon - Under the Sun

 Thank you for your comments and all of the support you give me - you make blogging such an amazing place to be!! Your encouragement is such a blessing for me - it makes my day! God bless you!

                                                          {{{hugs}}} and happy crafting

Monday, May 28, 2018

Spellbinders Lavender Trike Tutorial

Hello friends, thanks so much for stopping by.  I have a new tutorial for Spellbinders - sharing a card created using two of the Shapeabilities.  The Lavender Dies are just beautiful and a pleasure to use - and fun to colour in whichever medium you choose.  


I have used the beautiful  Eau de Lavande Label as a frame on my card - you can see how it all comes together as you follow along with the tutorial.

1. Cut/emboss the Large Label from the Eau de Lavande Label using white card stock.
2. Sponge the inside of the Die using Bamboo Leaves and a sponge Dauber.

3. Cut/emboss one Lavender Trike using white card stock.
4. Colour the Lavender Trike using a inks and sponge daubers; adding the details with Chameleon Pens.
5. Adhere the Lavender Trike to the Eau de Lavande Label using double sided tape.

6. Add extra layers of colour to the Lavender to create depth.
7. Pop up a computer generated sentiment using Small Black 3D Foam Squares across the trike.
8. Adhere a sheer bow to the left side of the Lavender Trike
9. Glue the recycled pearl button to the centre of the bow.
10. Pop up the layered dies onto Graphic 45 card front with rounded corners, using 3D Foam Squares.
11. Pop up the layered card front onto a pre-cut card base using 3D Foam Squares.


Spellbinders Products:
Other Supplies: White card stock; Scrapbook Adhesives by 3L: Extreme Double Sided Tape, 3D Foam Squares; Liquid Glue; Imagine: Memento Ink in Lulu Lavender, Bamboo Leaves, Teal Zeal, London Fog, Sponge Daubers; Chameleon Pens; Purple Ribbon, Recycled Button; Graphic 45: The Secret Garden.

Thank you for your comments and all of the support you give me - you make blogging such an amazing place to be!! Your encouragement is such a blessing for me - it makes my day! God bless you!

{{{hugs}}} and happy crafting

Sunday, May 27, 2018

Just Awesome

Hello friends - thanks so much for stopping by!  Today I have a little change of pace and am sharing a page from my Want2Scrap Wanted for Stealing Hearts Chipboard Album with you - a Work in Progress.  It is all about my grandson - one doting Nana here and proud of it! LOL!  


 I am so glad that phones have the good cameras on them these days - makes it so easy to catch these moments.  On a trip to Bunnings, our Grandson Noah fell in love with the cubby house and being me, I could not resist taking this photo - and of course it had to be scrapbooked.


I have trimmed and sponged the Want2Scrap Gear Corners 2 Pack Chipboard Embellishment with metallic inks and glued above the photo.  Heart Circles - Black Rhinestones have been added to two of the cogs.  I have also used various embellishments that have gathered in stash - they work so well - I love adding little details.


The sentiment has been created using a computer generated portion and finished using stickers. I have used Scrapbook Adhesives BY 3L E-Z Dots Permanent , 3D Foam Squares for dimension.

This project is linked to the following challenges:
Creative Fingers - ANYTHING GOES
Jo's Scrap Shack - ANYTHING GOES
QKR Stampede - ANYTHING GOES
Craft Rocket Challenges - Use Embellishments
Creative Moments -  Always Anything Goes
Pause Dream Enjoy - Scrapbook Layouts
WordArt Wednesdays - Anything Goes
Card Mania Anything but a Card
Love to Craft - Anything Goes
Not Just Cards - Always Anything Goes
Scribbles Designs Challenge - Make it Masculine
Your Scrapbook Place - Anything Goes
Always Fun Challenges - ANYTHING GOES

Thank you for your comments and all of the support you give me - you make blogging such an amazing place to be!! Your encouragement is such a blessing for me - it makes my day! God bless you!

{{{hugs}}} and happy crafting

Saturday, May 26, 2018

Cut and Emboss - Dotted Lace

Hello friends, thanks so much for dropping in, Today I am sharing with you a card created using another one of the new Cut and Emboss folders released by Spellbinders - how are you liking them so far - it is not secret that I am loving them BIG TIME!!  This one called Dotted Lace.


I have run the folder through the Platinum6 using DCWV shimmer card stock in grey, trimmed the edges and adhered Anna Griffin Inc. Lovely Layers patterned paper behind it. I really love the way the patterned paper looks, this has then been popped up onto a cream card base.


The sentiment is also from Anna Griffin Inc and has been popped up onto the centre of the card front using Scrapbook Adhesives by 3L 3D Foam Squares.  Little Birdie Crafts flowers have been adhered around the sentiment to create a partial frame. Want2Scrap Swirls Finesse - White pearls have been trimmed and added each side of the flowers.


Dotted Lace is just one of the new selection of  Cut and Emboss folders

This card is linked to the following challenges:
Craft Rocket Challenges - Use Embellishments
Sasayaki Glitter Challenge Blog M, P3, F, E3 May- Flowers
Creative Moments Challenge - Anything Goes
Ellibelle's Crafty Wednesday  - For Ladies or Girls Only
The Crafty Addicts Anything Goes
Star Stampz Challenge- No Squares Allowed
Creative Craft Cottage Challenges - Dies and/or Punches
Die Cut Divas Flowers
Word Art Wednesday - Anything Goes

Thank you for your comments and all of the support you give me - you make blogging such an amazing place to be!! Your encouragement is such a blessing for me - it makes my day! God bless you!

                                                          {{{hugs}}} and happy crafting

Friday, May 25, 2018

Cut and Emboss - Rose Flourish

Hello friends, thanks so much for stopping by.  I back with a card using the Spellbinders Rose Flourish Cut and Emboss Folder.  The more I use the Cut and Emboss folders the more I see how amazingly detailed they are, so quick and easy to use - they are totally addictive! Over the next week or so I will be sharing cards created with each of the folders, in many different styles - I hope I inspire you to check them out - you will not be sorry!  You can see a Video of International Ambassador Christine Emberson using one of the Cut and emboss Folders HERE.


Cut/emboss the Rose Flourish Cut and Emboss Folder using white card stock and the Platinum 6 Die Cutting and Embossing Machine - 6" Platform.  Sponge the embossed pattern using Imagine Radiant Neon inks in Electric Pink and Electric Yellow and Memento Ink in Bamboo Leaves. Back the die cut areas using green card stock.  Lightly sponge the top right hand corner using Electric Yellow and Electric Pink inks, adding a computer generated sentiment using Scrapbook Adhesives BY 3L small white 3D Foam Squares.

Pop up onto a slightly larger pink card base using Scrapbook Adhesives BY 3L 3D Foam Squares, using Imagine Pico Embellisher in Dandelion randomly add 'faux enamel dots to the card front - allow to dry! It is as easy as that!!


This card is linked to the following challenges:
Ellibelle's Crafty Wednesday -  For Ladies or Girls Only
House That Stamps Built - Anything Goes
The Crafty Addicts Anything Goes
WordArt Wednesdays - Anything Goes
Always Happy Birthday - Birthday + option of Flowers
Crafty Girls Creations Challenge - Always Anything Goes
Creatalicious Challenges- Anything Goes + Option: Glitter
Creative Craft Cottage Challenges - Dies and/or Punches
Die Cut Divas Flowers
LeAnn’s World 101 - Anything Goes
Love to Craft - Anything Goes
Papercraft Business Challenge Anything Goes + option of Mother's Day
The Creative Crafters - Anything Goes
World Wide Open Design Team Challenge - Always Anything Goes 
A Snowflakes Promise- Anything Goes
Lemon Shortbread - Always Anything Goes
Stinkin' Inkers - April Showers Bring May Flowers (use Flowers)

Thank you for your comments and all of the support you give me - you make blogging such an amazing place to be!! Your encouragement is such a blessing for me - it makes my day! God bless you!

{{{hugs}}} and happy crafting

Thursday, May 24, 2018

Little Birdie Crafts - Succulent Garden Double Zig Zag Card

Hello friends, I am so glad you stopped by.  I am very excited to have a my second post for Little Birdie Crafts.  I love using their products and had a great time creating this Double Zig Zag card.  I have used a variety of products - a little Mixed Media and a card - you are able to see a step by step tutorial on the Little Birdie Crafts Blog.


Thank you for your comments and all of the support you give me - you make blogging such an amazing place to be!! Your encouragement is such a blessing for me - it makes my day! God bless you!

{{{hugs}}} and happy crafting

Spellbinders - Romancing the Swirl Tutorial

Hello friends, thanks so much for stopping by.  I have a new tutorial for Spellbinders to share with you - using the new Romancing the Stone Collection by the amazingly talented Becca Feeken - I have to admit - I am a HUGE fan of the Hemstitch Dies and everything Becca!  I have cased one of Becca's cards - you can see her original HERE.


'Romancing the Swirl Collection by Becca Feeken is full of curl and swirl motifs that connect them to elements worthy of decoration and card making. This collection is a welcome addition to and matches well with her other collections in the Amazing Paper Grace line'. - Spellbinders

1. Cut/emboss one Trefoil Crest Etched Dies using Gold card stock and the Platinum Die Cutting Machine.
2. Cut/emboss one Hemstitch Squares Etched Dies using Anna Griffin Inc. patterned paper and the two largest dies. Note: it is advisable to use repostional tape to prevent the dies from moving.
3. Glue the Trefoil Crest Etched Dies to the Hemstitch Squares.

4. Cut/emboss three of the smallest die from the Sweetheart Swirl Etched Dies cream card stock
5. Cut the shank off the back of a recycled button and glue to the centre of the small Sweetheart Swirls.
6. Pop the die onto the centre of the card front using a 3D Dodz Adhesive.
7. Adhere the other two Sweetheart Swirls either side of the first using a 3D Dodz Adhesive.
8. Adhere a large white pearl to the centre of the dies.

9. Pop up the layered card front onto a slightly larger pre-cut cream card base using 3D Foam Squares.
10. Stamp the sentiment from the Graceful Tiny Tag stamp and Die set onto cream card stock, trim and pop up, slightly angled, with the left end tucked under the button.
11. Adhere small white pearls onto the top and bottom of the Trefoil Crest.


Spellbinders Products:
Other:  Cream and gold stock; Scrapbook Adhesives by 3L: E-Z Adhesive Runner, 3D Foam Squares; Small White 3D Foam Squares; Anna Griffin Inc: Lovey Layers Patterned Paper, Want2Scrap: Baby Bling - white pearls; recycled vintage button; Imagine: Memento Ink in Tuxedo Black


Thank you for your comments and all of the support you give me - you make blogging such an amazing place to be!! Your encouragement is such a blessing for me - it makes my day! God bless you!

                                                          {{{hugs}}} and happy crafting