}

Saturday, May 31, 2014

Imagine Crafts and Viva Las VegaStamps! Blog Hop

***This post will stay at the top of my Blog until the Blog Hop
Please scroll down for newer posts***

Mixed Media Blog Hop

Welcome to the IMAGINE Crafts and Viva Las VegaStamps! Blog Hop.  For the next week, our two design teams will be featuring some amazing projects featuring products from both our companies.   Amazing stamps require amazing ink, right?

Mixed Media Prize Package

We're proud to announce your chance to win one of three different Mixed Media Prize Packages from IMAGINE Crafts and Viva Las VegaStamps!  You have until midnight PST on Sunday, May 31st 2014  to comment on as many of the Design Team Blog Posts from this week as possible. On Monday, June 1st  we’ll draw three random blog posts and one comment from each of those posts will win a prize package!

Ready for some inspiration from our artists?

Here's today's posts from IMAGINE Crafts:

And from Viva Las VegaStamps!:


  If you're just joining us on the Mixed Media Blog Hop, you can go here for yesterday's list of blogs.   ***Blog Hop Hint – if you click on a link that takes you to a page saying something like, “Sorry this page cannot be found” just click on the header at the top of the blog (usually a picture or the blog’s name) and it will take you to that blog’s most recent post. That post *should* be our hop. If not, you can probably scroll down a short way to find the hop post.

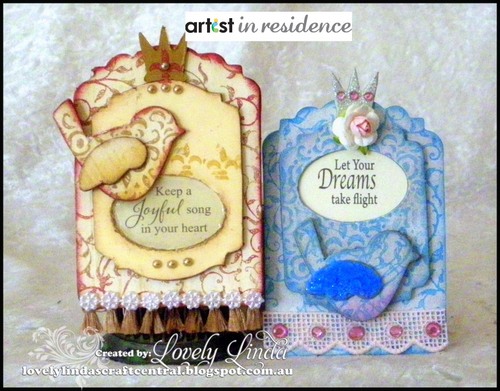
I have a project to share with you using stamps from Viva Las VegaStamps!  and  IMAGINE Crafts 
divine inks. 


Supplies:
  • Imagine Crafts/Tsukineko: Memento™ Dye Ink in Bamboo Leaves, Dandelion and Tangelo; Sponge Daubers
  • Viva Las VegaStamps! - stamp set
  • Spellbinders:  S5-192 Diamond Effects Nestabilities® Card Creator dies; S4-114 Standard Circles Nestabilities®; ES-013 Harlequin Spellbinders® M-Bossabilities™ folder;  GC-001 Grand Calibur® Machine  
  • Maya Road - Vintage Flowers - white
  • Miscellaneous: liquid glue, Want2Scrap bling - Swirls Finesse  - Black Rhinestone 72 Count - Brown Rhinestone - Self Adhesive; Scrapbook Adhesives by 3L E-Z Runner, dimensional foam squares, paper roses,  cardstock (cream and green); SRM Stickers
Directions:


Step 1. Cut circle using Stand Circles Die
Step 2. Adhere Circle mask to white card
Step 3. Sponge lower portion using Bamboo Leaves and a Sponge Dauber
Step 4. Sponge Upper portion using Dandelion and a Sponge Dauber


Step 5.Tear a piece of cardstock and lay across the sponged circle
Step 6. Sponge using Tangelo Ink and a Sponge Dauber - using torn card as a mask.
Step 7. Repeat this step across the yellow portion of the circle, until the desired effect is achieved.


Step 8. Attach Tack'N Peel to the acrylic Block
Step 8. Attach unmounted stamp to Tack 'N Peel
Step 9.  Stamp the image across the sponged circle using Onyx Black ink.
Step 10. Cut image to size
Step 11. Adhere to pre-made Easel card
Step 12. Add Swirls Finesse to top left corner
Step 13. Adhere Maya Rd flowers at the top of the flourish
Step 14. Cut long patterned edge from Diamond Effects and adhere to right side of the image.
Step 15. Adhere patterned paper top base of card
Step 16. Add a 2cm strip across the center - popping up on foam tape
Step 17. Adhere SRM Stickers Sentiment onto white card and cut around.
Step 18. Adhere the sentiment to Diamond Effects ta.g using 3D Foam Squares
Step 19. Adhere to middle strip using sided tape.
Step 20. Attach flower using liquid glue, followed by Swirls Finesse at right side of tag.
Step 21. Cut long patterned edge from Diamond Effects and adhere to lower edge of the raised portion of the base.E
Step 22. Add bling along the Diamond Effects edge as shown in the main photo.


Thank you for your comments and all of the support you give me - you make blogging such an amazing place to be!! Your encouragement is such a blessing for me - it makes my day! God bless you!

{{{Hugs}}}
Follow on Bloglovin

Blooms in Pink

Hello there Blog Friends - today's card has been created using some fabulous paper that comes with the beautiful image gold embossed on it - the name escapes me, but I will come back and add it!


 I have coloured the image using IMAGINE Crafts Radiant Neon in Electric Pink, Electric Green, Electric Yellow and Electric Orange, these have been applied using Sponge Daubers.


I have added extra depth just by adding another layer of ink - it is so effective.  A double Seam Binding bow has been added seam binding across the lower portion of the card, a paper rose added and a bling border from Want2Scrap has been added along the seam binding.  Scrapbook by Adhesives by 3L - E-Z Runner have been used on this card.


This card is linked to the following challenges:
 A Creative Need - Mother's Day/ For a Woman 
 A Creative Romance - Girly Creations 
Crafty Catz - Anything Goes 
Sister Act Card Challenge - Anything Goes 
Stampin' For The Weekend - For The Girls
Artbymiriam Challenge - Anything Goes
QKR Stampede Challenge - Baby, Spring or Celebration
 4 Krafty Girlz - Anything Goes
Dream it Up - Flora and Fauna 
In the Pink - Shabby Chic/Vintage 
Paper Crafting Journey - Perfect in Pink 
Crafty Creations - Use something that begins with "S" (Seam Binding)
Hambo Hoedown - Flowers 
Simon Says Stamp - Anything Goes

Thank you for your comments and all of the support you give me - you make blogging such an amazing place to be!! Your encouragement is such a blessing for me - it makes my day! God bless you!

{{{Hugs}}}
Follow on Bloglovin

Thursday, May 29, 2014

Caged Bird

Hello Blog Friends - thanks for stopping by today - it is always nice to know you have 'visited!' I m sharing a card today created with the free Prima stamp set that came with Australian Simply Cards #67 - for me it was 'love at first sight' and I may or may not have gone crazy stamping of images LOL!


The background white card is embossed using the Cabbage Roses Spellbinder® M-Bossabilities™ folder and the  Spellbinders Grand Calibur® Machine.  I have sponged the embossed cabbage roses using IMAGINE Crafts®/Tsukineko® Memento Luxe™ Mixed Media Pigment Ink in Rhubarb Stalk, using a Sponge Dauber


You can see the depth of the sponging in this close up - it adds such a lovely touch to this feminine card.  Lindy Glitz has been added to the 'bling' at the bottom of the birdcage, for added shimmer, this has been layered onto the Fancy Tags Two Spellbinders® Shapeabilities®, followed by the embossed layer.  All layering has been done using Scrapbook by Adhesives by 3L - 3D Foam Squares.  The brown patterned frame layer is from Prima.


The bling is Want2Scrap 72Count - Pink Rhinestone - Self Adhesive.  Finishing off with a bunch of roses - it does not get more feminine than this.


This card is linked to the following challenges:
 Craft Room Challenge - Things With Wings
Creative Card Crew - Shabby Chic/Vintage  
Party Time Tuesdays - Anything Goes 
Through The Craft Room Door - Always Anything Goes
Lawnscaping Challenge - Distressing 
Artistic Inspirations - Anything Goes / Things with Wings 
Craft Your Passion - Frame It 
Created With Love Challenges - Lots of Layers 
My Craft Creations - Always Anything Goes 
Use Your Stuff - Bling 
Come and Get It Lots of Layers
  The Corrosive Challenges  Anything Goes 

Thank you for your comments and all of the support you give me - you make blogging such an amazing place to be!! Your encouragement is such a blessing for me - it makes my day! God bless you!

{{{Hugs}}}
Follow on Bloglovin

Tuesday, May 27, 2014

Spellbinders Tuesday Video Tutorial - Fun in the Sun/Memorial Day

 Tuesday comes so quickly and that means it is Tuesday Video Tutorial Time on the Spellbinders Blog - this week the theme is Fun in the Sun/Memorial Day.


I would love you to pop over and check it out and leave me a comment letting me know what you think - you can see it HERE
 
Thank you for your comments and all of the support you give me - you make blogging such an amazing place to be!! Your encouragement is such a blessing for me - it makes my day!  God bless you!

{{{Hugs}}}
 

Monday, May 26, 2014

Butterfly Blues

Today's card is created using Labels Twenty-Eight, along with the Lacey Circles Spellbinders® Nestabilities


 Both Dies have been cut/embossed using the Grand Calibur® Die cutting and Embossing Machine. 


The handmade flower has been created using Standard Circles LG Spellbinders® Nestabilities in mixed sizes.  The circles are made using textured paper and have been sponged using
IMAGINE Crafts®/Tsukineko® Memento™ Dye Ink in Espresso Truffle.


The butterfly from Penny Black Inc. Social Butterfly stamp set has been stamped using IMAGINE Crafts®/Tsukineko® VersaFine™ Archival Pigment Ink in Vintage Sepia.  The gorgeous bling is from  Want2ScrapScrapbook by Adhesives by 3L - 3D Foam Squares and E-Z Runner have been used on this card.


This card is linked to the following challenges:
Penny Black and MoreMay – Anything Goes 
Dream Valley Challenge - Things With Wings 
Dragonfly Dreams Challenge - How Does You Garden Grow 
Come and Get it Challenge - Lots of Layers 
Amusing Challenges - Anything Goes 
Sentimental Sundays Challenge - Things with Wings 
Lacy Sunshine Challenge - Dies or Punches 
Artistic Inspirations Challenge - Anything Goes with Twist of Wings 
Scrapbook Stamp Society Challenge - Anything Goes Option Spring 
My Craft Creations - Anything Goes 
Created With Love Challenge - Lots of Layers 
Cards In Envy - Things with Wings 
The Corrosive Challenges - Anything Goes (week 1)
 One Stitch At A Time -  Anything Goes

Thank you for your comments and all of the support you give me - you make blogging such an amazing place to be!! Your encouragement is such a blessing for me - it makes my day! God bless you!

{{{Hugs}}}
Follow on Bloglovin

Sunday, May 25, 2014

Filigree Heart with Bling

Using up left over craft supplies and extra Spellbinders Die cuts is always fun - and definitely make creating easy - and there are times we need it to be quick and easy - or is that just me??


 I have used the beautiful and elegant A2 Filigree Delight Spellbinders® Nestabilities® Card Creator designed by the lovely Becca Feeken - who I had the privilege of rooming with in Phoenix - don't worry Becca - what happened in Phoenix stays in Phoenix!! LOL

I have also layered the Classic Scalloped Heart and  Classic Heart Spellbinders® Nestabilities
Vines of Passion Spellbinders® Shapeabilities® Die D-Lites™.


The layered hearts have been topped using Want2Scrap bling.  Scrapbook by Adhesives by 3L - 3D Foam Squares and E-Z Runner have been used on this card.


This card  is for the following challenges:
Brown Sugar –  Anything Goes 
Sister Act Card Challenge - Anything Goes  
4 Krafty Girlz - Anything Goes
Divas by Design - Anything goes 
ABC Challenge - L is for lots of layers 
 Die Cut Divas Use at least one Embellishment 
Crafting from the Heart - W, E3 - Always Anything Goes 
Love to Scrap - Anything Goes
My Craft Creation - Anything Goes
Created With Love Challenge - Lots of Layers
Artistic inspirations Challenge - Anything Goes Plus Use Punches/ Dies

I will be back a little bit later as I am taking part in Day 2 of this amazing Blog Hop - and you are invited to play along!

Mixed Media Blog Hop

Thank you for your comments and all of the support you give me - you make blogging such an amazing place to be!! Your encouragement is such a blessing for me - it makes my day! God bless you!

{{{Hugs}}}
Follow on Bloglovin

Friday, May 23, 2014

Imagine Crafts and Stampendous Blog Hop


***This post will stay at the top of my Blog until the Blog Hop
Please scroll down for newer posts***


Stampendous and Imagine Crafts Header


Welcome to a week of fantastic collaboration between IMAGINE Crafts and Stampendous! We have to admit that our two companies were made for each other and we're proud to have shared a long relationship of working together.  After all, what are stamps with out ink?  The projects created by our artists this week feature IMAGINE Crafts Radiant Neon™ inks paired perfectly with coordinating colors of Fran•táge Color Fragments from Stampendous, along with some of their newest stamp designs and Stack Art kits.

Prizes galore for participating in the Blog Hop this week!


We'll be giving three prize packages of 3 Radiant Neon inks and 3 Fran•táge Color Fragments (we'll choose your colors). There will be a bright crafting future ahead of you!  Each day we’ll post that day's participating artists.  Visit their blog and leave a comment by midnight PST May 25th.  We ‘ll randomly select three different blogs from the five days, then randomly draw one commenter from each blog. You must have a U.S. mailing address to win, but we’d love for everyone to hop and comment! You can check out the Official Rules for all our contests if you have questions. So are you ready for some exciting inspiration? Here's who is hopping today:

Kristine Reynolds

Isha Gupta

Tobi Crawford

Penny Ward

Janelle Stollfus

Linda Lucas

Tina McDonald

***Blog Hop Hint – if you click on a link that takes you to a page saying something like, “Sorry this page cannot be found,” just click on the header at the top of the blog (usually a picture, or the blog’s name), and it will take you to that blog’s most recent post. That post *should* be our hop. If not, you can probably scroll down a short way to find the hop post.


Supplies:
  • IMAGINE Crafts/Tsukineko: Radiant Neon Pigment Ink in Electric Blue; Craft Mat; Memento Luxe™ Mixed Media Pigment Ink in Wedding Dress; Sponge Daubers™
  • Stampendous -
  • Want2Scrap: 72 Count - Pink Rhinestones - Self Adhesive
  • Other: Scrapbook Adhesives by 3L E-Z Runner, 3D Foam Squares, Pink Lace, Paper Rose, Kindy Glitz/Liquid Glue, Liquid Glue
Method:


Step 1. Using Wedding Dress and a Sponge Dauber, ink the Chipboard on the front and edges

2014-04-022 2014_May_LL_Stampendous_Step 2

Step 2. Using Electric Blue stamp the chipboard using the
Step 3. Use a sponge Dauber and Electric Blue and sponge around the edges of the bird and wing.

2014-04-023 AIR_ 2014_May_LL_Stampendous_Step 3

Step 4. Adhere matching adhesive shape to the wing and cover with  Blue Color Fragments
Step 5. Apply liquid glue and add more Fragments, apply a little pressure to ensure they stick.
Step 6. Adhere the wing to the bird using liquid glue

2014-04-024 AIR_ 2014_May_LL_Stampendous_Step 4

Step 7. Cut out sentiment from the sheet
Step 8. Adhere to the back of the oval cut out
Step 9. Adhere the larger stamped chipboard
Step 10. Adhere lace to the lower portion of the large chipboard

2014-04-025 AIR_ 2014_May_LL_Stampendous_Step 5

Step 11. Attach the bird under the sentiment using liquid glue
Step 12. Cover the crown with liquid glitter
Step 13. Adhere paper rose using liquid glue
Step 14. Adhere bling to the crown and along the lace.

AIR 2014_May_LL_Stampendous_Main_Brown x2 wm

I make sure you leave your comment below so that you can be entered into the contest for the great prize package.

Thank you for your comments and all of the support you give me - you make blogging such an amazing place to be!! Your encouragement is such a blessing for me - it makes my day! God bless you!

{{{Hugs}}}
Follow on Bloglovin

Bees, Nestabling and more with Want2Scrap


 I have a card LIVE on the Want2Scrap Blog - using a lot of my favourite things - you can see the full project and details HERE.  I would love you to pop over and check it out - and let me know what you think!


Thank you for your comments and all of the support you give me - you make blogging such an amazing place to be!! Your encouragement is such a blessing for me - it makes my day! God bless you!

{{{Hugs}}}