}

Monday, December 30, 2019

Adorable Vintage Snowmen

Hello friends, welcome and thanks so much for stopping by. For those of you who have been wondering where I have been - it has been a challenging time in the lead up to Christmas - more than usual.  My brother had a massive cardiac arrest and only survived thanks to a Specialist being on hand in the ER - he had a stent and a pacemaker fitted and just when we started to relax - only a couple of days later he had another - thankfully they feel they have dealt with the problem and he is going well at this time...so....that was a little stressing not to mention distracting.  There has also been a very tragic loss in our extended family - heartbreaking!  Our adorable Grandson has been staying on a regular basis and I love that but it does mean time in the Studio is very limited - if at all...I am blessed to be able to be so 'present' in his little life -so am not complaining - but seriously -roll on 2020!!


In the meantime I have managed to create something - a gorgeous vintage Snowman - Sallianne McClelland shared these with us at a 'It's Almost Christmas Getaway' which I was privileged enough to teach at as well.  You can click on the above link and see some photos.  The original designer of these adorable Snowmen is Sue Pelletier . I can take no credit in any way for designing these - I was inspired by her beautiful work and added my own touches.


I have used a recycled Jam jar, recycled Sari Ribbon,vintage buttons and lots of embellishments from my stash!!


The Owl on the branch is made with Air Dry Clay and has been coloured using Chameleon Pens I added two owls as I created this for a gift and our friend whooooo loves owls!! LOL!  The sentiment is from an older Kaisrcraft Christmas Collection - although it is a sticker I glued it onto the jar - sure to make sure it doesn't go anywhere!


I may be a little addicted to these Snowmen - but can you blame me!! The three in the photo take pride of place in our Christmas cupboard - the two in the left were made by me and the one of the right was gifted to me  by Sallianne after the Workshop!


These snowmen are linked to the following challenges:
Allsorts - Anything Goes
Crafting by Design - Anything Goes
Just Us Girls - Anything Goes 
Crafter's Castle Anything Goes
The Paper Shelter - Anything Goes
613 Avenue Create - Anything Goes w/Optional Twist: Doodling or Zentangle
International Art & Soul Anything but a Card 
Brown Sugar - Anything Goes
A Vintage Journey HOLLY JOLLY CHRISTMAS 
Pixie's Crafty Workshop - Anything Goes using snippets
Aud Sentiments Challenge - Christmas/Winter + ASentiment
Word Art Wednesday - Anything Goes
Crafty Gals Corner - Tis the Season
Everybody-Art-Challenge - Winter Landscape or Christmas Color

Thank you for your comments and all of the support you give me - you make blogging such an amazing place to be!! Your encouragement is such a blessing for me - it makes my day! God bless you!
                                                          {{{hugs}}} and happy creating

Wednesday, December 18, 2019

Layered Butterflies

Hello friends - welcome and thank you for stopping by! I have a simple and pretty card t share with you today using patterned papers from a publication and I have to say it was so-o-o quick and easy to put together!


For the purple card the Layered Butterflies have been cut/embossed using Spellbinders Dies and the body glued, and the wings popped up using Scrapbook Adhesives BY 3L 3D Foam Squares.  A  narrow strip of pattered paper has been adhered to the left side of the card front using Scrapbook Adhesives BY 3L E-Z Adhesive Runner. Next the layered card front has been adhered to a slightly larger white card front that has had the corners rounded.  The computer generated sentiment has been adhered across the lower portion of each butterfly.


For the yellow card the card front has been cut/embossed using an older Spellbinders Etched Die.  The Layered Butterflies have been cut/embossed using Spellbinders Dies and the body glued, and the wings popped up using Scrapbook Adhesives BY 3L 3D Foam Squares onto the centre of the  card front. The embossed pattern around the frame has bee sponged using Imagine Memento Ink in Dandelion. Next the layered card front has been adhered to a slightly larger white card front that has had the corners rounded.  The computer generated sentiment has been adhered across the lower portion of the card front.  Pink sequins have been randomly added to the card front.

As you can see - there is lots of dimension but it is still not too bulky for posting - and that is something we need to keep in mind these days.  


This card is linked to the following challenges:
Digi Choosday Challenge - Anything Goes
Lemon Shortbread - Always Anything Goes
613 Avenue Create - Anything Goes w/Optional Twist: Doodling or Zentangle
The Corrosive Challenges - Always Anything Goes
A Gem of a Challenge - Anything Goes 
Just Us Girls - Anything Goes
The Corrosive Challenges - Always Anything Goes
A Gem of a Challenge - Anything Goes
Crafter's Castle Anything Goes 
2 Crafty Critter Crazies - Anything Goes with a Critter
DL.Art Linky Challenge - Always Anything Goes
Not Just Cards - Always Anything Goes

Thank you for your comments and all of the support you give me - you make blogging such an amazing place to be!! Your encouragement is such a blessing for me - it makes my day! God bless you!
                                                          {{{hugs}}} and happy creating

Sunday, December 15, 2019

Art Journal - Grow Where You are Planted

Hello friends, thanks so much for stopping by.  I have been on a run of  Art Journaling lately - it is my wind down time in the evenings, once everyone is in bed. As I have mentioned with each page - we are all on a journey, whether it is art, faith, health or something else.  This one came together easily - I love that part of it - just feels right. I am sure as I go along that will change - but in the meantime I am enjoying the process and looking forward to learning and evolving...


My pages have been created using recycled cardboard.  It is very simple, starting with recycled patterned paper adhered to the page using Scrapbook Adhesives by 3L E-Z Adhesive Runner.  Lots of layers have been added but it is still not bulky - one of the reasons I love Scrapbook Adhesives by 3L 3D Foam Squares.  The page has been sponged around the edges using white paint.


The floral image is from Uniquely Creative and has been coloured using Chameleon Pens and a white Gel Pen; next it has been Die cut with co-ordinating dies and glued to an inked panels. This has been adhered to the layered journal page. The eclectic sentiment has been created using Alphabet stickers from my stash - you know the ones we put aside thinking we will use them one day - I am sure we all have those - or is it just me!?! LOL!  The butterfly wings each side of the floral panel are on the recycled packaging and and too pretty to cover up.  Details have been added to the wings and other areas of the page using a White Gel Pen and smaller wings have been layered up to give a little dimension.

 The Tim Holtz Paper Doll is part of a very generous RAK I received and has had butterfly wings adhered behind her using Scrapbook Adhesives by 3L E-Z Adhesive Runner.  This has then been glued to the bottom left hand corner of the floral panel. The Texture Paste is from Little Birdie Crafts and has been used with  homemade stencil - one I cut using an Older Spellbinders Die cut and a Cereal box.  A few yellow splatters were added using Imagine sprays.  

I just love this journal created using recycled cardboard - I have great plans for it .... hope you join me as I continue this journey!


This project is linked to the following challenges:
A Bit More Time to Craft - Always Anything Goes
A Perfect Time To Craft - Always Anything Goes
Crafty Hazelnut's Patterned Paper - Anything Goes with Patterned Paper
DL.Art Linky Challenge - Always Anything Goes
Mix It Up Challenge - Anything Goes + optional: Veggie Stamping
Not Just Cards Always Anything Goes
World Wide Open Design Team Challenge - Always Anything Goes
Brown Sugar -  ANYTHING GOES
Crafty Catz - ANYTHING GOES OPTIONAL TWIST: BLUE CHRISTMAS
Creative Fingers - ALWAYS  ANYTHING GOES 
QKR Stampede - ALWAYS ANYTHING GOES
 Crafting With An Attitude - Always Anything Goes
Crafty Creations - Always Anything Goes 
Lavinia World Challenges - Anything Goes Using Rubber Or Clear Stamps
Everybody-Art-Challenge - Anything Goes 
Lemon Shortbread - Always Anything Goes
Word Art Wednesdays - Anything Goes


Thank you for your comments and all of the support you give me - you make blogging such an amazing place to be!! Your encouragement is such a blessing for me - it makes my day! God bless you!
                                                          {{{hugs}}} and happy creating

Friday, December 13, 2019

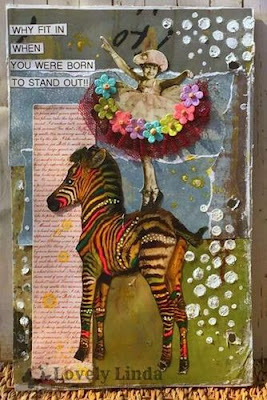
Art Journal - Why Fit In

Hello friends, thanks so much for stopping by.  Today I am sharing another page from my Art Journal - as I have mentioned with each page - we are all on a journey, whether it is art, faith, health or something else.  This one came together easily - I love that part of it - just feels right. I am sure as I go along that will change - but in the meantime I am enjoying the process and looking forward to learning and evolving...


This page has been created using recycled cardboard.  It is very simple, starting with patterned paper adhered to the page using Scrapbook Adhesives by 3L E-Z Adhesive Runner.  Lots of layers have been added but it is still not bulky - one of the reasons I love Scrapbook Adhesives by 3L 3D Foam Squares.  The page has been sponged around the edges using white paint.

The Zebra is recycled from an old birthday card and has been coloured using Chameleon Pens and a white Gel Pen; next it has been fussy cut (hand cut out using scissors) and glued to the layered journal page.  The Tim Holtz Paper Doll is part of a very generous RAK I received and has been adhered using Scrapbook Adhesives by 3L E-Z Adhesive Runner. A narrow strip of maroon tulle has been gathered and glued around the bottom of the dress/tutu and flowers from Little Birdie Crafts glued along the join.

The computer generated sentiment has been trimmed, inked around the edges using a Black Marker and glued to the top left corner of the page.  The Texture Paste is from Little Birdie Crafts and has been used with  homemade stencil - one I cut using an Older Spellbinders Die cut and a Cereal box.  A few Yellow splatters were added using Imagine sprays.  

I just love this journal created using recycled cardboard - I have great plans for it .... hope you join me as I continue this journey!


This card is linked to the following challenges:
Crafting By Designs - Anything Goes
Crafty Creations - Always Anything Goes
Creative Moments - anything goes
Ellibelle's Crafty Wednesday - Creatures Great and Small
Word Art Wednesdays - Anything Goes
Everybody-Art-Challenge - Anything Goes
Lemon Shortbread - Always Anything Goes 
The Corrosive Challenges Always Anything Goes
We Love 2 Create - Always Anything Creative/Mixed Media Goes
DL.Art Linky Challenge - Always Anything Goes
Not Just Cards - Always Anything Goes

Thank you for your comments and all of the support you give me - you make blogging such an amazing place to be!! Your encouragement is such a blessing for me - it makes my day! God bless you!
                                                          {{{hugs}}} and happy creating

Wednesday, December 11, 2019

Embossed One of Kind

Hello friends, thanks so much for stopping by.  I am sharing a card using one of the Spellbinders Cut and Emboss Folders - Floret Cluster  The more I use these folders the more I see how amazingly detailed they are, so quick and easy to use and timeless!


Cut/emboss the Floret Cluster using Kaisercraft patterned paper and the Platinum 6 Die Cutting and Embossing Machine - 6" Platform.  Sponge the embossed pattern using Imagine Radiant Neon inks in Electric Yellow, Electric Pink, Electric Yellow and Memento Ink in Teal Zeal. Back the die cut areas using pink card stock. 

Stamp both the One of a Kind image using Imagine Memento Ink in Tuxedo Black ink; Cut/emboss the image using the co-ordinating Die.  Colour using Chameleon Color Tone Pens.  Pop up the image onto the centre of the card front using 3D Foam Squares.  Adhere the layered card front to the pre-cut slightly larger pink card base using Scrapbook Adhesives BY 3L E-Z Adhesive Runner 


This card is linked to the following challenges:
Everybody-Art-Challenge - Anything Goes
Lemon Shortbread - Always Anything Goes 
Colouring in Scrapland - ANYTHING GOES OPTION CHRISTMAS
613 Avenue Create - Anything Goes w/Optional Twist: Doodling or Zentangle 
Lil Patch of Crafty Friends - Always Anything Goes
My Besties Spanish Challenge - Always Anything Goes
Stamping Sensations - Anything Goes
The Corrosive Challenges - Always Anything Goes
Crafty Hazelnut's Patterned Paper Anything Goes with Patterned Paper
Creatalicious Challenges Anything Goes + optional Winter

Thank you for your comments and all of the support you give me - you make blogging such an amazing place to be!! Your encouragement is such a blessing for me - it makes my day! God bless you!
                                                          {{{hugs}}} and happy creating

Sunday, December 8, 2019

Happy Birthday Mandala

Hello friends, welcome and thanks so much for stopping by!  Happy Sunday - it is a lazy-ish one for me - well as lazy as it can be with the 4 year old Grandson having sleepovers!! LOL!  Needless to say - we all sleep well at night! Wink:wink!!


Today I m sharing a card with you that was created using one piece of Kraft paper with a gold Mandala on it - I wanted to highlight the Mandala and sponged it using Imagine Memento Ink in Teal Zeal, followed by Dandelion and Tangelo inks around the outside of  the Mandala.  I have inked  all of the edges using Teal Zeal Ink as well.  The sentiment is from the Spellbinders Stamp and Co-ordinating Die set.  White and Blue Paint pens have been used around the Mandala and Want2Scrap bling added to the centre.

The completed card front has been popped up onto a slightly larger card front using Scrapbook Adhesives BY 3L 6" x 4" Adhesive Foam Sheets - it gives dimension but not as much as 3D Foam squares.


This card is linked to the following challenges:
A Gem of a Challenge - Anything Goes
QKR Stampede Challenge - Anything Goes
Creative Fingers Challenge - Anything Goes
Brown Sugar -  ANYTHING GOES
Crafting By Design  - Anything Goes
Paper Shelter - Birthday/Celebrations
Lemon Shortbread - Anything goes
Creatalicious Challenges - Anything Goes + optional Winter
Arty Diva's Challenge - Anything Goes
DL.Art Linky Challenge - Always Anything Goes
Digi Chooseday - Anything Goes
Sognando Scrap - Anything Goes
Word Art Wednesday - Anything Goes
World Wide Open Design Team Challenge - Always Anything Goes 

Thank you for your comments and all of the support you give me - you make blogging such an amazing place to be!! Your encouragement is such a blessing for me - it makes my day! God bless you!

                                                          {{{hugs}}} and happy crafting


Thursday, December 5, 2019

Fancy Fold Card - On Your Special Day

Hello friends - welcome and thank you for stopping by!  I was given these gorgeous images and papers from a friend - they are from a publication and I have to say it was so-o-o quick and easy to put together - simply elegant!  I am surprised just how many cards I have made with them - this time  I am sharing a fancy fold card using the 1009 Twist Panel Pop-Up - Karen Burniston.


Cut a card base and score half way; fold the card stock into an A-frame card base. Decorate the card front,  I have used two free papers from Publications - adhering to the pre-cut white card base using Scrapbook Adhesives BY 3L E-Z Adhesive Runner Ultra. The gorgeous Bling is from Want2Scrap and has been trimmed to adhere along the top of the sentiment.


I have used Scrapbook Adhesives BY 3L E-Z Adhesive Runner Ultra and 3D Foam Squares, along with Kaisercraft Collectibles.  Decorate the panels using the Collectibles and Little Birdie Crafts flowers.  The sentiment is from the Karen Burniston Die Word Set #2 Birthday.

You can find Karen's video HERE


This card is linked to the following challenges:
Crafting By Designs - Anything Goes 
Crafty Creations - Always Anything Goes 
Paper Shelter - Birthday/Celebrations
The Paper Funday Anything Goes/Optional Christmas
Word Art Wednesdays - Anything Goes 
613 Avenue Create - Anything Goes w/Optional Twist: Doodling or Zentangle
Lil Patch of Crafty Friends - Always Anything Goes
My Besties Spanish Challenge - Always Anything Goes
Crafter's Castle Anything Goes
Crafty Friends Challenge - Anything Goes
Just Us Girls - Anything Goes
Creative Fingers - ALWAYS  ANYTHING GOES
QKR Stampede ALWAYS ANYTHING GOES

Thank you for your comments and all of the support you give me - you make blogging such an amazing place to be!! Your encouragement is such a blessing for me - it makes my day! God bless you!
                                                          {{{hugs}}} and happy creating