}
Showing posts with label handmade embellishment. Show all posts

Monday, December 30, 2019

Adorable Vintage Snowmen

Hello friends, welcome and thanks so much for stopping by. For those of you who have been wondering where I have been - it has been a challenging time in the lead up to Christmas - more than usual.  My brother had a massive cardiac arrest and only survived thanks to a Specialist being on hand in the ER - he had a stent and a pacemaker fitted and just when we started to relax - only a couple of days later he had another - thankfully they feel they have dealt with the problem and he is going well at this time...so....that was a little stressing not to mention distracting.  There has also been a very tragic loss in our extended family - heartbreaking!  Our adorable Grandson has been staying on a regular basis and I love that but it does mean time in the Studio is very limited - if at all...I am blessed to be able to be so 'present' in his little life -so am not complaining - but seriously -roll on 2020!!


In the meantime I have managed to create something - a gorgeous vintage Snowman - Sallianne McClelland shared these with us at a 'It's Almost Christmas Getaway' which I was privileged enough to teach at as well.  You can click on the above link and see some photos.  The original designer of these adorable Snowmen is Sue Pelletier . I can take no credit in any way for designing these - I was inspired by her beautiful work and added my own touches.


I have used a recycled Jam jar, recycled Sari Ribbon,vintage buttons and lots of embellishments from my stash!!


The Owl on the branch is made with Air Dry Clay and has been coloured using Chameleon Pens I added two owls as I created this for a gift and our friend whooooo loves owls!! LOL!  The sentiment is from an older Kaisrcraft Christmas Collection - although it is a sticker I glued it onto the jar - sure to make sure it doesn't go anywhere!


I may be a little addicted to these Snowmen - but can you blame me!! The three in the photo take pride of place in our Christmas cupboard - the two in the left were made by me and the one of the right was gifted to me  by Sallianne after the Workshop!


These snowmen are linked to the following challenges:
Allsorts - Anything Goes
Crafting by Design - Anything Goes
Just Us Girls - Anything Goes 
Crafter's Castle Anything Goes
The Paper Shelter - Anything Goes
613 Avenue Create - Anything Goes w/Optional Twist: Doodling or Zentangle
International Art & Soul Anything but a Card 
Brown Sugar - Anything Goes
A Vintage Journey HOLLY JOLLY CHRISTMAS 
Pixie's Crafty Workshop - Anything Goes using snippets
Aud Sentiments Challenge - Christmas/Winter + ASentiment
Word Art Wednesday - Anything Goes
Crafty Gals Corner - Tis the Season
Everybody-Art-Challenge - Winter Landscape or Christmas Color

Thank you for your comments and all of the support you give me - you make blogging such an amazing place to be!! Your encouragement is such a blessing for me - it makes my day! God bless you!
                                                          {{{hugs}}} and happy creating

Thursday, November 2, 2017

Cup of Best Wishes

Hello friends, my card today features some beautiful teacups - these stamps were a free gift with a publication, I am not sure which one - so please let me know if you do!!  I do find it hard to resist a nice china tea cup - how about you?


The image has been stamped using Imagine Memento ink in Tuxedo Black an coloured using Chameleon Pens.  It has then been fussy cut/hand cut using scissors.  This has been popped up onto the Spellbinders Nestabilities Celebrations Pierced Ovals Etched Dies using Scrapbook Adhesives BY 3L 3D Foam Squares. 


The card base has been created using thick patterned paper. Pink card stock has been embossed using the Spellbinders Flourish Stitch Em-bossing Fold'ers Quilt It by Lene Lok and is popped up onto the centre of the card base using Scrapbook Adhesives BY 3L 3D Foam Squares. 


The next layer has been cut/embossed using Spellbinders Nestabilities Breanna's Corset Label Etched Dies Chantilly Paper Lace Collection by Becca Feeken and popped up onto the layered card front.  This is followed by the layered image, also using 3D Foam Squares.  The sentiment has been computer generated and added to the right side of the cups.

Want2Scrap Beautiful Bling Borders by Nina Brackett - Beautiful Blooms have been adhered below the embossed layer.  Silver Rhinestones have been adhered to the top of the card.  A double pink seam binding bow has been glued to the left side of the Pierced Oval and a handmade butterfly embellishment glued to the centre of the bow.  The butterfly has been coloured using Chameleon Pens 


This card is linked to the following challenges:
Creates And Makes Challenge - Anything Goes
Crazy 4 Challenges - Use Pink 
Lemon Shortbread Challenge - Anything Goes
Really Reasonable Ribbon Anything Goes with Ribbon
Crafting From the Heart - Anything Goes
In The Pink Ribbons and/or Bows
Pixie's Crafty Workshop Weeks - Anything Goes using snippets

Thank you for your comments and all of the support you give me - you make blogging such an amazing place to be!! Your encouragement is such a blessing for me - it makes my day! God bless you!

{{{hugs}}} and happy crafting


Saturday, September 23, 2017

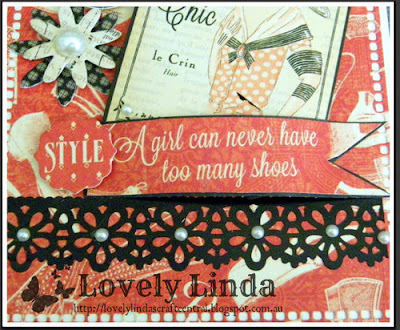
A Girl Can Never Have too Many Shoes

Hello friends, I have enjoyed a very quiet Saturday, resting (well trying to rest wink:wink) as I try and recouperate from the flu that has been going around. I am sharing a card created using Graphic 45 Couture Collection - I have had this image sitting in my stash, along with quite a few others from this  for quite some time but now is the time to get it 'happening!'


The card front has been cut/embossed using the Spellbinders Nestabilities Hemstitch Rectangles Etched Dies Venise Lace by Becca Feeken and the Platinum Die Cutting Machine.  This has been popped up onto a pre-cut card base using Scrapbook Adhesives by 3L Crafty Foam Tape.


The image has been layered onto slightly larger black matting and popped up at an angle onto the card front also using Crafty Foam Tape. Co-ordinating Chipboard embellishments have been added.

Co-ordinating Chipboard embellishments have also been added to the top of the card front.  The sentiment has been cut from the patterned paper and trimmed, a dve tail cut at the right end and layered onto slightly larger black card stock.  This has been popped up across the image using Scrapbook Adhesives by 3L Crafty Foam Tape. 

Self Adhesive Paper lace has been adhered under the sentiment and Want2Scrap™ White Pearls have been added along the paper lace 


This card is linked to the following challenges:
A Perfect Time To Craft - Always Anything Goes
Colour Crazy Challenge -  Anything Goes
Archiscraps - Use Lots of Something - patterned paper
Creative Fingers - Anything Goes  
Crafty Girls Creations Challenge - Always Anything Goes
QKR Stampede - Embossing or Anything Goes
Crafty Hazelnut's Patterned Paper - Anything Goes with Patterned Paper
Craftaholics R Us - Fall Colors
Monochrome Magic - Anything Monochrome Goes + option of Gems or Pearls
Inspiration Destination - Always Anything Goes
Not Just Cards - Always Anything Goes
Simon Says Stamp - Pop It Up
World Wide Open Design Team Challenge  Always Anything Goes
WordArt Wednesdays - Anything Goes
Little Miss Muffet Challenges -Always Anything Goes

Thank you for your comments and all of the support you give me - you make blogging such an amazing place to be!! Your encouragement is such a blessing for me - it makes my day! God bless you!

{{{hugs}}} and happy crafting

Saturday, September 9, 2017

Gorgeous Vintage Lady

Hello friends, I have enjoyed a very quiet Saturday and am popping in to share a card created using Graphic 45 Couture Collection - I have had this image sitting in my stash for quite some time but now is the time to get it 'happening!'


The card front has been cut/embossed using the Spellbinders A2 Valiant Honor Card Creator Etched Dies and the Platinum Die Cutting Machine.  This has been popped up onto a pre-cut card base using Scrapbook Adhesives by 3L Crafty Foam Tape.


The image has been layered onto slightly larger black matting and popped up at an angle onto the card front also using Crafty Foam Tape. Co-ordinating Chipboard embellishments have been added, along with a double seam binding bow.

A Handmade Paper Clay corner has been coloured using Chameleon Pens and added to the top left corner of the image. Want2Scrap Turquoise Baby Bling has been added to the centre of the flowers.


This card is linked to the following challenges:
Card Mania - Shabby Chic or Rustic
Craft-Dee BowZ - Anything Goes with a Handmade Bow
Crafty Girls Creations Challenge - Always Anything Goes
Crafty Hazelnut's Patterned Paper - Anything Goes with Patterned Paper
Create and Inspire - Anything Goes + optional Summer Theme
Love to Craft - Anything Goes
Tinker- Dream - Anything Goes
Crafting-With-Friends - Anything Goes
Creative Fingers - Anything Goes 
Crafty Gals Corner - Favorite Colors
Lemon Shortbread - Always Anything Goes
Retarte - Anything Goes

Thank you for your comments and all of the support you give me - you make blogging such an amazing place to be!! Your encouragement is such a blessing for me - it makes my day! God bless you!

{{{hugs}}} and happy crafting

Saturday, June 17, 2017

Kaleidoscope Memories

Hello friends - it is Saturday evening here and I have had a little time to play in The Studio -' just because' - I love these times because I can use some of the things I have put aside to use one day...and then they become UFOs - unfinished objects - you know what I mean - or is it just me?!? LOL!


I have used the Spellbinders Shapeabilities Geo Steps Kaleidoscope by Lene Lok Etched Dies as my starting place.  It has been cut/embossed using the Platinum 6 Die Cutting and Embossing Machine and glued onto some patterned paper using liquid glue.  The patterned paper has been trimmed using scissors.  This in turn has been adhered to a card front, using Graphic 45 paper.


A row of lace has been adhered along the join of the patterned papers and a flower from Kaisercraft popped up on Scrapbook Adhesives by 3L 3D Foam Squares to the centre of the patterned paper panels.  I have added a light touch of blue to the centre of the flower - using Imagine Memento Ink in Summer Sky.    72 Count - White Pearls have been adhered along the lace trim - wither side of the flower.


A double seam binding bow has been glued to the left of the flower and a handmade embellishment glued to the centre of the bow,  The Kaisercraft sentiment has been popped up onto the bottom right hand corner of the card.


This card is for the following challenges:
Brown Sugar  - Anything Goes
Creative Fingers - Anything Goes  
Inspiration Destination - Anything Goes 
Crafty Creations Challenge - Anything Goes
Mod Squad Challenge - Square Card
Scrapy Land Challenge - Anything Goes using a die cut
The Sisterhood Of Crafters - Use Your Imagination
Lemon Shortbread - Always Anything Goes
The Crafty addicts Challenge - Anything Goes - Optional Use Die Cuts
The Crazy Challenge - USE FLOWERS 
The Corrosive Challenges Always Anything Goes
The Ribbon Girls - Any Image + ribbon

Thank you for your comments and all of the support you give me - you make blogging such an amazing place to be!! Your encouragement is such a blessing for me - it makes my day! God bless you!

                                                                          {{{hugs}}} and happy crafting