}
Showing posts with label Lene Lok. Show all posts

Monday, February 11, 2019

Spellbinders Chinese Knot Frame Tutorial

Hello friends - welcome and thank you for stopping by! I am delighted to be sharing a tutorial for Spellbinders using another Die from the Spellbinders Destination China Collection by Lene Lok.  I am mixing it up a little with both the Dies and the colours and am very happy with the outcome.  


'From detailed frames to intricate accents to beautiful lanterns, Destination China Collection by Lene Lok is a wonderful grouping of Asian inspired elements to bring an exotic flair to your projects.' -Spellbinders

1.Cut/emboss four Chinese Knot Frame Etched Dies using the both the second largest die, along with the insert and white card 
2.Adhere two dies together using by overlapping the inlaid rectangles on one side.  Repeat this with the remaining two dies.
3.Glue the two sets of die cuts together in the same way as above.

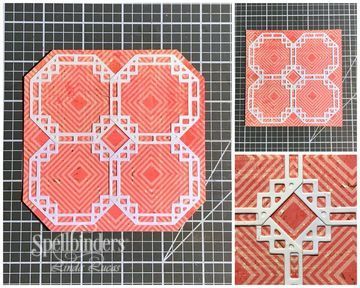
4. Adhere to patterned paper, trim abut the edges leaving approx 1/4cm around each edge.
5. Trim each corner diagonally leaving 1/4cm border of patterned paper.
6. Pop up onto a slightly larger white pre-cut card base using 3D Foam Squares.


7. Hand cut four (4) lanterns from the patterned paper, going around the edges using the Wink of Stella in Gold.
8. Adhere the larger lantern onto the centre of the left side of the card using double sided tape, followed by the smaller lantern using 3D Foam Squares - as shown in the photos above. 
9. Repeat on the right side, next sure a gold gel pen to draw string from each lantern to the  inside of the white patterned frame - as shown in the photos above.
10. Stamp the sentiment from the 100% Sweet Sentiments Clear Stamps onto white card stock using black ink.
11. Cut/emboss using the smallest die from the A-2 Matting Basics B Card Creator Etched Dies.
12. Use the Die as a stencil, sponging inside the cutting edges using Sea Breeze Ink.
13. Remove from the die and pop up across the lower portion of the Chinese Knot Frame using 3D Foam Squares.
14. Randomly add faux enamel dots using the Pico Embellisher in Shimmer.

Spellbinders Products:
Other:  White, Black and Gold card stock; Kaisercraft  Konechewha patterned paper;Scrapbook Adhesives by 3L: E-Z Adhesive Runner, 3D Foam Squares; liquid glue; Imagine: VersaMagic ink in Sea Breeze, irRESISTibles Pico Emebllisher in Shimmer; Gold Gel Pen; Wink of Stella - Gold; 

Thank you for your comments and all of the support you give me - you make blogging such an amazing place to be!! Your encouragement is such a blessing for me - it makes my day! God bless you!

                                                          {{{hugs}}} and happy crafting

Monday, January 14, 2019

Spellbinders Shine Bright Tutorial

Hello friends - thanks so much for stopping by! I am delighted to be sharing a card created using the the Spellbinders Destination China Collection by Lene Lok.  I have kept to the more traditional colours of black, red and gold but am going to play around using other colours too - these detailed dies are adorable with so much potential.


'From detailed frames to intricate accents to beautiful lanterns, Destination China Collection by Lene Lok is a wonderful grouping of Asian inspired elements to bring an exotic flair to your projects.' -Spellbinders

1.Cut/emboss one Etched Lanterns #1 using cream card stock.
2.Adhere red patterned paper to the main part of the lantern, trim and glue together. 

3.Cut/emboss one Etched Lanterns #2 using white card stock.
4. Use the Die as a stencil and sponge the open areas using Red ink and a sponge dauber
NOTE:  Use a damp cloth or baby wipe to clean the ink from the die.

5. Overlap Etched Lantern #1 half way across Etched Lantern #2 and pop up using 3D Foam Squares.

6. Adhere the Etched Lanterns onto black card.
7. Emboss the Captured Sentiment using VersaMark Ink, Gold Embossing Powder and a Heat Tool.

8. Cut/emboss one Water Lilies Decorative Element using the largest Die and gold card stock.
9. Pop up the layered card front onto the gold layer using 3D Foam Squares.
10.Adhere to a slightly larger white pre-cut card base using double sided tape.
11.Add a piece of gold thread under the Lantern Tops, securing with a know at each side.


Spellbinders Products:
Other:  White, Black and Gold card stockScrapbook Adhesives by 3L: E-Z Adhesive Runner, 3D Foam Squares; liquid glue; Imagine: Sponge Daubers; Gold Thread

Thank you for your comments and all of the support you give me - you make blogging such an amazing place to be!! Your encouragement is such a blessing for me - it makes my day! God bless you!

                                                          {{{hugs}}} and happy crafting

Monday, December 17, 2018

Spellbinders Do You See What I See Tutorial

Hello friends - thank you for stopping by! Today I have a tutorial to share for Spellbinders - created using the Destination China Collection by Lene Lok - I have created not one but three cards using this fabulous Die, each one using a different technique to show how versatile it is - it was so easily done - as you will see as you follow along with the Tutorial.


Shapeabilities Lucky Clouds Etched Dies Destination China by Lene Lok is a set of two dies that includes a rectangle outline and its insert piece full of playful cloud designs. From detailed frames to intricate accents to beautiful lanterns, Destination China Collection by Lene Lok is a wonderful grouping of Asian inspired elements to bring an exotic flair to your projects. - Spellbinders

Card 1
1. Cut/emboss white card stock using both Dies.
2. Glue to blue patterned paper and trim off any excess patterned paper

3. Adhere to a slightly later pre-cut white card base using double sided tape.
4. Wrap white seam binding around the card front, securing using double sided tape on the left side of the card front.
5. Glue a white double seam binding bow over the join
6. Add a large white pearl to the know of the bow.

Card 2
1.  Lightly spritz white card stock using water.
2. Run through the Platinum Die Cutting and Embossing Machine with the cutting edge facing up, followed by the tan mat and the pink embossing plate.
3. Trim any excess off around the edges.
4. Adhere a 3cm strip of patterned paper down the embossed card front using double sided tape.
5. Glue a strip of scalloped lace onto the patterned paper - trim any excess off each end.
6. Adhere a large white pearl inside each scallop on the lace.
7. Adhere to a slightly later pre-cut white card base using double sided tape.

Card 3
1. Lightly spritz patterned paper using water.
2. Run through the Platinum Die Cutting and Embossing Machine with the cutting edge facing up and the patterned paper facing down onto the die, followed by the tan mat and the pink embossing plate.
3. Trim any excess off around the edges.
4.
5.Lightly sand the embossed patterned paper using a sanding block.
6.  Pop up onto a slightly later pre-cut white card base using  double sided tape.
7. Glue a strip of scalloped lace across the lower portion of the patterned paper - trim any excess off each end.
8. Adhere a double white seam binding bow to the centre of the strip of lace.
9. Add a large white pearl to the know of the bow.

Spellbinders Products


Other: White card stock; Scrapbook Adhesives by 3L: E-Z Adhesive Runner, 3D Foam Squares; Liquid Glue; Anna Griffin Inc: blue patterned paper; Want2Scrap: 72 Count - White Pearls - Adhesive; White Seam Binding; May Arts Ribbon: White Scalloped Lace;Sanding Block


Thank you for your comments and all of the support you give me - you make blogging such an amazing place to be!! Your encouragement is such a blessing for me - it makes my day! God bless you!

                                                          {{{hugs}}} and happy crafting

Monday, September 24, 2018

Spellbinders Be Merry Tutorial

Hello friends, thanks so much for stopping by.  I am sharing a tutorial for Spellbinders using one of the new Holiday Die D-Lites - what is not to love about these adorable Reindeer.  I have also used a number of other dies as you will see when you follow along with the tutorial below.


'Die D-Lites Reindeer Etched Dies 2018 Holiday is a set of six includes everything you need to create your own kind of reindeer fun.' - Spellbinders

1. Cut/emboss three (3) each of the Reindeer face, Reindeer Ears, Nose, Antlers, Holly and Berries using Kraft card stock and the Platinum Die Cutting Machine to make 3 Reindeer.

2. Colour the pieces as desired using Chameleon Pens, making each Reindeer slightly different - making sure there is one red nose (for Rudolph)
3. Glue together as shown in the photos above.

3. Cut/emboss one Wreath Etched Die using White card stock.  
4. Colour using two shades of brown,
5. Cut/emboss one bow from the Wreath Etched Die using patterned paper,  lightly sand using a Sanding Block.  Trim the long ends off using sharp scissors, as shown above.
6. Pop the bow up onto the front of the Wreath using 3D Foam Squares, gluing the ends of the Bow behind the wreath as shown above.
7. Cut/emboss one Hemstitch Square using both of the largest Dies and patterned paper.
8. Remove the small pieces using the Tool'n' One.
9. Glue the Holly around the lower portion of the wreath and pop up onto the card front.

10. Glue one Reindeer towards each side of the Wreath.
11. Pop up the third Reindeer (Rudolph) in the centre of the other two using 3D Foam Squares.
12. Cut/emboss the sentiment from the Naughty or Nice Etched Dies using gold card stock.
13. Glue the bottom of the sentiment across the Holly
14. Line the Hemstitch Square using the same size red card stock.
15. Pop up the layered card front onto a slightly larger pre-cut white card base.

Spellbinders Products:
Other: Kraft, gold, red and white card stock;Scrapbook Adhesives by 3L; 3D Foam Squares; E-Z Adhesive Runner Ultra; I

    Thank you for your comments and all of the support you give me - you make blogging such an amazing place to be!! Your encouragement is such a blessing for me - it makes my day! God bless you!

    {{{hugs}}} and happy crafting

Monday, September 3, 2018

Spellbinders - Toucan Do it Tutorial

Hello friends - I am excited to be sharing a tutorial for Spellbinders today using the most adorable 'Birds of a Feather' stamp and Die set from the  - this adorable set is part of The Perfect Match Collection by Licensed Designer Debi Adams - I know even the Collection name is adorable!


'Friends of a Feather Stamp and Die Set The Perfect Match by Debi Adams brings both worlds together of die templates and coordinating stamps to give these images life.  The Perfect Match is a fun-loving grouping of "punny" sayings and whimsical images that truly is a perfect match for cards, invitations and special notes.'- Spellbinders

1. Cut/emboss the largest Scored and Pierced Rectangles Etched Dies using white card stock.
2. Cut/emboss the third smallest Scored and Pierced Rectangles Etched Dies using light blue card stock.
3. Add a patterned pre-cut frame to the light blue die cut.

4. Stamp the Toucan onto white card stock using Black Ink.
5. Cut/e,boss using the co-ordinating die.
6. Colour using Chameleon Pens.

7. Pop up the Toucan inside the frame using 3D Foam Squares.
8. Cut/emboss two small Monstera Leaves Etched Dies and one the next size up using green card stock.
9.Adhere the larger leaf to the bottom corner of the die cut frame using liquid glue, followed by one smaller leaf popped up using 3D Foam Squares.
10. Pop up the other smaller leaf to the top left corner also using 3D Foam Squares.


11.Pop up the layered image onto the card front using 3D Foam Squares, followed by the yellow card base using double sided tape.
12.Stamp the sentiment onto white card stock using black ink.
13. Cut/emboss the sentiment using the tag from the Beautiful Dreamer Stamp and Die Set.
14. Sponge inside the die using yellow ink before removing the sentiment.
15. Pop up the die cut sentiment to the lower portion of the card base using 3D Foam Squares.
16. Cut emboss the largest cloud using white card stock from the Sun and Clouds Etched Dies.
17. Cut emboss the sun using yellow card stock from the Sun and Clouds Etched Dies.
18. Pop up the sun and the cloud onto the right side of the frame using 3D Foam Squares.
19. Cut/emboss the sentiment using the tag from the Beautiful Dreamer Stamp and Die Set.
20. Sponge inside the die using yellow ink before removing the sentiment.
21.Pop up across the top of the blue frame using 3D Foam squares as shown in the main photo.

Spellbinders Products:
Other:  White, blue, green and yellow card stock; Scrapbook Adhesives by 3L: E-Z Adhesive Runner, 3D Foam Squares; Authentique Paper: patterned paper; liquid glue; Imagine: Memento Inks in Summer Sky, Dandelion and Tuxedo Black, Sponge Daubers; Chameleon Pens.

Thank you for your comments and all of the support you give me - you make blogging such an amazing place to be!! Your encouragement is such a blessing for me - it makes my day! God bless you!

Saturday, July 7, 2018

Recyled - Happiness Always

Hello friends, thanks so much for stopping by.  I have a recycled card to share with you today.  I have a friend who works in a Boutique and she saves me any novel boxes or anything she thinks I can use - she did well with this lots - there are about 2 dozen boxes and I have cut them all up ready to be reused and brought to life in  different way!


The box already had the beautiful image and the gorgeous scalloped edge - I popped it up onto an embossed background using the Spellbinders Cabbage Roses Embossing Folders and  Scrapbook Adhesives BY 3L Crafty Foam Tape - the roses blend beautifully with the floral image,  This has been popped up onto a slightly larger pre-cut pink card base.

I have added a computer generated sentiment to the top right corner, below that Want2Scrap Bling has been added, along with Silver Rhinestones to each corner.  Very easy but I am sure you will agree that the image is too pretty to discard,

This card is linked to the following challenges:
Aud Sentiments Challenge - Flowers + A Sentiment
That's Crafty! Challenge - Close to Nature
Card Mania - Anything Goes
Country View Crafts' Challenge In the Summer Garden
Crafter's Cafe - Keep it Simple
Word Art Wednesday - Anything Goes
Creative Sketchy Girls - Summer Card
Polka Doodles - Anything Goes
World Wide Open Design Team Challenge - Always Anything Goes 

Thank you for your comments and all of the support you give me - you make blogging such an amazing place to be!! Your encouragement is such a blessing for me - it makes my day! God bless you!

{{{hugs}}} and happy crafting

Friday, June 1, 2018

Recycled Love You Sew Much

Hello friends, thanks for stopping by today - can you believe it is Friday already AND June 1 - for those of us 'Down Under' anyway!! The first day of winter - yikes!!  Enough of that - I have a recycled card to share with you today - yes that gorgeous colourful background is recycled - from a box set of cards.  I have a friend who works in a Boutique and she saves me any novel boxes or anything she thinks I can use - she did well with this lots - there are about 2 dozen boxes and I have cut them all up ready to be reused and brought to life in  different way!


I have combined this recycled background with Spellbinders stamps, Dies and Embossing Folders and am happy with the final result.


The background has been layered onto a slightly larger pre-cut blue card base, along with white card stock that has been embossed using the Flourish Stitch Em-bossing Fold'ers Quilt It by Lene Lok and the Platinum Die Cutting MachineA row of narrow Washi Tape has been added along the base of the card front.


A computer generated sentiment has been popped up in the centre of the card front using Scrapbook Adhesives by 3L 3D Foam Squares.  The Two Spools from the Sew Handmade by Stephanie Low Stamp and Die Set have been stamped onto white paper using Imagine Memento Ink in Tuxedo Black.  Next they have been cut and embossed and coloured using Chameleon Pens and popped up to the left of the sentiment also using Scrapbook Adhesives by 3L 3D Foam Squares.


This card is linked to the following challenges:
Simon Says Wednesday - Anything Goes
Digi Chooseday Challenge - Anything Goes
CCEE Stampers 2 Embossing Folders
A Snowflakes Promise - Anything Goes
Lemon Shortbread Challenge - Anything Goes
That's Crafty! Challenge - Stitching (on the embossing folder)
Die Cuttin' Divas - Anything Goes
Use Your Stuff - WASHI TAPE
Pile It On! - Sports/Hobbies and /or Make Us Laugh ( Hobby - quilting)
Moo-mania - Die Cuts

Thank you for your comments and all of the support you give me - you make blogging such an amazing place to be!! Your encouragement is such a blessing for me - it makes my day! God bless you!

                                                          {{{hugs}}} and happy crafting