}

Saturday, March 31, 2018

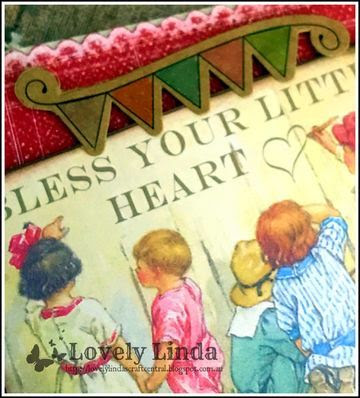
Bless Your Little Heart

Hello friends - thank you so much for stopping by.  It is Easter weekend, Saturday night and I am snatching a moment to share a card I created using a lot of my favourite products - tomorrow will be busy as we celebrate such an important day in History - The Resurrection of Christ - I love the meme I have been seeing a lot on facebook ...'It is not about the Bunny - it is about the Lamb!'  So true!


In saying this - we will be having an Easter Egg Hunt for our Grandson - but that is not our focus! Now on with the card...

I have used  an image from Crafty Secrets - how adorable is it!?  It has been cut out and popped up onto a card front that has been cut/embossed using Spellbinders Nestabilities Fancy Edged Rectangles Etched Dies #7 (#1 being the smallest) and the Platinum 6 Die Cutting and Embossing Machine - 6" PlatformThe card base has been lightly sanded using a Sanding Block and popped up onto a precut cream card base using Scrapbook Adhesives by 3L 3D Foam Squares. 


The Banner is from The Little Birdie Handmade Embellishments - and is self adhesive - popped up at the top of the image.


The Burlap Stars are from the same pack - I love the texture of them and the little touch of bling.  The have been adhered onto a strip of Washi Tape that I purchased from a local Thrift Store.  The Strip under the image is from the front of an old journal and was perfect to add rather than lace for this card - in my opinion anyway! Wink:wink!!


This card is linked to the following challenges:
Simon Says Wednesday - Anything Goes
A Snowflakes Promise - Anything Goes
Through The Craftroom Door - Anything Goes
House That Stamps Built - Anything Goes
WordArt Wednesdays - Anything Goes
Retro Rubber Challenge - Anything Goes - image is over 1 year old
613 Avenue Create - Anything Goes w/Optional Twist:Reuse/Recycle (button)
Lemon shortbread Challenge - Anything Goes
Artistic Inspirations - ANYTHING GOES OPTION THEME EASTER TIME
Crazy 4 Challenges - Child theme
Creates and makes Challenge - Anything Goes
World Wide Open Design Team Challenge  - Always Anything Goes 

Thank you for your comments and all of the support you give me - you make blogging such an amazing place to be!! Your encouragement is such a blessing for me - it makes my day! God bless you!

{{{hugs}}} and happy crafting

Friday, March 30, 2018

Live Every Moment

Hello friends, thanks for stopping by - I always love to know you have visited.  Today I an sharing a floral card created using one of the gorgeous Penny Black Inc. stamp sets and Chameleon Color Top Pens -I love the vibrant colours in these flowers - it is so easily achieved using the Color Tops - and of course I have used Spellbinders Dies.


The sentiment from the happy wishes has been stamped onto white card stock that has been spritzed using; Imagine Memento Ink in Teal Zeal and has been cut/embossed using white card stock and the Nestabilities Curved Rectangles Etched Dies  #5 #6 (#1 being the smallest) and the Platinum Die Cutting Machine and popped up onto the card base using Scrapbook Adhesives BY 3L 3D Foam Squares.


The Penny Black Incfloral applique has been stamped onto white card stock using Imagine Memento Ink in Tuxedo Black. and has been coloured using Chameleon Pens along with the Chameleon Color Tops - such incredible pens and the Color Tops take them to a whole new level. 


The floral applique has been fussy cut/hand cut using scissors and popped up onto the top and bottom of the card front using Scrapbook Adhesives by 3L 3D Foam Squares and then onto the card front.


This card is linked to the following challenges:
WordArt Wednesdays - Anything Goes
House That Stamps Built - Anything Goes
Simon Says Wednesday - Anything Goes
Sisterhood of Crafters - Spring flowers 
The Crafty Addicts Anything Goes
Papercrafters' Linky Party - Anything Papercrafts Goes
Love to Craft - Anything Goes
Morgan's ArtWorld -Anything Goes 
Sognando Scrap - Anything Goes
Mod Squad Challenge Spring 

Thank you for your comments and all of the support you give me - you make blogging such an amazing place to be!! Your encouragement is such a blessing for me - it makes my day! God bless you!

{{{hugs}}} and happy crafting

Thursday, March 29, 2018

Want2Scrap Treasures of the Heart

Hello friends, thanks so much for stopping by.  I am sharing a pretty card on the Want2Scrap Blog. I have used a mixture of Want2Scrap bling - I love the way it all works together so well.


You can see the details in full HERE

Thanks so much for stopping by and the lovely comments you leave - they are appreciated.  I hope you are inspired to get your Want2Scrap on!!  Make sure you  visit to see all the amazing products you will need to create your own projects.

{{{Hugs}}} and Happy Creating


Wednesday, March 28, 2018

It Will be Worth it

Hello friends, thanks so much for stopping by - can you believe the week is half way through - time goes by so quickly!  I have had time in The Studio lately and have enjoyed playing around with some of the Little Birdie Crafts products and have to say I am so impressed with them.


The card front has been cut/embossed using the Spellbinders Nestabilities Celebrations Pierced Squares Etched Dies and the Platinum 6 Die Cutting and Embossing Machine - 6" Platform a pre-cut white frame has been added to the card front. The textured back ground has been created using the Dots Stenciltexture paste and a spatula.  Once dry it has then been popped up onto a pre-cut card base using Scrapbook Adhesives by 3L 3D Foam Squares. 


A frame has been cut/embossed using the Nestabilities Labels 59 Etched Dies Wine Country by Stacey Caron #4 #5 and popped up onto the layered card base using Scrapbook Adhesives by 3L 3D Foam Squares.  Black/white gingham has been tied around the centre of the card front and base, scored on the left side of the layered frame.  A triple bow has been glued over the ribbon join and a Little Birdie Crafts flower has been added to the knot on the bow

The Long Masoong Mason Jar Quotes 6pcs Chalk has been popped up onto the centre of the card front. Hearts are added to the top of the frame and sticker 'hugs and kisses' to the lower edge of the frame.


This card is linked to the following challenges:
Colouring in Scrapland - ANYTHING GOES
Pammie's Inky Pinkies Challenges - ALWAYS ANYTHING GOES
Lil Patch of Crafty Friends - Always Anything Goes
Pile It On Circles and/or Squares (Square card)
Crafter's Castle - Anything Goes+ optional: Share Your Favorite Technique
Crafty Friends Challenge - Anything Goes
A2Z Scrapbooking Linky Party Anything Goes
Craft-Dee BowZ Anything Goes with a Handmade Bow.
Love to Craft - Anything Goes
Mix It Up Challenge Anything Goes + option: Make your own Background
Papercraft Business Challenge - any papercraft
World Wide Open Design Team Challenge - Always Anything Goes 

Thank you for your comments and all of the support you give me - you make blogging such an amazing place to be!! Your encouragement is such a blessing for me - it makes my day! God bless you!

{{{hugs}}} and happy crafting
Tuesday, March 27, 2018

A Little Birdie Told Me

Hello friends, thanks so much for stopping by!  Today I am sharing a quick and easy card created using Spellbinders Dies and an image from Crafty Secrets.  I discovered where I had put a box of images so they would be safe - well they were for about 2 years - LOL!  Have to love that! Wink:Wink!


The card base has been created by cutting and embossing two (2) Nestabilities Scored and Pierced Rectangles Etched Dies #7 (#1 being the smallest) and blue card stock using the Platinum 6 Die Cutting and Embossing Machine - 6" Platform.  Score one Rectangle at 1cm and fold forward, add strong tape to the folded forward piece and adhere the second Rectangle, making sure to line up the edges - to form the card base.

Cut/emboss patterned paper using Nestabilities Scored and Pierced Rectangles Etched Dies #6 (#1 being the smallest),emboss using the Em-bossing Fold'ers Floral 4.25 x 5.5 in Single Sided and pop up onto the card base using Scrapbook Adhesives by 3L 3D Foam Squares. 


Cut/emboss one Frame #1 from Nestabilities Romantic Rose Etched Dies the using white card stock, popping up onto the layered card front.   Pop up the Crafty Secrets image also also using Scrapbook Adhesives by 3L .

Adhere a double Seam Binding bow to the lower left hand corner of the image, securing a Want2Scrap Silver Charm around the knot of the bow using twine and finishing with Baby Bling - Steel Blue Pearls - 100 Count - 2.5 mm.


This card i s linked to the following challenges:
The Corrosive Challenges - Always Anything Goes
A Bit More Time to Craft - Anything Goes
Card Mania Embossing
Craft-Dee BowZ Anything Goes with a Handmade Bow.
Die Cut Divas Monochrome

Thank you for your comments and all of the support you give me - you make blogging such an amazing place to be!! Your encouragement is such a blessing for me - it makes my day! God bless you!

{{{hugs}}} and happy crafting

Monday, March 26, 2018

Spellbinders Swirls of Love Tutorial

Hello friends - thanks so much for stopping by today.  I have a tutorial for Spellbinders to share today - using dies and stamps by Licensed Designer Joanne Fink.  I have combined two different sets to create a unique card and I am loving it - what do you think?!  This is a very easy card to create as you will see as you follow along with the tutorial.


Shapeabilities Swirl Frame Etched Dies On the Wings of Love Collection by Joanne Fink is a set of two dies includes a whimsical swirly frame and flower accent. On the Wings of Love Collection brings together faith and art for a great creative collaboration by Joanne Fink. Joanne's positive messages and award-winning style create uplifting designs used for Bible Journaling, cards and more to share. Her art helps others to express themselves in any skill level. - Spellbinders

1. Cut/emboss one Swirl Frame using white card stock.
2. Emboss the front only of a beige card base using the Flourish Stitch Embossing Folder.
3. Glue the Swirl Frame to the embossed card case

4. Stamp four hearts from the Love Stamp and Die set using Espresso Truffle ink.
5. Colour the small hearts using red and the circles using silver..
6. Stamp the word banner using Rhubarb Stalk ink.
7. Cut out both the hearts and the four squares from the banner - as shown above.
8. Pop up each square onto the centre of a heart using a 3D Foam Square.

9.Adhere the roses ribbon across the center of the card front using strong tape.
10. Pop up the hearts onto the card front, to spell LOVE, above and below the roses braid using 3D Foam Squares.
11. Glue a double Seam Binding light beige bow  half way up on the left side of the card front.
12. Glue a small rose from the rose ribbon to the knot of the rose.
13. Add medium and small white pears along the top and bottom of the Swirl Frame as shown in the main photo.

Spellbinders Products:
Other Supplies: Kraft and white card stock; Scrapbook Adhesives by 3L: Extreme Double Sided Tape, 3D Foam Squares; Liquid Glue;  Imagine: Memento Ink in Espresso Truffle and Rhubarb Stalk; Rose Ribbon - medium and narrow; Light biege Seam Binding; Want2Scrap: 250 Count -White-Pearls

Thank you for your comments and all of the support you give me - you make blogging such an amazing place to be!! Your encouragement is such a blessing for me - it makes my day! God bless you!

{{{hugs}}} and happy crafting

Sunday, March 25, 2018

Recycled - But First...Coffee

Hello friends - thanks so much for stopping by - if it was IRL we would have a coffee together and all things creative - how lovely would that be!  It is a drizzling Sunday here and we are loving it - and desperately need it infact - so I thought it would be a great time to share a little recycled Coffee Humour with you - brace yourself! Wink:wink!!


I have had the cow image for a long time and decided to fussy cut (hand cut using scissors) and pop it up onto a negative Die from the Spellbinders Shapeabilities Swirl Frame Etched Dies On the Wings of Love Collection by Joanne Fink - using Scrapbook Adhesives by 3L 3D Foam Squares - don't you love those funky swirls!  I used the original Die HERE.


The layered image has been popped up onto a card front - using patterned paper designed by the lovely and talented Trudy SjolanderThe paper reminded me of a meadow of grass and flowers - perfect for the crazy cow!! LOL!  All of the layers have been adhered to the pre-cut card base using Scrapbook Adhesives by 3L E-Z Adhesive Runner Ultra.


 A computer generated sentiment has been trimmed and adhered onto the negative Die.  A coffee has been added to the image - what more does it need!?

This card is linked to the following challenges:
Crafter's Castle - Anything Goes+ optional: Share Your Favorite Technique
Crafty Friends Challenge - Anything Goes
Imagine That! Creative Playground - Year Round Link Party
Create With TLC - Anything Goes 
Crafty Hazelnut's Patterned Paper - Anything Goes with Patterned Paper
The Creative Crafters Anything Goes 
World Wide Open Design Team Challenge - Always Anything Goes 
Jo's Scrap Shack - ANYTHING GOES
QKR Stampede - ANTYHING GOES
Simply Papercraft - ANYTHING GOES
CCEE Stampers - Funny Cards
A Snowflakes Promise  - Anything Goes
Lemon Shortbread - Always Anything Goes

Thank you for your comments and all of the support you give me - you make blogging such an amazing place to be!! Your encouragement is such a blessing for me - it makes my day! God bless you!

{{{hugs}}} and happy crafting


Saturday, March 24, 2018

Especially for You

Hello friends, thanks so much for stopping by.  It is a lovely Saturday morning here in the Nations Capital and I have been enjoying some Studio time - I have a pretty card to share with you using some of my 'staple' and favourite products - it doesn't get much better than that! 


The card front has been cut/embossed using pink card stock and one of my favourite Spellbinders Dies - Nestabilities Romantic Rose Etched Dies and the Platinum 6 Die Cutting and Embossing Machine - 6" Platform This has been popped up onto the pre-cut card front using Scrapbook Adhesives by 3L 3D Foam Squares. 

Next Frame #1 from Nestabilities Romantic Rose Etched Dies the using white card stock has been cut/emboss and popped up onto the layered card front; followed by a pink oval from the Nestabilities Fancy Edged Ovals Etched Dies.


The Sentiment is from the Little Birdie Crafts  Handmade Embellishments - it is pre-cut and popped up on foam squares - it does not get much easier than that!  I have also used Little Birdie Crafts Flowers and a Butterfly.  

I have added HEARTY ME'LANGE CRIMSON HEARTS to the butterfly using liquid glue and adhered it to the side of the flowers.  Small Pink Pompom trim has been adhered below the sentiment and finished off with some Want2Scrap 250 Count White Pearls


This card is linked to the following challenges:
Simon Says Wednesday - Floral Frenzy
Crafty Hazelnut's Patterned Paper Anything Goes with Patterned Paper
Creative Moments Challenge - Anything Goes
Create and Inspire - Anything Goes / All about Mums
Inspiration Destination Challenge - Anything Goes - opt. twist, spring or pastel colours
Die Cut Divas Monochrome
D L Art Challenge - Flowers, or thanks
Morgan's ArtWorld - Anything Goes 
Little Miss Muffet Challenge - Anything Goes
QKR Stampede - ANTYHING GOES

Thank you for your comments and all of the support you give me - you make blogging such an amazing place to be!! Your encouragement is such a blessing for me - it makes my day! God bless you!

                                                                           {{{hugs}}} and happy crafting