}
Showing posts with label tutorrial. Show all posts

Monday, October 16, 2017

Spellbinders Snow...What's Up Tutorial

Hello friends, thanks so much for stopping by.  I have a tutorial for Spellbinders to share with you - and I have to warn you - it is whimsical and so adorable!  I have also used stamps and Dies by three of Spellbinders Licensed Designers - can you pick who they are?!


This adorable little penguin has been created using fruit - yes, you read that right - you can see what I mean by following along with the tutorial.

1. Cut/emboss one pear/avocado from the Market Fresh by Debi Adams The Pearfect Avocado Stamp and Die Set  - the larger one in black and the smaller one in white.
2. Cut/emboss one leaf in black and cut through the centre.
3. Cut/emboss two paws from the  Some Bunny Etched Dies My Little Red Wagon using kraft card stock.

4. Layer the white die cut onto the back to form the body.
5, Glue each leaf half to the penguin as arms, adhere the paws as feet.
6. Draw black eyes using Chameleon Pens Black Detail Pen and add white highlights.
7. Hand cut a tiny orange triangle for a beak and glue to the penguins face.
8. Place the die over the penguin, securing with repostional tape and add silver to the lower portion of the belly using the Tool 'n One and the Foam Applicator – Circle.

9.Stamp the Notebook Border Stamp Set Happy Grams #4 Collection by Tammy Tutterow using Black ink onto slightly larger blue card stock.
10. Cut/emboss the Shapeabilities Jagged Edge Etched Dies by Seth Apter using white textured paper.
11.Adhere the Jagged Edge inside the Notebook Border Stamp.
12. Pop up the penguin onto the card front using 3D Foam Squares.
13. Cut one Cascade Dots using cardboard (I have used a cereal packet) to create a stencil
14. Using the Stencil, create snowflakes using texture paste - allow to dry.
15. Lightly add liquid glitter to the snowflakes - allow to dry.
16. Pop up a layered computer generated sentiment to the top right corner of the card front.
17. Layer onto a white pre-cut card base using Crafty Foam Tape.

Spellbinders Supplies:

Other Supplies: White, blue, and black card stock; Scrapbook Adhesives by 3L: E-Z Adhesive Runner, 3D Foam Squares; Liquid Glue;  Imagine: Delicata Ink in Shimmery Silver; recycled cardboard eg.Cereal Box; Texture Paste and tool; Kindy Glitz/Liquid Glitter; DCWV Textured white card stock; Chameleon Pens:Black Detail Pen; Orange card stock (for beak); White Gel Pen.

Thank you for your comments and all of the support you give me - you make blogging such an amazing place to be!! Your encouragement is such a blessing for me - it makes my day! God bless you!

{{{hugs}}} and happy crafting

Tuesday, October 3, 2017

Spellbinders Bicycle Tutorial

Hello friends, I am sharing a tutorial for Spellbinders, combining a few of the newer Die sets to create a summer scene.  Bikes with baskets have made their way back on trend and it just has to be said - this one is perfect with it's basket on the front.


1. Cut/emboss one grass edge from the Posie Parts Happy Grams using cream card stock.
2. Use the negative Die as a Stencil , sponging three strips of grass onto the lower portion of the card front using Bamboo Leaves.

3. Emboss Kraft card stock using the Picnic Embossing Folder.
4. Cut to size and lightly sand using a sanding block.
5. Adhere to the card front just above the top row of grass.
6. Adhere sponged grass die cut using liquid glue.

7. Cut/emboss one Bicycle using recycled cereal box
8. Cut/emboss two clouds from the Rise N Shine Die D-Lite using white card stock, sponge with grey ink before removing from the Die.
9. Colour the bike with an ombre effect using Teal Zeal Ink.

10. Adhere the bicycle to the card front - onto the grass strip, using liquid glue.
11. Cut/emboss three pink flowers, 3 green leaves from the Bicycle Die D-Lite Etched Dies.
12. Cut/emboss one Harry Small Dog from the Dog Club Die D-Lites Etched Dies.
13. Sponge the inside of the Harry Small Dog using Desert Sand ink before removing the die cut.
14. Arrange and glue the flowers and leaves into the bike basket.
15. Adhere Harry Small Dog to the bike carrier.
16. Cut clouds in half and attach 3 pieces using double sided tape
17. Adhere computer generated sentiment using double sided tape.

Spellbinders Supplies:

Other Supplies: Cream, kraft, white and pink card stock; Scrapbook Adhesives by 3L: E-Z Adhesive Runner, 3D Foam Squares; Liquid Glue;  Imagine: Memento Ink in Teal Zeal, Desert Sand, London Fog and Bamboo Leaves; recycled cardboard eg.Cereal Box; Sanding  Block

Thank you for your comments and all of the support you give me - you make blogging such an amazing place to be!! Your encouragement is such a blessing for me - it makes my day! God bless you!

{{{hugs}}} and happy crafting

Tuesday, September 19, 2017

Spellbinders Fa La La Tutorial

Hello friends, I have a tutorial for Spellbinders today using the fabulous Shapeabilities Fa La La Holiday 2017 by Sharyn Sowell Etched Dies.  I do love this line of silhouettes and this adorable die with a sweet silhouette of children dancing to holiday music - although I must say I am sure it can be used for other occasions and I am sure I will be doing just that!!


You can read about Sharyn's inspiration for this collection HERE.


1. Cut/emboss one  Fleur de Circle Etched Dies from the Rouge Royale Deux Collection using white card stock.
2. Using the Die as a stencil, sponge the exposed areas using Rhubarb Stalk ink and the Tool 'n One with the Circle Foam Refill.
3. Using the Fleur de Circle Etched Die as a template, hand cut patterned paper to fit he card front.

4. Cut/emboss one Fa La La Holiday 2017 using green card stock.
5. Adhere the Fa La La Die cut image to the inner circle of the Fleur de Circle using double sided tape.
6. Adhere the hand cut patterned paper behind the Fa La La Holiday 2017 images.
7. Use the card front as a template, drawing around and cutting two pieces using white card stock.
8. Score the top of one card base, folding forward, adhere double sided tape and attach the second piece to form card base.

9. Adhere a double Seam Binding bow ti the top of the card front.
10.  Cut/emboss Layered Poinsettia #1 #2 (#1 being the smallest) using cream card stock.
11. Sponge the Layered Poinsettia petals using Rhubarb Stalk Ink, the tops of the petals using Bamboo Leaves.
12. Layer using small 3D Foam Squares.
13. Glue a small threaded yellow button to the flower centre.
14. Add sentiment stickers below the bow.
15. Adhere Moss Green pearls around the Fleur de Circle frame, using medium and small pearls. 


Spellbinders Supplies:

Other Supplies: White, cream and olive green stock; Want2Scrap: 250 Count Moss Green PearlsScrapbook Adhesives by 3L: E-Z Adhesive Runner, 3D Foam Squares White Small Size; May Arts Ribbon: Green Ribbon; Liquid Glue; Authentique Paper; Imagine: Memento Inks in Rhubarb Stalk and Bamboo Leaves; button; black thread

Thank you for your comments and all of the support you give me - you make blogging such an amazing place to be!! Your encouragement is such a blessing for me - it makes my day! God bless you!

{{{hugs}}} and happy crafting

Friday, September 15, 2017

Tammy Tutterow Prim Hearts

Hello friends, I am sharing a card created using one of the NEW Happy Grams #4 Collection by Tammy Tutterow –  I used one of the stamps to created a background for a tutorial on the Spellbinders Blog and you can see it HERE


Stamp the Nothing But Love Stamp onto cream card stock using Tuxedo Black ink.  Fill in/colour the letters using red marker in a few of the rows for interest.


Glue a pre-cut frame onto the card front.  Cut/emboss two Prim Hearts #2 #3 (#1 being the smallest) using gold card stock. Layering the smaller heart onto the larger using Scrapbook Adhesives by 3L 3D Foam Squares; popping up onto to the centre of the card front also with 3D Foam Squares.

Glue a narrow double d\seam binding bow onto the lower portion of the hearts. Add flowers to the centre of the bow.  Lightly add shimmer/glitter.  Finish with Want2Scrap moss green pearls.


This card is linked to the following challenges:
Craft Rocket Challenges - Something Beginning With 'F' (Flowers)
Moving along with the Times - No Images (Sentiment as Focal Point) 
Crafty Gals Corner - Add a Heart
Day Dreamer Challenges - Always Anything Goes 
WordArt Wednesdays - Anything Goes
Creates and Makes - Anything Goes
Artistic Inspirations - ANYTHING GOES + ANYTHING GOES
Angie's Digital Stamps - Anything Goes
Glitter n Sparkle - Anything Goes
heARTful Stamping Challenge - Anything Goes + a Stamp
Crazy 4 Challenges Use Glitter
Imagine That! Creative Playground - Anything Crafty Goes
Scrapy Land Challenge - Anything Goes
Crafty Creations Challenge - Anything Goes

Thank you for your comments and all of the support you give me - you make blogging such an amazing place to be!! Your encouragement is such a blessing for me - it makes my day! God bless you!

{{{hugs}}} and happy crafting

Tuesday, September 12, 2017

Spellbinders Just Dance Tutorial

I have a tutorial for Spellbinders to share with you today - using one of the beautiful Dies from the Venise Lace Collection by Licensed Designer Becca Feeken and the adorable Just Dance Die D-Lites - as soon as I saw the ballerina I knew I wanted to give her a beautiful 'stage' to dance on! 


I hope you will join me for this tutorial.  Any questioons please leave in the comments and I will get back to you with an answer - if I don't have one - I will find someone who will! 

1. Cut/emboss the Marcheline Plume Etched Dies Venise Lace #2 #3, inserting the #2 Die inside the #3 Die to create a frame, using Lovely Layers patterned paper.

2. Cut/emboss the Marcheline Plume Etched Dies Venise Lace #1 in the centre of a card front using White card stock.
3. Cut the Circle Emblem in half.

4. Adhere to the top and bottom of the die cut circle to create a frame.
5. Pop up onto the Marcheline Plume Etched Dies Venise Lace using 3D Foam Squares.
6. Adhere to black card stock, followed by a slightly larger white card base.

7. Adhere a row of Nestabling Heart Circles Pink Pearls around the outside of the circle.
8. Glue a double sheer bow to the left side of the circle.
9. Adhere a handmade embellishment and mulberry paper rose to the centre of the bow.
10.Attach white pearls to the corners of the black card front.

Spellbinders Supplies:

Other Supplies: White and black stock; Want2Scrap: Nestabling Heart Circles Pink Pearls, 250 Count - White Pearls; Scrapbook Adhesives by 3L: E-Z Adhesive Runner, 3D Foam Squares; May Arts Ribbon: White Sheer Ribbon; Anna Griffin Inc: Lovely Layers Collection; Handmade Paper Clay frame.; Mulberry Paper Rose; Liquid Glue; 

Thank you for your comments and all of the support you give me - you make blogging such an amazing place to be!! Your encouragement is such a blessing for me - it makes my day! God bless you!

{{{hugs}}} and happy crafting

Tuesday, August 22, 2017

Spellbinders Trailing Hearts Tutorial

Hello friends, I am sharing a tutorial for Spellbinders featuring two of the new Dies by Licensed Designer Marisa Job - and I have to say I am more than happy with the results.  You can see how this card has been created by following along with the Step by Step Tutorial.


1. Add an Adhesive Sheet to the A2 Matting Basics A #6 (#1 being the smallest) and trim to the correct size.
2. Cut/emboss one Trailing Hearts using both green and mauve card stock. 
3. Adhere the mauve Trailing Hearts to the card base, pressing down to adhere it all
4. Add a row of green squares from the green Trailing Hearts from Step 2, along with one row of hearts.  Press firmly to help them stick firmly.

4. Sprinkle glitter into an embossing tray, press down the die cut making sure to press it into all the open spaces in the die cut
5. Pop up the Die cut layer onto the card base using liquid glue

6. Cut/emboss two of the heart die using white card stock.
7. Layer and adhere to the centre of the mauve Trailing Heart card front.
8. Cut two flowers from the Textured Flowers #1 #2 (#1 being the smallest) using patterned paper.  
9. Sand using a Sanding Block.
10. Layer the flowers and colour the centre using a yellow pen. Adhere a large pearl to the centre of the flower.
11. Cut/emboss three leaves using green card stock, curl using a thin paint brush handle.
12. Pop up around the flower using a 3D Foam Square.

13. Trim the Swirls Finesse and adhere either side of the flowers.
14. Adhere computer generated sentiment.

Spellbinders Supplies:
Other Supplies: White, purple and green pink card stock; ImagineMemento Luxe Ink in Wedding Dress;  Want2Scrap: Scrapbook Adhesives by 3L: E-Z Adhesive Runner, 3D Foam Squares; ; 

Thank you for your comments and all of the support you give me - you make blogging such an amazing place to be!! Your encouragement is such a blessing for me - it makes my day! God bless you!

{{{hugs}}} and happy crafting

Tuesday, August 8, 2017

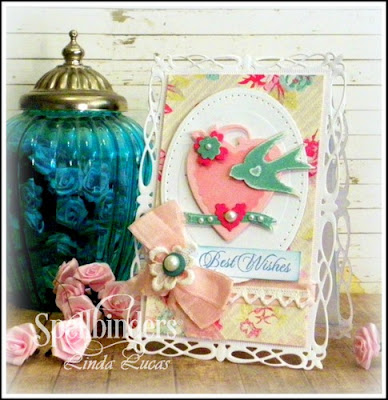
Spellbinders Swallow and Heart Tutorial

Hello friends - it is time to share a tutorial for Spellbinders here on my Blog.  Today's card has been created using one of the Die D-Lites by Licensed Designer Sharyn Sowell as a focal point.


These gorgeous Whimsy dies are perfect for so many occasions - even individually as embellishments - so many possibilities! 

1. Cut/emboss one (1) swallow, Banner and small flower using patterned paper.
2. Cut/emboss one (1) large flower and heart using dark pink patterned paper.
3. Cut/emboss one (1) heart using pink card stock.
4. Use the die as a stencil sponging the inside of the heart using the Foam Applicator and Angel Pink Ink.


5. Lightly sand the swallow using a Sanding Block.
6. Pop up onto the top right of the heart using 3D Foam Squares.
7. Layer the small flower onto the large flower using liquid glue.
8. Pop up onto the top left of the heart using 3D Foam Squares, adding a white pearl to the centre.
9. Adhere the banner across the base of the heart, add small heart and White pearls.
10.Cut/emboss a Pierced Oval using white card stock and pop the layered heart onto the centre using using 3D Foam Squares. 


11. Cut/emboss two
 (2) Romantic Rectangles Two #4 (#1 being the smallest).  

12. Score one Romantic Rectangles Two 1.5cm from the top and fold forward.
13, Adhere the second Romantic Rectangles Two onto the scored one to form the card base, making sure the patterned edges line up.
14. Pop up patterned paper using 3D Foam Squares, followed by the layered images on the top portion of the card front.
15. Add seam binding around the card front, threading through the filigree edges as shown above.
16. Secure to the left of the card front.
17. Glue a double Seam Binding bow onto the join, followed by a lace flower, recycled button and Medium White Pearl.
18. Stamp the sentiment onto white card stock using Teal Zeal ink, trim to size, adding a Dove Tail at the right end. 
19. Pop up cross the base of the heart, tucking in under the Seam Binding Bow.

Spellbinders Supplies:
Other :  Liquid Glue; Scrapbook Adhesives by 3L: E-Z Adhesive Runner, 3D Foam Squares; white, pink, teal card stock; patterned paper;Want2Scrap: 250 Count White Pearls; Imagine Memento Ink in Teal Zealand Angel Pink; Pink Seam Binding, recycled button

Thank you for your comments and all of the support you give me - you make blogging such an amazing place to be!! Your encouragement is such a blessing for me - it makes my day! God bless you!

{{{hugs}}} and happy crafting

#neverstopmaking