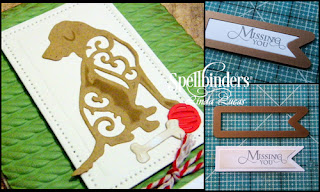
I have a Spellbinders Tutorial on my Blog today - sharing a card using the adorable Dog Days Die - it can be used for so many occasions!
Spellbinders Products:
- GLD-007 Petite Pennants
- S2-175 Dog Days
- SCD-012 Pierced Rectangles
- ESDS-006 Need a Rope
- GC-200 Grand Calibur Die Cutting and Embossing Machine
Cross Promotional Partners:
- Imagine Crafts 'featuring' Tsukineko: Memento Ink in Espresso Truffle and Rich Cocoa; Delicata Pigment Ink in Golden Glitz; Sponge Daubers
- Want2Scrap©: 72 Count - Pink Pearls - Self Adhesive
- Scrapbook Adhesives by 3L: E-Z Adhesive Runner and 3D Foam
Other: Red, White and Kraft cardstock; scissors; sentiment from my stash; paw brads, red/white twine; dogbone brad
1. Cut/emboss Dog Days #3 (# 1 being the smallest) using Kraft cardstock.
2. Cut/emboss one bone #2 using white cardstock and;
3. Cut/emboss one ball #1 using red cardstock
4. Emboss green cardstock using Need a Rope 3-D Em-bossing Fold'er
NOTE: The sandwich for Spellbinders 3-D Em-bossing Fold'ers in Spellbinders Grand Calibur® Die Cutting and Embossing Machine (stack from bottom up): B-Pink Embossing Plate, 3-D Em-bossing Fold'er with Media Inside and D-Raspberry Adapter Plate.
5. Pop up onto the card base using Crafty Foam Tape
6. Cut/emboss one (1) Pierced Rectangles #1 #2 (#1 being the smallest) using white cardstock, placing #1 Die inside the #2 die and secure using masking tape.
7. Adhere the Dog Days to the Pierced Rectangle using Liquid Glue
8. Pop up onto the upper portion of the layered card base
7. Stamp sentiment using Espresso Truffle
8. Cut/emboss using Petite Pennants Ribbon Tail #1 (#1 being the smallest)
9. Tie Twine around the card front twice and secure with a knot
10 Add Bone Brad to the left side of the sentiment tag
11 Adhere the sentiment to the lower portion of the card using crafty foam tape
Thank you for your comments and all of the support you give me - you make blogging such an amazing place to be!! Your encouragement is such a blessing for me - it makes my day! God bless you!
{{{Hugs}}} and happy crafting!!


What a wonderful card Linda - that rope texture is the perfect background.
ReplyDeleteBlessings
Maxine
This is an adorable die to have in your collection. Thanks for the tutorial. Dianne
ReplyDeleteThis is a lovely card, could be used for so much, love it,
ReplyDeleteDi B.