Hello friends, thanks so much for stopping by. I have a new tutorial to share for Spellbinders using one of the new Special Moments Collection by Licensed Designer Marsia Job. Marisa's beautiful style brings together her signature floral designs and sentiments to help create expression through art and all of her collections work so well together. The possibilities really are endless.
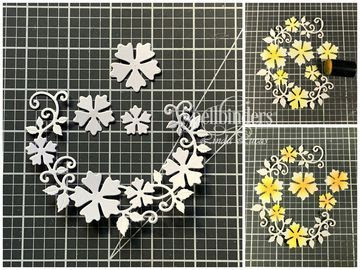
'Shapeabilities Floral Oval Etched Dies Special Moments Collection by Marisa Job is a set of three dies includes a lattice oval with a flowered crescent shape, and a set of three different sized flower accents. Assemble them together to create a beautiful garden motif. Special Moments Collection by Marisa Job brings together her signature floral designs and sentiments to help create expression through art. Special Moments complements her other collection to mix and match for a wonderful collaboration.' - Spellbinders
1. Cut/emboss one Blessings Vine Frame Etched Dies using light green card stock.
2. Adhere to a pre-cut white card base using liquid glue.
3. Cut/emboss one Oval from the Floral Oval Etched Dies using Grey card stock.
4. Cut/emboss the largest Scored and Pierced Oval Etched Die using white card stock.
5. Glue the grey oval to the center of the larger white oval.
6. Cut/emboss two Floral Oval Etched Dies Flower Crescent and additional three flowers using white card stock. NOTE: you will have a total of 6 individual flowers.
7. Ink the centres of all flowers using yellow ink, followed by highlights of orange using Sponge Daubers.
8. Sponge the leaves with green ink using a Sponge Dauber.
9. Layer the individual flowers onto co-ordinating flowers from the flower crescent using 3D Foam Squares. Note: Some flowers will remain one layer.
10. Glue the Flower Crescents around the white edges of the layered ovals, intertwining the extra leaves at each end.
11. Adhere a row of narrow scalloped lace along the lower portion of the card.
12.Alternate small and medium white pearls along the scalloped lace.
11. Cut/emboss the sentiment from the Blessings Frame Etched Dies, once using black card stock and once using silver card stock.
12. Glue the silver sentiment onto the black - slightly off setting to. give a shadow effect - this also gives the sentiment more dimension.
Spellbinders Products Used:
- S4-906 Nestabilities Scored and Pierced Ovals Etched Dies
- S5-336 Shapeabilities Blessings Vine Frame Etched Dies Thoughtful Expressions by Marisa Job
- S5-387 Shapeabilities Floral Oval Etched Dies Special Moments Collection by Marisa Job
- T-001 Tool 'n One
- PL-001 Platinum Die Cutting Machine
Other: Cream,dark green, light green, silver and white card stock; Scrapbook Adhesives by 3L: E-Z Adhesive Runner, 3D Foam Squares;
Thank you for your comments and all of the support you give me - you make blogging such an amazing place to be!! Your encouragement is such a blessing for me - it makes my day! God bless you!
{{{hugs}}} and happy crafting


Oh Linda this is exquisite - love your colours as well as how you have used these fabulous dies
ReplyDeleteBlessings
Maxine