
Hello friends - thanks so much for stopping by!! Today I am sharing a tutorial for Spellbinders using one of the dies from the A Sweet Christmas Collection by Sharyn Johnson Sowell to create a nostalgic Christmas Card. Lots of layering to create this card front - I love the ! You can see how easily it is created by following along with the tutorial.

Shapeabilities Hanging Stockings Etched Dies A Sweet Christmas by Sharyn Sowell is a sweet silhouette of Santa hanging stockings on the fireplace with a happy furry companion to help! Spellbinders Shapeabilities cut, deboss, emboss and stencil with a single etched die template. - Spellbinders

1. Cut/emboss the patterned paper using the second largest Fancy Edged Rectangles Etched Dies.
2. Lightly sand/distress around the edges using a Sanding Block.

3. Adhere a sheet of white card stock to Adhesive Sheet 6x4; cut/emboss one Hanging Stockings Etched Die .
4. Adhere an Adhesive Sheet 6"x4" to white Craft Foam; cut/emboss using Hanging Stockings Etched die.
5. Peel the backing off the back of the white card stock and adhere to the front of the die cut craft foam.
6. Peel the backing off the back of the White Craft Foam and adhere to the front of the die cut patterned paper.
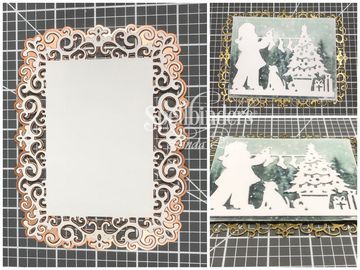
7. Cut/emboss one 8. Cut/emboss one Swirl Happy Birthday Frame Etched Dies using gold card stock.s using gold card stock.
8. Pop up the layered card front onto the gold Swirl Happy Birthday Frame Etched Die using 3D Foam Squares.

9. Cut/emboss one Hemstitch Rectangles Etched Dies using the largest two dies and patterned paper. NOTE: Secure using Masking tape to avoid the Dies moving.
10. Cut/emboss one Coralene's Chemise Layering Frame Large Etched Dies using white card stock. Adhere to a slightly larger pre-cut mauve card base.
11. Adhere the Hemstitch Rectangles Etched Dies to the layered card base using 3D Foam Tape.
12. Pop up the layered Hanging Stocking image to the layered card base, also using 3D Foam Squares,

13. Cut/emboss one second smallest Open Scallop Edge Circles using white card stock.
14. Adhere the sentiment from Misty Wishes using double sided tape.
15. Pop up the sentiment onto the top right corner of the image layer using 3D Foam Squares on the right side of the sentiment to keep it level.
16. Glue a double Seam Binding Bow to the left side of the card and a gold Poinsettia onto the knot of the bow.
Spellbinders Products:
- S4-905 Nestabilities Fancy Edged Rectangles Etched Dies
- S4-910 Nestabilities Open Scallop Edge Circles Etched Dies
- S4-937 Shapeabilities Hanging Stockings Etched Dies A Sweet Christmas by Sharyn Sowell
- S5-308 Nestabilities Hemstitch Rectangles Etched Dies Venise Lace by Becca Feeken
- S5-358 Shapeabilities Swirl Happy Birthday Frame Etched Dies Blooming Garden by Marisa Job
- S6-130 Shapeabilities Coralene's Chemise Layering Frame Large Etched Dies Chantilly Paper Lace Collection by Becca Feeken
- T-001 Tool 'n One
- PL-001 Platinum Die Cutting Machine
Other: Purple, gold and white card stock; Scrapbook Adhesives by 3L: E-Z Adhesive Runner, 3D Foam Squares; Adhesive Sheets 6x4, Kaisercraft: Mint Wishes Collection; May Arts Ribbon: Sheer Ribbon; Little Birdie Crafts: Gold Poinsettia
Thank you for your comments and all of the support you give me - you make blogging such an amazing place to be!! Your encouragement is such a blessing for me - it makes my day! God bless you!
{{{hugs}}} and happy crafting

Oh what a beauty Linda - you have really emphasised the main die cut with the wonderful background paper and layers
ReplyDeleteBlessings
Maxine