}
Showing posts with label Etched Dies. Show all posts

Thursday, February 9, 2017

Spellbinders One of a Kind Tutorial

Hello friends, I am sharing a tutorial for Spellbinders today using one of the newer Dies - 'purrr-fect' for the animal lovers among us (sorry I could not help myself! Wink:wink!   There are so many possibilities with this die and here is one of them...


Spellbinders Product
Other : Liquid Glue;  Scrapbook Adhesives by 3L: E-Z Adhesive Runner, 3D Foam Squares; Imagine Crafts: Memento Ink in Dandelion; Memento Luxe in Wedding Dress; Sponge Daubers, rust and white card stock; computer generated sentiment

1. Emboss rust card stock using the Picnic embossing folder.
2. Sponge raised lines using Wedding Dress and a Sponge Dauber.
3. Trim 1 width of brisks and pop up onto the top portion of the remaining panel using 3D Foam Squares, creating a wall.

4. Cut/emboss Standard Circles SM #6 (#1 being the smallest) using white card stock.
5. Before removing the Die, sponge inside the lines using Dandelion Ink and a sponge dauber.
6. Adhere the 'brick wall' to patterned paper using double sided tape.
7. Adhere the Standard Circle SM to the card stock, with the lower portion under the wall.

8. Cut/Emboss two Here Kitty cats using Kraft card stock.
9. Cut/Emboss one Here Kitty cat using turquoise card stock.
10. Pop up the Kraft cats onto the wall with approx 1.5cm between them and using 3D Foam Squares.
11. Pop up the turquoise cat in the centre using 3D Foam Squares - 2 thicknesses of 3D Foam Squares.
12. Add white spots to the turquoise cat using a white gel pen.
13. Add computer generated sentiment onto the lower portion of the card.
14. Pop up the layered patterned paper onto the pre-cut card base.

Take care friends - thank you for your comments and all of the support you give me - you make blogging such an amazing place to be!! Your encouragement is such a blessing for me - it makes my day! God bless you!
{{{Hugs}}} and happy crafting

Monday, February 6, 2017

SB Diamond Flourish Pocket Tutorial

Hello friends, it is lovely having you join me today for a Spellbinders Tutorial using one of the gorgeous new Rouge Royale Deux Collection by Stacey Caron.  


Totally elegant and romantic, this is a one piece die set with a beautiful intricate flourish design and embossed diamond background to place pearls and other small accents


You can bring your projects to the next level with Stacey's Rouge Royale Deux Collection. This die has so much potential - it can be a Pocket Card, as I have done, I can see it used on Wedding Invitations, or any invitation for that matter, with it's ornate design - there is no limit to the possabilities.


Spellbinders Products
Other : Liquid Glue;  Scrapbook Adhesives by 3L: E-Z Adhesive Runner, 3D Foam Squares; Imagine Crafts: Memento Ink in Tuxedo Black, Gray Flannel, Espresso Truffle, cream card stock; Want2Scrap: 72 Count - White Pearls; Anna Griffin Inc - patterned papers; Chameleon Art Pens. Large gold and pearl embellishment, 3x Mulberry Paper Roses, Our Daily Bread Designs  Never Give Up Stamp set; Flourishes lc Flourished Frame with Sentiment set, cream lace

1. Fold cream card stock in half, cut/emboss using the A2 Matting Basics A # 7 (#1 being the smallest), making sure the folded edge is inside the cutting edge (as shown in the photo above) to form card base.
2. Cut/emboss using the  A2 Matting Basics A # 7 (#1 being the smallest) to form card front.

3. Cut/emboss the Diamond Flourish Pocket  using patterned paper,
4. Fold the pre-scored lines forward to create tabs
5. Adhere the Diamond Flourish Pocket tabs to the to the single  A2 Matting Basics A # 7 as shown above.

6. Adhere lace across the centre of the Diamond Flourish Pocket using liquid glue.
7. Attach the card front to the card base using 3D Foam Squares.
8. Adhere the metal and pearl embellishment to the centre of the lace.
9. Glue a mulberry paper rose to either side of the pearl.
10. Attach white pearls to the Diamond Flourish Pocket - as shown in the main photo.

10. Cut/emboss one A2 Matting Basics A # 6 in cream card stock.
11. Lightly stamp the Flourished Frame using Tuxedo Black ink - to give an aged look.
12. Colour the Flourished Frame Corners using Chameleon Pens.
13. Stamp the cross from the Never Give Up stamp set using Gray Flannel ink.
14. Stamp the sentiment from the Never Give Up stamp set using Tuxedo Black Ink.
15. Adhere one mulberry paper rose to the centre, near the top of the card.
15. Adhere 1 medium and two small white pearls either side.

Take care friends - thank you for your comments and all of the support you give me - you make blogging such an amazing place to be!! Your encouragement is such a blessing for me - it makes my day! God bless you!
{{{Hugs}}} and happy crafting

Tuesday, January 24, 2017

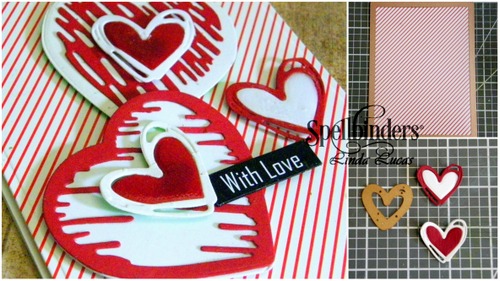
Spellbinders Heart to Heart Tutorial

Hello Friends, today's tutorial for Spellbinders is all about love - using the new Hearts Die D-Lite.  Such a cute little set and very versatile too,  This card could be for Valentines Day, which is just around the corner - or any other occasion, maybe even just because - whatever the reason, it is full of love and you can see how to create it below.


Spellbinders Products:
Other : Liquid Glue;  Scrapbook Adhesives by 3L: E-Z Adhesive Runner, 3D Foam Squares;  Red and white card stock; computer generated sentiment; striped card stock; Recycled patterned cardboard. Want2Scrap 72 Count - Red Rhinestones - Self Adhesive


1, Cut/emboss one solid Heart with the Scribbled Heart inside the Solid heart; using red card stock. and one using white.
2. Cut/emboss one solid Heart with the Scribbled Heart inside the Solid heart;,using white card stock.
3. Adhere the Scribble Heart outline to the co-ordinating Solid Heart using liquid glue. ie. red to white and white to red.


4.Cut two Overlapping Hearts in red and two in white.  Swap the centre Hearts to co-ordinate in three of the hearts - as shown above.
5. Pop up one onto each of the larger Hearts using a 3D Foam Square.
6. Cut/emboss recycled patterned cardboard using A2 Matting Basics A #5
7. Pop the layered Hearts onto the Die cut layer using 3D Foam Squares.
8. Adhere one small Overlapping Heart to the side using 3D Foam Squares.


9. Adhere computer generated sentiment using double sided tape.
10. Pop layers onto precut white card base using 3D Foam Squares.
11. Randomly add red bling as shown in the photos above.

Take care friends - thank you for your comments and all of the support you give me - you make blogging such an amazing place to be!! Your encouragement is such a blessing for me - it makes my day! God bless you!
{{{Hugs}}} and happy crafting