
International Ambassadors – Laced With Love Blog Hop
The International Ambassadors are blog hopping again! We had so much fun with our last informal Blog Hop featuring the Victorian dies we thought we would like to inspire you all again - this time we are using the Laced with Love Dies - and you are going to love them!! I hope you are getting to know us and and seeing our different styles - thank you so much for all of the lovely comments you left on my Blog - you made my day!

If you came here from Christina's Blog - you are in the
right place.
We have chosen to use dies from the Laced
with Love collection – we thought these work beautifully to coincide with
Valentine's weekend. It is so much fun
to create with them, as you will see as you stop by each Designer's Blog:
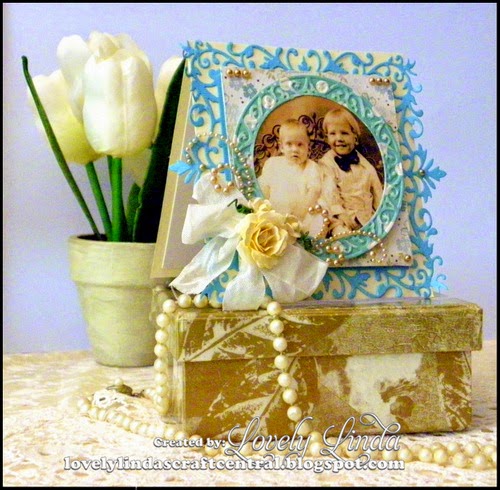
Here are a few photos of my card using
the …….


- S4-477 Floral Assortment Spellbinders® Nestabilities® Decorative Elements
- S4-478 Blooming Collection Spellbinders® Shapeabilities® Decorative Frames
- S5-086 Bitty Blossoms Spellbinders® Shapeabilities®
- GC-200 Spellbinders® Grand Calibur® Die Cutting and Embossing Machine
Cross Promotional Partners:
- Want2Scrap© - Baby Bling - LeCreme - Self Adhesive: Swirls Finesse - White - Self Adhesive
- Scrapbook Adhesives by 3L® - E-Z Runner; 3D Foam Squares
Other: White cardstock; blue cardstock; Leftovers of Patterned paper, Nostalgic photo; Mulberry Roses; Seam Binding; Sanding Block
Directions:
1. Cut/emboss one (1) Floral Assortment using blue cardstock.
2. Adhere to precut card base in white cardstock using liquid glue.
3. Adhere scraps together to fill in the middle of the DieCut piece using double sided tape - NOTE: I really wanted to use this paper but only had scraps - improvising here!
4. Adhere layers to precut card base using Crafty Foam Tape.

5. Cut/emboss one(1) Blooming Collection #2 in blue patterned paper
6. Cut photo slightly smaller and adhere behind the frame, popping up using Crafty Foam Tape.
7. Lightly sand the embossed pattern on the frame using a Sanding Block.

8. Adhere double Seam Binding Bow to the lower left portion of the circle.
9. Adhere Bitty Blossom to the center of the bow, along with two small white flowers
10. Trim Swirls Finesse to the card as shown in the photos
11. Add Baby Bling to the patterned paper corners, as shown.
The next stop is Yvonne. The list of International Ambassadors is below, in case you get lost along the way.
Linda Lucas (you are here)
Ursula Langhammer *on a break
Thanks so much for stopping by - we hope
you enjoy your time with us - we will be back with more!

{{{Hugs}}}


Gorgeous card and I love Bitty Blossoms and use them lots,Have a good Weekend, xxxx
ReplyDeleteHello Linda,
ReplyDeleteWow! this is gorgeous and it frames the photo so well.
Lydia
X
Such a lovely frame to the photograph and the flowers makes it so special x
ReplyDeleteSuch a lovely card and beatiful frame. Love the flower too.
ReplyDeleteit is a very beautiful card. nice to have an ambassador in australia. congratulations and crafty hugs.
ReplyDeleteA really super frame and great instructions for those of us that are here to learn thank you
ReplyDeleteHugs
Margaret corgi owner
UK
A beautiful card Linda. Bitty blossoms is one of my favourite dies and the new dies are so pretty.
ReplyDeleteThank you for sharing.
Lesley
Enjoying the blog hop. Lovely card, and thanks for the instructions.
ReplyDeleteCheers
Janice W
Good afternoon Linda i've just been to Christina's blog so I've just hopped across to yours and im so pleased I did your cards are amazing And I have these dies so I hope you don't mind If I have ago at making this card myself.
ReplyDeleteI'm now a follower of you.
Debs xx
{Debs Cards– my personal blog}
I'm a regular at Christine's Hope and Chances, and popped by to see what you are up to. Pretty card, love the dies!
ReplyDeleteThis is oh so beautiful!
ReplyDeleteGorgeous Linda. Hugs to you :)
ReplyDeleteHi Linda
ReplyDeleteI just popped across from Christine's blog. What a lovely card you've done for us. Thanks for the tutorial.
Wow....simply gorgeous!!!
ReplyDeletebeautiful card Linda
ReplyDeleteGr Karin
What a beautiful card Linda, and a lovely keepsake too....I just love all the new Spellbinders....luv Ursula xx
ReplyDeleteLinda, hi! Your card is just lovely! Those children in the photo are just adorable. And I, for one, so appreciate that you took the time to also give us detailed pictorial step-by-step assembly instructions! Well done!
ReplyDeleteThat is so pretty!
ReplyDeleteWhat a great idea...I really like the way you used the dies to create a portrait card. Love that blue card too.
ReplyDeleteVery pretty. The flowers look great.
ReplyDeleteHi Linda, I'm a regular at Christine's Blog, and I've popped over from Christina's. This step by step is fabulous and the finished project is gorgeous.
ReplyDeleteLots of love from Patricia xx
So pretty - love the dies.
ReplyDeleteVery pretty. Love the Victorian feel.
ReplyDeleteWell how you doing Linda!! :)
ReplyDeleteGorgeous card, these dies are awesome. Glad I decided to do this hop, wish there were more places to go :).
Popped over here from Christina's blog and so pleased I did. Love your card, those dies are just fabulous. Pat x
ReplyDeleteWhat a beautiful card - love the photo too x
ReplyDeleteSuch a great idea. I love to use photos and u have stirred a desire in me to make a card fir my oldest daughter. Beautiful card. ~
ReplyDeleteHi Lyndia,I love your card,I am sorry that I do not leave you a comment more often,I do visit and see you on Facebook,
ReplyDeleteI have been very ill since 2 013, and have followed all your problems with your foot,your smile brings sunshine to my heart.
Ita in Ireland.
Very pretty. Thanks for sharing
ReplyDeleteSue
rolfe974@prodigy.net
Hi Lyndia just came from Christina Griffins and happy i did lovely cards thanks
ReplyDeleteshi
Hi Lyndia love how you have used the dies and the colours you have used are so fresh looking, I've popped over from Christina's blog, I check it out every day, I love her style of cards. Thanks for the tutorial, much appreciated.
ReplyDeleteRegards Liz . U.K.
Hi Linda, Thank you for sharing this very pretty card. A great way to display a special photo and I just love the way you used the scrap paper that you so loved. Janelle xx Australia
ReplyDeleteSuch a pretty card!
ReplyDeleteSimply Beautiful!! I love the vintage look. I am really glad you provided the step by step - makes me want to reproduce this project.
ReplyDeleteBeautiful, i love how you have used the dies xxx
ReplyDeleteLove this frame on a special card. Beautiful with all the bling you have added. Dianne Crowe
ReplyDeleteYour card is a beautiful frame and a keepsake...what a wonderful idea...it turned out awesome
ReplyDeletewell done and thanks for the blog hop
Hi Linda.very nice card made out of the new die range. Such a sweet card as centre element
ReplyDeleteMaria Uk
what a beautiful card it really sets of that lovely photo x
ReplyDeleteWhat a delightful card Linda - love the way you use the dies. (And the scrappy back to the circular layer )
ReplyDeleteBlessings
Maxine
How lovely. You have now inspired me to use my dies to creat lovely scrapbooking 'frames' for text and pictures. Thank you. xxx
ReplyDeleteHi Linda,
ReplyDeleteLove your card and the dies you used. Great card.
Di B
That was just a beautiful project and such great work. I loved it!
ReplyDeleteSo sweet! Love the intricacy of the die cuts, but the focus remains on the wonderful photo. Beautiful card :D
ReplyDelete