
Hello friends - thanks so much for calling in. Today I have a tutorial for Spellbinders to share, using two of the beautiful Flower Garden Dies by Sharyn Sowell. You may not know this but Sharon's designs are all snipped freehand using only a simple pair of scissors - how amazing! These dies are perfectly suited for any time you want a feminine, fresh floral look.

This collection is a snapshot of a cottage garden, snipped in English gardens and Sharyn's own little patch.

1.Cut/emboss the Bird on Cherry Branch using white card stock.
2. Colour using Chameleon Pens.
3.Pop the wing up using 3D Foam Squares.
4. Cut/emboss one frame and one strip Floral Photo Frame using patterned paper.
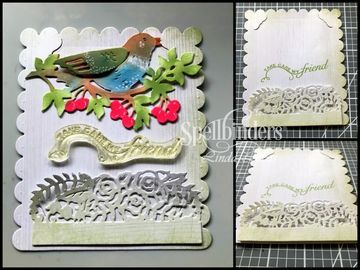
5. Place the Floral Frame onto a Stamping Platform.
6. Position the strip and the bird on the Floral Frame to determine where the sentiment will go.
7. Remove the diecuts and stamp the sentiment using Bamboo Leaves ink.
8. Pop the strip onto the lower portion of the frame using Crafty Foam Tape
9. Adhere the Floral Frame onto a pre-cut card base.

10. Adhere the Bird in a Cherry Branch to the top portion of the Floral Frame using 3D Foam Squares on on the bird and tucking some leaves into the notched corners -secure using double sided tape.
11. Trim a strip of Beautiful Bling -Beautiful Blooms to base of the Die Cut strip.
12. Add Red Pearls along the border and to the top corners as shown in the main photo.
Spellbinders Products:
- S2-285 Shapeabilities Bird on Cherry Branch Etched Dies Flower Garden by Sharyn Sowell
- S4-850 Shapeabilities Floral Photo Frame Etched Dies Flower Garden by Sharyn Sowell
- T-001 Tool 'n One
- PL-001 Platinum Die Cutting Machine
Other Supplies: White, cream and green card stock; Scrapbook Adhesives by 3L: Extreme Double Sided Tape, 3D Foam Squares; Crafty Foam Tape; Liquid Glue; Chameleon Color Tone Pens: Want2Scrap: - 250 Count - Red Pearls - Self Adhesive; Beautiful Bling - Beautiful Blooms; Imagine: Memento Ink in Bamboo Leaves; Hero Arts:Fancy Friends Clear Art Stamp set; Kaisercraft
Thank you for your comments and all of the support you give me - you make blogging such an amazing place to be!! Your encouragement is such a blessing for me - it makes my day! God bless you!
{{{hugs}}} and happy crafting

No comments:
Post a Comment
Thank you for your comment, I read and appreciate each one - you make my day! All comments are moderated and spam deleted.
Those leaving a comment on any post on this blog do so in the knowledge that their name and blog link are visible to all who visit this blog and by providing the comment, they have published their own personal details on this blog.{{hugs}}}