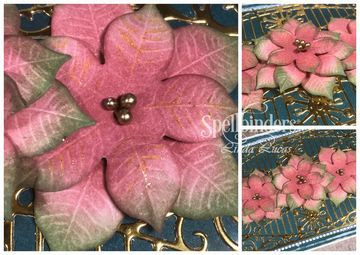
Hello friends, thanks so much for stopping by. I am sharing a tutorial for Spellbinders using the beautifully elegant and festive Dies from the A Charming Christmas Collection by Becca Feeken - these dies definitely make creating an elegant Christmas card so easy - as you will see when you follow along with the tutorial below.
'A Charming Christmas Collection by Becca Feeken offers holiday motifs that bring classic and elegant designs to your projects. This festive grouping is a wonderful addition to your holiday die collection!' - Spellbinders
1. Cut/emboss two (2) sets all four Cinch and Go Poinsettia flowers using white card stock and the Platinum Die Cutting Machine.
2. Sponge all of the flowers using Red Ink, adding touches of green at the end of the petals -carefully blend.
3. Shape each layer of flowers using the Tool 'n One and the Stylus Tips for Tool n' One
NOTE: A foam mat is recommended when shaping the flowers.
4. Layer the Cinch and Go Poinsettia flowers to create 3 flowers with assorted layers
5. Pop up each layer using 3D Foam Squares in the centre of each layer for extra dimension.
6. Cut/emboss one Hemstitch Rectangles Etched Dies using the largest two dies and patterned paper.
7. Lightly sand the embossed edges using a Sanding Block.
8. Cut/emboss two (2) Rectangle Toppers using both the Rectangle Topper/Border ands the Insert Design as shown in the photo above.
9. Glue the Rectangle Toppers to the top and bottom of the card front, lining each up inside the Hemstitched border and leaving a plain section in the centre of the card front.
10. Poke a hole through the centre of the layered Poinsettias, poke through 3 Gold Stamens and glue to the back of the flower. Repeat with each flower.
11. Glue one layered Cinch and Go Poinsettia to each side of the plain section.
12. Pop up a third Poinsettia into the centre using a 3D Foam Square
13. Pop up the card front onto a pre-cut slightly larger white card base using Crafty Foam Tape.
14. Adhere three (3) small Light Brown Rhinestones along both Insert Designs.
Spellbinders Products:
- S4-960 Shapeabilities Cinch and Go Poinsettia Etched Dies Etched Dies A Charming Christmas Collection by Becca Feeken
- S4-963 Shapeabilities Snowflake Toppers Etched Dies A Charming Christmas Collection by Becca Feeken
- S5-308 Nestabilities Hemstitch Rectangles Etched Dies Venise Lace by Becca Feeken
- T-001 Tool 'n One
- T-003 Stylus Tips for Tool n' One
Other: White and gold card stock; Scrapbook Adhesives by 3L: E-Z Adhesive Runner, 3D Foam Squares; ; liquid glue; Imagine: Memento Inks in Rhubarb Stalk and Bamboo Leaves Want2Scrap: 250 Count - Brown Rhinestones - Self Adhesive; Sanding Block; Gold Stamens; Liquid Glue
Thank you for your comments and all of the support you give me - you make blogging such an amazing place to be!! Your encouragement is such a blessing for me - it makes my day! God bless you!
{{{hugs}}} and happy crafting


No comments:
Post a Comment
Thank you for your comment, I read and appreciate each one - you make my day! All comments are moderated and spam deleted.
Those leaving a comment on any post on this blog do so in the knowledge that their name and blog link are visible to all who visit this blog and by providing the comment, they have published their own personal details on this blog.{{hugs}}}