}
Showing posts with label Quick Quotes. Show all posts

Monday, November 19, 2018

Spellbinders Happy Narwhal Tutorial

Hello friends, thanks so much for stopping by.  I have a tutorial for Spellbinders to share with you - Something a little bit more whimsical than usual. How adorable is this little Happy Narwhal?!  He is the unicorn of the ocean and a lot of fun to create with. 


'Die D-Lites Happy Narwhal Etched Dies is a set of two dies that includes a sweet narwhal animal and a splash accent with a hint of heart designs. The Spellbinders Exclusives Collection will be only available at select retailers.'- Spellbinders

1. Cut/emboss the Happy Narwhal using white card stock and the Platinum Die Cutting Machine.
2. Use the Die as a Stencil and sponge the open areas with pink ink as shown above, before removing the Die cut.
3. Sponge the body of the Happy Narwhal using Golden Glitz ink and Espresso Truffle.
4. Add eyes using a Black Marker and a white Paint pen for extra details.

5. Cut/emboss patterned paper using the largest die from the Fancy Edged Rectangles Etched Dies.
6. Lightly sand the embossed edges using a sanding block.
7. Cut/emboss white card stock using the third largest Scored and Pierced Ovals Etched Dies.
8. Pop up the Happy Narwhal onto the centre of the Scored and Pierced Ovals Etched Dies using 3D Foam Squares.
9. Cut/emboss pink card stock using the second largest Scored and Pierced Ovals Etched Dies.
10. Pop up the layered Happy Narwhal onto the Pink oval using 3D Foam Squares.
11. Pop up the layered Happy Narwhal onto the centre of the card front using double sided tape.


12. Cut/emboss one Heart Splash using white card stock and one in pink.
13. Remove the hearts inserts from each, placing the pink inside the white Heart Splash - add a little tape behind it so they stay in place.
14. Pop up the Heart Swirl above the Happy Narwhal using double sided tape and 3D Foam Squares on the portion that is outside of the oval.
15. Randomly adhere silver rhinestones to the card front.

Spellbinders Products

Other:  White and pink card stock; Scrapbook Adhesives by 3L: E-Z Adhesive Runner, 3D Foam Squares; ; liquid glue; Imagine: Memento Luxe Inks in Rose Bud, Memento Ink in Espresso Truffle, Delicata Ink in Golden Glitz. Want2Scrap: 250 Count - Silver Rhinestones - Self Adhesive; Sanding Block; Liquid Glue; Quick Quotes Scrapbook Company: Patterned Paper;Black Marker

{{{hugs}}} and happy creating

Wednesday, October 3, 2018

These Pretzels are Making Me Thirsty.....

Hello friends, thanks so much for stopping by! If you are a Seinfeld fan the title of this post will immediately bring to mind the episode with Kramer and the Pretzels - it always makes us smile... I have to ask - what do you do in your spare time?  I can almost hear some of you laughing at that question - most of us don't have any - do we?!  As for me - I love to recycle - not much leaves this house without me salvaging what I can....


This time is was a Costco Pretzel Jar - they are a great hit in our house and those huge jars have to be good for something - right!?  This one was perfect for our grandsons cars - like all little boys he is car, bus and anything on wheels crazy - and they seem to be anywhere but away when it is time for him to go home...hence the Card Jar - which I must add is ideal because it is plastic!


I have cut Quick Quotes Scrapbook Company patterned paper to the same size as the pretzel label and adhered it using Scrapbook Adhesives BY 3L E-Z Adhesive Runner Ultra - it won't be going anywhere in a hurry! LOL!

The chipboard letters are from my stash and have been coloured using Chameleon Pens, with touches of  blue and white paint along with faux enamel dots created using  Imagine irRESISTibles Pico Embellisher in Tuxedo Black - allow to dry!  They have been adhered used liquid glue.

The chipboard car and fire engine/truck are from Little Birdie Crafts - these have been glued to the lower portion of the patterned paper and held in place by repositional tape, or any low tack tape can be used, until the glue is dry.

Lastly - fill it up with cars or whatever you have created it for - it is a great size and holds so many cars - I think I see one for Dinosaurs in the future.... wink:wink!!

This project is linked to the following challenges:
A Snowflakes Promise - Anything Goes
Lemon Shortbread - Always Anything Goes 
Altered Eclectics - Anything Goes 
Crafty Hazelnut's Patterned Paper - Anything Goes with Patterned Paper
Creatalicious Challenges - Anything Goes + Option: Texture
Love to Craft - Anything Goes
Not Just Cards Always Anything Goes
Pile It On - Think Big and/or One-Layer Card
We Love 2 Create  - Always Anything Creative/Mixed Media Goes

Thank you for your comments and all of the support you give me - you make blogging such an amazing place to be!! Your encouragement is such a blessing for me - it makes my day! God bless you!

{{{hugs}}} and happy crafting

Thursday, September 27, 2018

Kind Words

Hello friends, thanks so much for stopping by.  I love a good sentiment on a card and am always on the look out for new ones.  The one I have used here is from an older Collection from Quick Quotes Scrapbook Company - and I have to admit has been sitting in my stash for some time (head hung in shame)  I am sure you know what it is like - but what fun to rediscover things when you start sorting - and that is all I will say about that! LOL!


'Kind words can be short and easy to speak, but their echoes are truly endless' - Mother Teresa

The card front has been created by using two strips of Kaisercraft patterned paper that were left over from other projects, they have been adhered to a piece of card board and cut/embossed using Spellbinders Nestabilities Scored and Pierced Rectangles Etched Dies and the Platinum Die Cutting Machine, then popped up onto a pre-cut slightly larger white card base using Scrapbook Adhesives By 3L 3D Foam Squares. 

Authentique Paper patterned paper has been cut/embossed using the Spellbinders Shapeabilities Victorian Medallion One Etched Dies and adhered to the centre of the card front using liquid glue.  Next the sentiment has been adhered to the centre of the Medallion.


The butterfly has been created by cut/emboss the Butterfly Body using Kaisercraft patterned paper and the Shapeabilities Layered Monarch Etched Dies - Exclusive, this is followed by the Butterfly Wing Layer 3 n black card stock.  Adhere the Wing layer over the patterned Body Layer using glue.  Colour the body using black marker.  Add liquid glitter to the wings and allow to dry.

Pop up the butterfly on the top right portion of the sentiment panel with the body overlapping onto the panel and the wings a popped up onto the card front using Scrapbook Adhesives By 3L 3D Foam Squares - glue the body portion.   Want2Scrap 250 Count White Pearls have been added to each corner.
This card is linked to the following challenges:
Creative Moments - Always Anything Goes 
Fab 'n' Funky - All Creatures
Simon Says Wednesday - Anything Goes
That's Crafty! Challenge - Forever Autumn
WordArt Wednesdays Anything Goes 
Paper Shelter Challenge - Fall Colors
Create and Inspire - Anything Goes + option of inspired by a song (The Ellusive Butterfly)
Let's Craft & Create Challenge - Anything Goes + option of Best Friends
Love to Craft - Anything Goes
Love to Scrap - Anything Goes
Pause Dream Enjoy - Any Cards
Scribbles Designs Challenge - Patterned Paper
Sparkles Forum Challenges - Dies or Punches
Sunny Day Crafting - Always add an Animal

Thank you for your comments and all of the support you give me - you make blogging such an amazing place to be!! Your encouragement is such a blessing for me - it makes my day! God bless you!

{{{hugs}}} and happy creating

Tuesday, March 13, 2018

Upcycled - Sweet Celebrations

Hello friends, thanks so much for stopping by.  I have a very quick upcycled card to share with you today - it all started with a Winnie the Pooh image on a piece of paper - who does not love Winnie the Pooh - he just had to be given a second chance! Wink:Wink!


I have popped up the image into a negative Die from the Spellbinders Shapeabilities Seth Apter Drip Dry Etched DiesThis has been trimmed and adhered to a slightly larger piece of orange card stock.  Thin strips of inked and embossed card stock have been adhered across the image - approx 2.5 cm apart.  A sentiment (from my stash) has been popped up across the lower portion of the image using Scrapbook Adhesives BY 3L.


The balloon and sentiment have been cut/embossed using the Die D-Lites Celebrate Etched Dies and the Platinum 6 Die Cutting and Embossing Machine - 6" Platform.  The balloon and string have been adhered to the right of the sentiment banner; the Die Cut sentiment has been adhered to the lower portion of the card front.  The balloon has been coated using a clear gloss and Little Birdie  Crafts Dazzle Cocktail Tequila Sunrise for some added shimmer.


This card is linked to the following challenges:
613 Avenue Create - Anything Goes w/Optional Twist:Reuse/Recycle
Tinker- Dream Birthday/Party
Dragonfly Dreams - All that Glitters
Pixie's snippets Playground Challenge - Anything Goes Using Snippets
Crafty Catz - LAYER IT UP
International Art and Soul Challenge - Use embossing and a die cut
Aud Sentiments Challenge - Anything Goes + A Sentiment
Crafter's Cafe - Recycling
The Corrosive Challenge - Anything Goes
CCEE Stampers - Die Cut Words
Catch The Bug Theme Challenge - Natures Wonders - use a creature
Crafty Animals Always Anything Goes


Thank you for your comments and all of the support you give me - you make blogging such an amazing place to be!! Your encouragement is such a blessing for me - it makes my day! God bless you!

{{{hugs}}} and happy crafting

Tuesday, February 14, 2017

Spellbinders Swallow and Heart Tutorial

Hello friends - welcome to the International Ambassadors Unofficial Blog Hop!  A BIG thank you to those who Hop along with us each month and left such lovely comments - it means so much! This month the theme is 'Valentines Day/Love'.  I hope you can hop along with us and see what each of the International Ambassadors has for you as we 'share the love!'


Spellbinders Product
Other : Liquid Glue;  Scrapbook Adhesives by 3L: E-Z Adhesive Runner, 3D Foam Squares; Imagine Crafts: Memento Ink in Summer Sky, Sponge Daubers, white card stock; Want2Scrap: 72 Count - White Pearls; Quick Quotes Scrapbooking Co: Farmhouse Collection


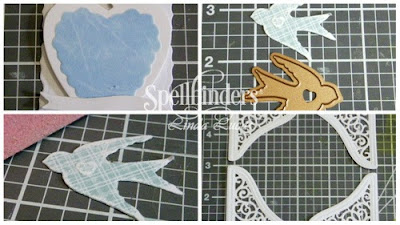
1. Cut/emboss one Swallow and Heart heart and banner using white card stock.
2. Cut/emboss one swallow using scrap of patterned paper.
3. Use the Die a a Stencil and sponge inside using Summer Sky ink and a sponge dauber.
4. Cut/emboss two Fairmont Labels using white cardstock.
5. Score one Fairmont Labels 1cm from the top and fold forward.
6. Adhere the second Fairmont Labels to form card base, making sure to line up patterned eadges.

7. Cut/emboss one Fairmont Labels using white cardstock.
8. Pop up the heart using 3D Foam Squares.
9. Remove the swallow from the die and lightly sand using a sanding block.
10. Cut/emboss four Amazing Paper Grace Swirl Bliss corners using white cardstock.
11. Pop up heart onto the small Fairmont Labels

12. Adhere patterned paper to the card base.
13. Glue corners on, overlapping each one onto the next.
14. Tie blue thread around the front of the card, securing with a bow.
15. Pop up the layered heart onto the layered card base.


16.  Pop up the dove onto the heart - slightly to the right, using 3D Foam Squares.
17. Adhere the banner across the lower portion of the heart.
18. Adhere white pearls across the banner.
19. Glue a mulberry paper rose to the bow.
20. Adhere White pearls around the filigree border.

Make sure you pop in and visit the other International Ambassadors - these girls are so talented - each one is picked to be an Ambassador for their country because they are seasoned designers and so inspiring, they also stand as talented designers in their own right - as you will see!!!  The list of International Ambassadors is below, in case you get lost along the way.

  Linda Lucas - Australia (you are here)
Yvonne van de Grijp - Netherlands
Christine Emberson - England

Take care friends - thank you for your comments and all of the support you give me - you make blogging such an amazing place to be!! Your encouragement is such a blessing for me - it makes my day! God bless you!
{{{Hugs}}} and happy crafting    


Sunday, November 20, 2016

Want2Scrap and Quick Quotes Card Sneak Peek

Hello friends, I am excited to be sharing another project over on the Want2Scrap Blog - we have joined with Quick Quotes Scrapbook Company for an Inspiration Week - I am sharing a card today - you can see it all HERE.


Thank you for your comments and all of the support you give me - you make blogging such an amazing place to be!! Your encouragement is such a blessing for me - it makes my day! God bless you!

{{{hugs}}} and happy crafting

Thursday, November 17, 2016

Sneak Peek of Want2Scrap and Quick Quotes Art Journal

Hello friends, I am excited to be sharing a project over on the Want2Scrap Blog - we have joined with Quick Quotes Scrapbook Company for an Inspiration Week - I am sharing not one, but two pages of  my Art Journal - you can see it all HERE.


Thank you for your comments and all of the support you give me - you make blogging such an amazing place to be!! Your encouragement is such a blessing for me - it makes my day! God bless you!

{{{hugs}}} and happy crafting

Tuesday, May 10, 2016

Enjoy Life Layout

Hello friends - today I have a layout to share with you - and yes, it is of my adorable grandson, Noah who turned one last month - time has flown by so quickly!  When he was born, I decided to create a Scrapbook of him - rather than a Baby Book and I have been working really hard behind the scenes to fill it - typically, this one has more pages than any of my others...LOL!


I have used Spellbinders 5x7 Em-bossing Folder Maze by Seth Apter of The Altered Page which has been inked and had the photo mounted on it using Scrapbook Adhesives by 3L 3D Foam Squares.  I have also used A stamp from Unity Stamp Company, Kaisercraft rubon, Washi Tape, letters from Authentique Paper, chipboard sentiment from Quick Quotes, along with bits and pieces from my stash.


This layout is linked to the following challenges:
Bizzy Bec's May Challenge - Anything Goes
Scrapbook Stamp Society Challenge Blog Anything goes with option of Layers
The Crazy Challenge - 3 Layers or more
Artistic Inspiration Challenge - Anything Goes, twist, use a Die
Avenue 613 Challenge - Anything Goes - twist, My Sentiment Exactly

Take card friends - thank you for your comments and all of the support you give me - you make blogging such an amazing place to be!! Your encouragement is such a blessing for me - it makes my day! God bless you!
{{{Hugs}}} and happy crafting