}
Showing posts with label Scrapbook Adhesives. Show all posts

Sunday, August 7, 2016

Spellbinders Renaissance Christmas Frame

Hi everyone, it is Linda here with a tutorial for Spellbinders using one of the gorgeously elegant Dies from the Renaissance Collection - these Dies are a statement in themselves and help create the most stunning cards - perfect for Christmas with its joyful opulence or any occasion for that matter.


Spellbinders Products:
Other : Liquid Glue;  Gold Cardstock; Scrapbook Adhesives by 3L: E-Z Adhesive Runner, 3D Foam Squares; Want2Scrap: Swirls Finesse - Le Creme Pearls - Self Adhesive   Imagine Crafts:  Delicata in Golden Glitz, Sponge Daubers; Music Sheet; Gold Braid, KaiserCraft: White Lace; Gold Button; May Arts Ribbon: Sheer cream ribbon; Corner Rounder


1.Cut/emboss one (1) Renaissance Christmas Frame using Gold Cardstock. 
2. Cut/emboss two (2) Poinsettia flowers using cream cardstock.
3. Using the Die as a Stencil, sponge inside the Die using Golden Glitz and a Sponge Dauber.
4. Cut/emboss one (1) set of Holly Leaves, along with two (2) birds
5. Using the Die as a Stencil, sponge inside the Poinsettias and  Birds using Golden Glitz and a Sponge Dauber.


6. Adhere white lace onto a pre-cut music sheet using liquid glue.
7. Glue gold/white braid across the center of the lace.
8. Adhere the frame onto pre-cut sheet music using 3D Foam Squares.
9. Adhere the layers onto cold cardstock cut slightly larger using double sided tape.
10. Attach all layers onto pre-cut card base using double sided tape.
11. Pop Poinsettias into the frame (top and bottom) using 3D Foam Squares.

12. Adhere Swirls Finesse to the center of each side of the frame.
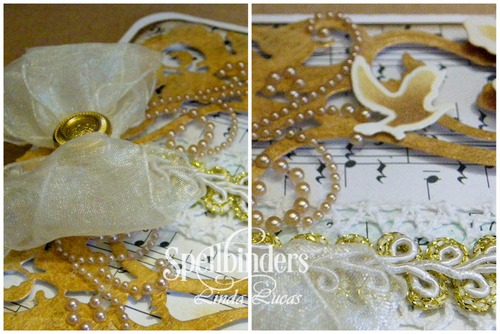
13. Glue the double sheer bow, to the left hand side of the frame,
14. Adhere the button to the center of the bow using liquid glue.
14. Adhere the birds to each side of the Poinsettia using liquid glue.


Take care friends - thank you for your comments and all of the support you give me - you make blogging such an amazing place to be!! Your encouragement is such a blessing for me - it makes my day! God bless you!

{{{Hugs}}} and happy crafting

Saturday, November 21, 2015

Spellbinders Lacey Layers Tutorial

Hello everyone -I am sharing a Spellbinders Step by Step Tutorial today - I am wanting to show you just know easy it is to create lacy layers using the gorgeous filigree dies and having an elegant and professional looking card.


One of the things I love about Spellbinders Dies is the way the dies work so well together creating unique and timeless cards.

Spellbinders Products:
Preferred Partner Products:


1. Cut.emboss one (1) Lacey Oval using Whirl White
2. Cut/emboss stamped and coloured image using Classic Oval # 5 (#1 being the smallest)
3. Pop oval onto Lacey Oval using 3D Foam Squares
4. Adhere double to the top of the Classic Oval using liquid glue

5. Cut/emboss one (1) A2 Tranquil Moments using Whirl White, 
6. Remove the extra pieces using the Tool'n One
7.Adhere the A2 Tranquil Moments to a precut card base in green
8. Adhere the layered image onto the card base using 3D Foam Squares
9. Add pearls as shown in the main photo

As I told you - it is so very easy - don't let layers fool you - they do not have to be complex - but they can certainly be beautiful when you use Spellbinders Dies.

Thank you for your comments and all of the support you give me - you make blogging such an amazing place to be!! Your encouragement is such a blessing for me - it makes my day! God bless you!
{{{Hugs}}} and happy crafting

Friday, March 27, 2015

Quietfire March Guest Designer - Each of us Has a Song


Hi, I am excited to be back for my second post as the March Guest Designer for Quietfire Design - using a stamp set and a separate sentiment that goes so well with it.   I love these sentiments and images - the calligraphy reminds me of my beautiful Nana - it was a preferred style of hers - it is not hard to see why!


I would love you to pop across and see the whole card - and leave the Quietfire Designs ladies a little love!!  You can see it here.

Thank you so much for having me and all of the encouraging comments you have left me - it has been a fabulous privilege being a Guest Designer - I hope you have been inspired in some way!
{{{hugs}}}

Monday, September 8, 2014

Spellbinders, Bezels and ICE Resin


A very quick post from me today, while I am catching up with things since being away with the Art is You Australian Mixed Media Roadshow...but sometimes less is more - right?!! LOL!'


I am quickly acquiring a new addiction - Bezels and Ice Resin - I know slow to get started but believe me I am making up for lost time.  This is the start of a keychain I am creating fir my DH using  Authentique Paper, Spellbinders Dies, Imagine Crafts/ Tsukineko inks and Scrapbook Adhesives by 3L along with ICE Resin - have you tried it - you are going to love it - if you don't already....
 
 
So easy and so many different ways to use it - you are only limited by your imagination!
 
Thank you for your comments and all of the support you give me - you make blogging such an amazing place to be!! Your encouragement is such a blessing for me - it makes my day! God bless you!
 
{{{Hugs}}}
Follow on Bloglovin

Tuesday, August 19, 2014

Art is You Australian Mixed Media Roadshow


Hello Blog Friends, as you can imagine we have hit the ground with our feet running and I have not had the opportunity for another update...so today I will do my best to give you a brief look at some of the NSW Retreat.


I taught my first all day Mixed Media Workshop and I have to tell you it was full on ... 6 hours of technique, Dies, bling, ink and fabulous,ours paper, glues and tape....the ladies all did a wonderful job and we had a lot of fun along the way.


Food was never an issue...or maybe it was because there was so much of it and the quality was fabulous.  A little sneak peek of one morning tea...


It was great to catch up with Facebook friends, Amy, Kel-lea and Meryll and meet so many new friends, all who have th same passion.


Also got to meet some of the amazing artists yet there eg. Jane Davenport, who is a bundle of energy.


Fell in love with Carol Cantrell, Jan Crossley and I adopted her as our 'Rent a Mum' .. She is the sweetest lady....(pssst Carol, I hope this makes me the favourite now! LOL! )


As you may have noticed I am way behind on my posts ... I could.d give you all kinds of fancy excuses but the truth is we are so busy each day that at night when I go to finish my post....sleep wins!  But I will post this tonight even if it is not finished.....


Our next stop was Berrima, on the way to Melbourne via Canberra...it was wet,meet, wet!  Unpacking the bags was a challenge....but thanks to Michael and Seth, under the watchful eye of Andrea, it all managed to be unpacked and packed up again.


Check out the rubbish...Rafferty's Resort packed some snack boxes for our trip


Okay, that is it for me tonight...tomorrow I will share Canberra and a little touch of Melbourne

Thanks so much for stopping by today...you know ai love to see you.  I appreciate all of the love and support along the way.

{{{hugs}}}
Lovely  Linda