}
Showing posts with label Embellishments. Show all posts

Tuesday, July 25, 2017

A Little Mixed Media - Heart Bezel

Hello friends - Monday here for me, Monday evening infact and it has been a productive day.  It is always a great feeling to get some projects finished and photographed - getting them blogged is a whole 'nother show!! LOL!! 


I have used the  largest Bezel in the Spellbinders Media Mixage Hearts One - Bronze and the co-ordinating Die, which I believe may have been discontinued.  I have used some recycled Mixed Media paper, stamping some eclectic images onto it and then coating on both sides using Imagine Creative Medium to seal the paper so liquid does not change it.
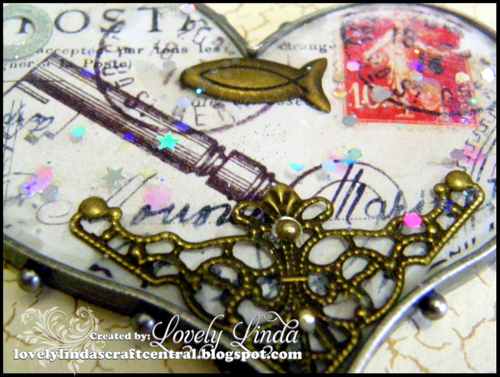

I have added some embellishments - they are adhered by drizzling a little Ice Resin into the bezel and layering the embellishment onto it.  Once I was definite I poured in some Ice Resin - I love how it is self doming and dries like jewellers glass - perfect.

Some reasonably chunky glitter has been sprinkled onto the Ice Resin - it is heavy enough to sink slightly and has a great effect.  I am still deciding exactly what I am going to do with it - the options are many - maybe a necklace, on a canvas, bookmark.....to name a few!


This project is lined to the following challenged:
Artistic Inspirations -  ANYTHING GOES + ANYTHING GOES
Incy Wincy Designs - 1 PAPER LAYER ONLY
heARTful Stamping Challenge - Anything Goes + Stamp
The Mixed Media World Challenge - Anything Mixed Media + Use Natural Materials
613 Avenue Create Challenge - Anything Goes
We Love 2 Create - Always Anything Creative/Mixed Media Goes
Imagine That! CreativePlayground - Anything Crafty Goes
Craft Rocket Challenges - Anything Goes
Crafting By Designs - Recycle, Reuse, Repurpose

Thank you for your comments and all of the support you give me - you make blogging such an amazing place to be!! Your encouragement is such a blessing for me - it makes my day! God bless you!
{{{Hugs}}} and happy crafting!!

Thursday, October 8, 2015

Want2Scrap Nestabling


Hello Blog Friends, I have a new card on the e Want2Scrap Blog - here is a little sneak peek - I have used some of the amazing Nestabling and know you are going to love all of the little extras along the way,


I would love you to pop over and check it out and let me know what you think - you can see all of the details HERE.

Thank you for your comments and all of the support you give me - you make blogging such an amazing place to be!! Your encouragement is such a blessing for me - it makes my day! God bless you!
{{{Hugs}}} and happy creating!

Friday, August 21, 2015

Spellbinders Dear Friend Tutorial

Hello Blog Friends - I am back to share a Step by Step Tutorial for Spellbinders - today's card is layered and shabby - layering is made so easy using Spellbinders Dies -  building on the Core dies is the perfect starting place - as you will bee in my tutorial.


Spellbinders Products

Preferred Partners Products:
Other:  Printed Image; Sanding Block; Handmade Embellishments; Mulberry Paper Roses; Lace

1. Cut emboss one (1) A2 Curved Matting Basics B #9 (#1 being the smallest) using the Grand Calibur Die Cutting and Embossing Machine and Time to Flourish patterned paper
2. Cut/emboss one (1) Triple Floral #2  (#1 being the smallest) using Graphic 45 image
3. Cut/emboss one (1) Triple Floral #3  (#1 being the smallest) using Whirl White
4, Sand around edges of the die-cut A2 Curved Borders using a Sanding Block

5. Sponge around the inside edges of the Triple Floral #3 using Pixie Pink and a Sponge Dauber
6. Cut/emboss two (2) A2 Curved Matting Basics A #8 in white cardstock .
7. Score the top of one A2 Curved Matting Basics A #8 at 1cm, fold forward and attach to the front to form card base.
8. Adhere the Die Cut A2 Curved Matting Basics B to the base using double sided tape.
6. Adhere the white Triple Floral #3 to the top portion of the layered card base using double sided tape
7. Adhere Triple Floral #2 Die cut image to the #3 Diecut using Crafty Foam Tape
8. Add lace strip underneath the layered image
9. Attach double seam binding bow using liquid glue
10 Adhere resin birds nest to the bow using liquid glue
11 Attach Mulberry Paper Rose either side of the birds nest using liquid glue
12 Trim Swirls Finesse to size and attach as shown in the main photo.
13 Add 250 Count Rhinestones – Baby Blue around the edges of the Triple Floral #3 edges
14 Adhere resin bird to the right edge of the lace using liquid glue
14 Adhere Beautiful Bling Border - Fancy That! by Nina Brackett across the lower portion of the lace
15 Add 250 Count Rhinestones – Baby Blue to the swirls on the beautiful bling border.


Thank you for your comments and all of the support you give me - you make blogging such an amazing place to be!! Your encouragement is such a blessing for me - it makes my day! God bless you!

{{{Hugs}}} and happy creating!

Saturday, August 8, 2015

A Touch of Paris with Ice Resin

Hello Blog Friends - today I wanted to share a combined project with you.  My DH is a very talented man - he does photography and is also upcycling furniture, which you can see here.  I have to be honest and say that he does all of the hard work!


I create the Bezels that he has added to a few pieces - as you will see.  Don't be fooled - these are very easy to create - and a lot of fun!


I have used the medium Oval Hobnail Bezel.  My images are stickers that is created to co-ordinate with the Bezels, it has been sealed using  Imagine Crafts 'featuring' Tsukineko: Creative Medium.  This is applied to the front and the back of the image and also around the cut edges - then allow to dry.  

Mix equal amounts of Part A and Part B of the Ice Resin (use a small measuring cup for accuracy), stir until clear, using a wooden stirrer, Put aside for 5 minutes for the bubbles to settle.  Drizzle a little bit of Ice Resin into the Bezel and spread it with the wooden stirrer.  Add the sticker making sure it is smooth and no air bubbles underneath.

Add any embellishments, including glitter.  Slowly pour Ice Resin into the Bezel using the wooden stirrer until the Bezel is full - remember Ice Resin is self doming - but be careful not to overfill. 


 Set aside for 24 hours to dry properly.  You will have a finished product with Jeweler quality glass - how good is that!!


The finished Bezels have been added to this beautiful french, shabby screen, adding a lovely 'Parisian' touch - what do you think?!  You can find other projects HERE

Thank you for your comments and all of the support you give me - you make blogging such an amazing place to be!! Your encouragement is such a blessing for me - it makes my day! God bless you!
{{{Hugs}}} and happy crafting!!

Tuesday, March 4, 2014

Spellbinders Tuesday Video Tutorial - Spring - Card Embellishments

I am sharing the Tuesday Video Tutorial on the Spellbinders Blog today - the theme is Spring - Card Embellishments - there are so ,many possibilities!  I would love you to pop across and visit and leave a comment and let me know what you think, if you have the time. You know I love to hear from you - just click on the HERE. 


Thank you for your comments and all of the support you give me - you make blogging such an amazing place to be!! Your encouragement is such a blessing for me - it makes my day! God bless you!

{{{Hugs}}}
 
 
Follow on Bloglovin
 

Sunday, February 23, 2014

Graphic45 - Special Day Card

Hello Blog Friends, I received an early copy of the Australian Simply Cards Magazine  as I have a 6 page article in it - which is exciting enough, I was excited to see that their free gift for March was some Graphic 45  Papers from the A Place in Time Collection and Chipboard Embellishments.


 I could not resist creating something straight away - with this gorgeous Chipboard tag. I have inked around the edges using IMAGINE Crafts®/Tsukineko® Memento™ Dye Ink in Rich Cocoa.  The image has been layered onto the Lacey Circles Spellbinders® Decorative Elements Nestabilities


This has inturn been layered onto the Gold Majesty Circles Spellbinders® Imperial Gold die using g Scrapbook Adhesives by 3L™  - 3D Foam Squares.  The patterned paper is
Authentique™ Paper- Glistening Collection and has been embossed using the
Spellbinders Grand Calibur® Machine and  Dotted Flowers M-Bossabilities™ folder.


The flower is created using Bitty Blossoms Spellbinders® Shapeabilities® and the Bling is  Want2Scrap©- Baby bling in LeCreme.


This card is for the following challenges:
ABC Challenge - F is for Flowers
Cards Galore Encore - Add a gem, glitter, candi or any bling you fancy
 One Crazy Stamper - Anything Goes
The Crafting Cafe - Embossing
A Creative Romance - Let's Get Sentimental 
Sister Act Card Challenge - Anything Goes 
 The Stamping Boutique - Use a Punch or a Die-Cut 
TagaLong - Lots of Layers 
Crafter's Cafe - Vintage/Shabby Chic
 WordArt Wednesdays - Anything goes (must be uplifting, no dark images or themes)
Make it Monday - Always Anything Goes 
 Whoopsi Daisy - 2 or more Die Cuts


Thank you for your comments and all of the support you give me - you make blogging such an amazing place to be!! Your encouragement is such a blessing for me - it makes my day! God bless you!

{{{Hugs}}}
Follow on Bloglovin

Friday, November 8, 2013

Craft Central - Where It All Happens...

 While I am busy working on projects that cannot be shown yet, I thought I would share my creative space - affectionately known as 'Craft Central', with you.  Up until a couple of months ago I was in the family room and love being with the family - in all honesty if I was not out there, they would hardly see me some days! LOL!


With the Design Team deadlines I have, Tutorials, Videos and Skype calls and a house full of noisy teenagers, my DH, a cat and two dogs - I could hear myself, on more than one occasion, say 'I wish I could shut a door sometimes.'


This did not fall on deaf ears - my DH did some 'shuffling' and almost instantly I had my own Studio - small and cosy - totally wonderful to  create in - and the beauty of it is - it only took an 1.5 hours to move it all in.


I love the warmth and character of an eclectic look and this works so well for me - baskets are fantastic - keeping everything together and so easy to move around - not to mention great storage.


One of my favourite things is being able to keep my Spellbinders Grand Calibur out - so quick and easy to cut Dies - and I cut so-o-o many!


Bookcases are my best friend - hold everything from papers to bling and anything inbetween!  This is a room where everything has it's place and everything goes back in it's place.


Recycling is a BIG part of my storage - one of my favourites being this Spice Rack - the best $2 I ever spent - holds my embellishments perfectly!  I use glass fishbowls for lace and vases for ribbon - you name it and you can probably find it here - keeps it interesting! LOL!


Thank you for visiting today - if only it could be in real life - the coffee is always on and the door is always open - for YOU!  Thanks for your comments and all of the support you give me - you make blogging such an amazing place to be!! Your encouragement is such a blessing for me - it makes my day! God bless you!

{{{Hugs}}}
Follow on Bloglovin


Saturday, September 21, 2013

Bourgogne Heart Bezel

The Spellbinders  Media Mixage range is so inspiring - and you don't have to make jewellery to create using it, or be a Mixed Media Artist - to make a unique and timeless piece of 'art from the heart.'


I have used the  Hearts One Spellbinders® Media Mixáge™  Bezel, cutting the Ephemera Papers One  using the Hearts One Spellbinders® Media Mixáge™ Dies#3 (#1 being the smallest)


I have  used Art Institute Glitter, Inc. along with some embellishments from my stash and finished by filling the Bezel with ICE Resin®.


This project is for the following challenges: 
Chocolate, Coffee & Cards - Anything Goes 
4 Krafty Girlz - 2 Anything Goes 
Crafting By Designs - Heritage 
Crafty Creations - Charm 
Tuesday Throwdown - Things With Wings (Butterfly embellishment) 
Crafty Bloggers Network - Things with Wings (butterfly embellishment)
 Tammy's Scrappin Corner - Anything Goes
 
Thank you for your comments and all of the support you give me - you make blogging such an amazing place to be!! Your encouragement is such a blessing for me - it makes my day! God bless you! 
{{{hugs}}}
Follow on Bloglovin

Monday, May 7, 2012

Exquisite Embellishments Blog Hop

****This post will remain at the top until the end of the Blog Hop****
You can find the Spellbinders Spring Blog Hop and Giveaway HERE
Please scroll doen to see new posts!


I am so thrilled to be part of the Exquisite Embellishments Blog Hop hosted by the lovely Keri Lee Sereika, who is the authour of this amazing book!  These pages are once again FILLED with the talent and creativity of some of the top designers in the paper crafting industry! And so without further ado I present to you "Exquisite Embellishments for Paper Crafts"!!!

Exquisite Embellishments WEB


Isn't it GORGEOUS?????  The cover boasts art work from three different designers who have been featured in the book, Sherry Wright, Kandis Smith and Sharon Reinhart. And let me tell you that is just a taste of the delights that grace each and every page!  This divine book is now on sale here.   If you arrived here from the talented Keri Lee's Blog you are in the right place - your next stop from here is Sherry's Blog

I am honoured to have been asked to share some projects to the book, especially top be among such amazing designers - thank you Keri Lee for this wonderful opportunity.   I thought I would share one with you today.  I featured  a handmade flower using a stamp and layering it. I loved adding layers to give dimension, along with the flower, the butterfly becomes a gorgeous embellishment in it's own right.  Add to that beautiful patterned paper, pearls and lace and the card is complete.  You can find step by step instructions in the book, for this card and many others.


Cardstock:  Creativ8 Textured Cardstock – Cream, Pink
Printed Papers: Pink Paislee – Sweetness 6x6 Pad
Stamps: Layers of Color: SCG-0406-021 Flowering Gems, SCG-0406-024 Butterfly Collector and SCG-0406-013 Old World Flourish art stamp sets
Ink: Tim Holtz Ranger Distressing Ink –
TIM19534 / 1.5 Walnut Stain
Coloured Pencils: Stampin’ Up 120962 Pastels
Ribbon:  Crochet Lace, recycled Lace (for bow)
Brads:  Kaiser EM930 Pearl Brads
Adhesives: Xpress It 6mm x 50m Double Sided Tape, Stampin’ Up – Sticky Strip
Miscellaneous: Derivan 3D Kindy Glitz, Spellbinders Grand Calibur DieCut Machine
                                                                       
Would  you like to see a few more projects? Well we have a list of the designers who were able to participate in the book and take part in the blog hop today too! Be sure to leave a comment for each and every designer as we will be drawing not one, not two but THREE winners at random. Each winner will receive their very own copy of the book absolutely free! The more comments you leave the more chances you have to win! :) Have fun hopping!

Thank you so much for visiting today, we are excited to have you 'hop' along with us - don't forget to comment along the way - it could be YOU who wins one of these gorgeous books!
{{{hugs}}}