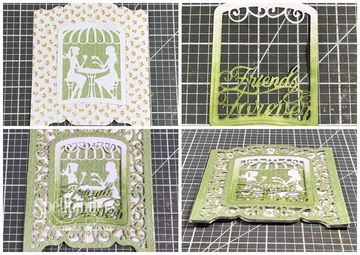
Hello friends - thanks so much for visiting. Today I am excited to be sharing a card I created using one of the new Shadow Box Collection by Becca Feeken.
' Amazing Paper Grace® Shapeabilities Friends Forever Etched Dies Shadowbox by Becca Feeken is a set of four die that includes three layering pieces for a dimensional adventurous scene and the phrase “Enjoy the Ride.” Also works with S6-138 Grand Arch 3D Card Etched Dies Set.' - Spellbinders
1.Cut/emboss one Grand Cabinet using the Outline only and floral patterned paper.
2. Cut/emboss one Grand Cabinet pieces using the Grand Cabinet Outline and Inlay together, along with the Inner Cabinet Outline using green patterned paper.
3.Carefully trim the tabs off the sides of both the Grand Cabinet Frames, using scissors or a paper trimmer - this is for the card front.
4.Cut/emboss the Layered Forever Friends Insert along with the outer frame, followed by the Layered Forever Friends Sentiment layer with the outer frame and white card stock.
5.Place the filigree frame onto the card front, adhere the Cafe layer onto the centre of the card front using double sided tape. Remove the filigree card front.
6. Sponge the Sentiment layer using Bamboo Leaves Ink in an ombre effect- from dark at the base to light at the top.
7. Pop up onto the Cafe layer using small 3D Foam Squares, trimming to size where needed.
8. Pop up the Filigree Frame to the layered card front using 3D Foam Squares.
9. Cut/emboss the Grand Cabinet using the Outline only using yellow shimmer card stock, making sure to leave the fold inside the cutting edge to form card base.
10.Adhere the layered card front to the case using double sided tape.
16. Cut/emboss 9 each of the Large Flower and the small flower using white card stock.
17.Sponge the centres using yellow ink.
18.Using the small Stylus Tip and a foam mat, shape each petal. Glue the the two layers together, offsetting the petals - adhere around the Grand Cabinet using liquid glue.18.Add a small yellow rhinestone to the centre of the flowers.
18.Cut/emboss two of the 'Besties' sentiment, colouring two shades of yellow.
19.Glue the die cut sentiments together, slightly offset to give a slight shadow effect.
20. Glue to the frame, above the inserts.
21.Apply a layer of Pico Embellisher over each sentiment and allow to dry.
You can find Becca's Grand Cabinet Tutorial HERE.
Spellbinders Products
- S4-983 Shapeabilities Layered Friends Forever Café Scene Etched Dies Shadowbox by Becca Feeken
- S6-139 Shapeabilities Grand Cabinet 3D Card Etched Dies Elegant 3D Vignettes by Becca Feeken
- T-001 Tool 'n One
- PL-001 Platinum Die Cutting Machine
- Other: Yellow Shimmer and white card stock; Kaisercraft: Golden Grove Collection 6x6; Want2Scrap: Baby bling - Orange Rhinestones; Scrapbook Adhesives by 3L: E-Z Adhesive Runner, 3D Foam Squares; liquid glue; Imagine Memento Inks in Bamboo Leaves, Dandelion and Tangerine, Sponge Daubers


Oh Linda this is exquisite - love the pretty pastel colours you have used to make this beauty.
ReplyDeleteBlessings
Maxine
Wow, this is stunning Linda x
ReplyDelete