}

Sunday, November 15, 2015

Spellbinders Workshops

One of my roles as the Spellbinders International Ambassador for Australia is to teach and educate through demonstrations and Workshops at Craft Stores - both local and interstate.  This is a role I am proud of and love to do - firstly I get to use the most amazing products and secondly I get to meet and work with so many wonderful people...creative people are always so amazing and inspiring.


This weekend I visited Fantasia Scrapbooking and Stamps in Bella Vista, Sydney NSW.  Such a lovely large store and a pleasure to be in.  I have been visiting this particular store for a number of years.  Some of the ladies come to every Workshop without knowing what I am teaching - others are first timers.  The creativeness flows and each person adds their own 'flavour' to their projects - I love that - we can all be given the same products but it is not often we create 'works of the heart' that are the same.


I do like to get group photos and am always amazed at how many of the ladies disappear when the camera comes out - but these ladies were game - others - not so much! LOL!


I run two different Workshops one in the morning and another in the afternoon - with not a lot of time between,  The morning Workshop had a Nostalgic Christmas theme - using some of the new Holiday Dies.  The paper for these cards is from Kaisercraft.


The second Workshop was all about 'Shabby Chic' and we created 3 cards using a lot a big variety of  Dies.  I also use a variety of other products - Imagine Crafts ‘featuring’ Tsukineko; Scrapbook Adhesives by 3LWant2Scrap bling.  


The lovely owner of Fantasia - Julie and myself.


Looking for a Spellbinders Die - I believe you may find it here


Demonstrating Spellbinders Dies


Some of the ladies that have attended the Workshops.

If you would like a Workshop in your local Craft Store, please leave a comment for me here and we will go from there - imagine the fun we would have! 

Thank you for your comments and all of the support you give me - you make blogging such an amazing place to be!! Your encouragement is such a blessing for me - it makes my day! God bless you!
{{{Hugs}}} and happy crafting

Thursday, November 12, 2015

Spellbinders Cascading Grace Tutorial

Hello Spellbinder  fans - it is time for another Spellbinders Step by Step Tutorial  and I am using two sets from the Amazing Paper Grace Collection by Becca Feeken. I love the instant elegance that is achieve using these Dies - along with all of the gorgeous details.


Spellbinders Products:
Preferred Partner Products:
Other:  Dear Daffodil cling stamp; Seam Binding; Water Spritzer;  Yellow cardstock


1. Cut/emboss two (2) Cascading Grace Flourish Frame using Whirl White cardstock
2. Score one Flourish Frame at 2cm and fold forward
3. Add double sided tape to the folded flap
4. Adhere other Flourish Frame - making sure to line up the edges,


5. Cut/emboss one (1) Cascading Grace Decorative Frame Insert using Luscious Lime cardstock
6. Adhere the Decorative Frame Insert to the card base using liquid glue
7. Cut/emboss stamped image using 5x7 Matting Basics A (#1 being the smallest)
8. Adhere to the card base using 3D Foam Squares
9. Wrap Seam Binding arund the front of the card - as shown in the main photo.
10 Adhere double Seam Binding bow to the center of the Seam Binding


11. Cut/emboss four (4) Cinch and Go flowers using mauve paper,
12 Cut/emboss one (1) Cinch and Go flourishes #1 #2 using green cardstock
13 Adhere Flourishes across the double bow, using liquid Glue
14 Create Cinch and Go Flowers - you can see Becca Feekens Video HERE
15 Adhere flowers using liquid glue, as shown in the photo above
16 Adhere the Swirls Finesse portions either side of the bow as shown in the main photo


Thank you for your comments and all of the support you give me - you make blogging such an amazing place to be!! Your encouragement is such a blessing for me - it makes my day! God bless you!
{{{Hugs}}} and happy crafting

Wednesday, November 11, 2015

Back to Basics with Sock Monkey

Hello Blog friends - I am going back to basics here - very basic - but I could not resist creating this card when I found this paper tucked away deeply in my RAKs container - from my days of being on Splitcoast Stampers and in the Twisted Sistah's - anyone else remember the Sock Monkey??


Seemed to be the perfect paper for a baby boy card - the sentiment is from Darkroom Door and the twine from Spellbinders - it really did not need more (in my opinion) - the monkeys are doing all of the work on this one LOL!  I have cut the card base and patterned paper using the A2 Curved Matting Basics Spellbinders® Nestabilities® Card Creator and the  Platinum Die Cutting and Embossing Machine.     I have also used Scrapbook Adhesives by 3L Crafty Foam Tape and E-Z Adhesive Runner.

I have to give you a close up of the Teddy Bear embellishment - a lovely RAK from Camilla Sheridan.  I have painted it and tried to give it a rustic look - how cute is it - it has a very high chance of being used on a layout with my Grandson on it - no surprises there!


This card is linked to the following challenges:
2 Creative Chicks - Anything Goes
Animal Friends Challenge - Hat, scarves or gloves
Not Just Cards Challenge - Anything Goes
Country View Crafts' Challenge - The Colour Blue
Karleigh Sue Challenge - One for the Boys
Crafty Hazelnut's Patterned Paper - Anything goes with Patterned Paper
Just Keep On Crafting - Anything Goes

Thank you for your comments and all of the support you give me - you make blogging such an amazing place to be!! Your encouragement is such a blessing for me - it makes my day! God bless you!
{{{Hugs}}} and happy creating!

Monday, November 9, 2015

Nostalgic Children

Hello Blog Friends, I have a nostalgic card to share with you today - I love everything nostalgic - it just feel so right to me - and a little sentimental!  That cannot be so bad -can it?!


I had fun creating the background using the Flower Play Stamps and Imagine Crafts 'featuring' Tsukineko Memento Ink in Teal Zeal and a Sponge Dauber.  This has been cut/embossed using Baby Buntings Spellbinders® presents “A Gilded Life. Want2Scrap Pearls have been added to the center of the flowers.


The circle frame has been cut from the Blooming Collection Spellbinders® Shapeabilities® Decorative Frames and adhered using liquid glue - don't you love the embossing and debossing on this - perfect on plain cardstock or patterned paper.


Scrapbook Adhesives by 3L Kraft Photo Corners, 3D Foam Squares and E-Z Runner have been used on this card.  A double seam binding bow has been adhered to the side of the image and a silver fairy embellishment added.


This card is linked to the following challenges:
Allsorts - ribbons and bows
Catch The Bug - anything goes 
Crafty Friends Challenge - use your favourite colour - Teal
Artbymiran Challenge Anything Goes
Simply Papercraft - Always Anything Goes
CCEE Stampers - CCEE1545 Circles
Crafting With An Attitude - Anything Goes
Crafty Girls Creations - Always Anything Goes
Crafty Ribbons - Monochrome 
DRS Designs - Pile It High
Jilia Spiri Challenge - Use Something Old
Paper Shelter Challenge - Layer on Layer
The Crafty Addicts Anything Goes/ Use A Die Cut 
Everybody-Art-Challenge - Star, Circle or Heart
Lemon Shortbread - Always Anything Goes
Craft-Dee BowZ - Anything Goes with a Handmade Bow

Thank you for your comments and all of the support you give me - you make blogging such an amazing place to be!! Your encouragement is such a blessing for me - it makes my day! God bless you!
{{{Hugs}}} and happy creating!

Friday, November 6, 2015

Spellbinders Cascading Grace Pocket Tutorial

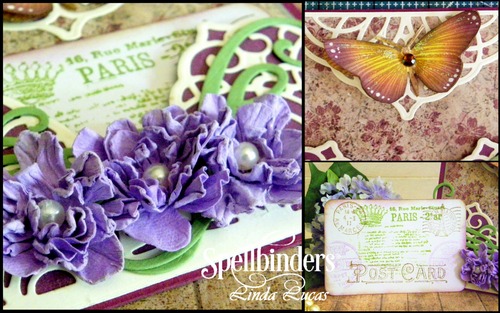
I am excited to be sharing a Spellbinders Tutorial using not one but two of the Amazing Paper Grace Collection by Becca Feeken. 


This new line is royally beautiful and richly created, to add grace and elegance to any creative project. This Cascading Grace Pocket design can be used to create pockets for 5 x 7 inch cards, scrapbook pages, and more! - Spellbinders Blog

Spellbinders Products:
Preferred Partner Products:
Other: 
Patterned Paper; purple, mauve and green cardstock; liquid glue; Butterfly stamp; water spritzer, premade collage tag

1. Cut/emboss one (1) Pocket Frame and Top Frame using Cuddle Cream cardstock and the Platinum Die cutting and Embossing Machine
2. Cut/emboss one (1) Pocket Insert using purple cardstock
3. Trim the side and lower tabs from the insert
4. Adhere to the inside of the Pocket Frame using liquid glue

5. Cut patterned paper to 13cm x 13cm
6. Adhere the pocket by apply adhesive to the tabs and folding behind the patterned paper
7. Adhere the Top frame to the top of the patterned paper using liquid glue.
8. Cut card base slightly larger than the patterned paper, using purple cardstock and adhere pocket layers, adhere the layers to the card base.

9. Cut/emboss four (4) Cinch and Go flowers using mauve paper,
10 Cut/emboss one (1) Cinch and Go flourishes #1 #2 using green cardstock
11 Adhere Flourishes using liquid Glue
12 Create Cinch and Go Flowers - you can see Becca Feekens Video HERE
10 Adhere flowers using liquid glue, as shown in the photo above,
11 Add collage tag for inside the pocket
12 Stamp butterfly twice and fussy cut/hand cut both images using scissors.
13 Colour images using misc inks and daubers
14 Glue the butterflies together at the body, adhere to the Top Frame using liquid glue
15 Add one large bling to the center of the butterfly, lightly add liquid glitter to the wings,
\
Thank you for your comments and all of the support you give me - you make blogging such an amazing place to be!! Your encouragement is such a blessing for me - it makes my day! God bless you!
{{{Hugs}}} and happy crafting

Thursday, November 5, 2015

Happy Big Day

Hello friends - a little change of pace from 'shabby/vintage cards - something a little more whimsical.  If you are anything like me, you hate to waste a Die cut - this one was left over from a layout and just begging to be used!


I have used Texture Paste for the background pattern and sponged it using  Imagine Crafts ‘featuring’ Tsukineko Radiant Neon Ink in Electric Yellow and a Sponge Dauber.  The Pierced Stars Spellbinders® Celebra’tions™ Line by Richard Garay has been cut using the Platinum Die Cutting and Embossing Machine.  A white Gel Pen has been used around the piercing holes for faux stitching.  The sentiment is from Flourishesllc.com and has been popped up on 3D Foam Squares.   I have used Scrapbook Adhesives by 3L Crafty Foam Tape and E-Z Adhesive Runner on this card. 

This card is linked to the following challenges:
The Crafty Addicts Anything Goes/ Use A Die Cut 
WordArt Wednesdays - Anything Goes
Everybody-Art-Challenge - Star, Circle or Heart
Fan-Tastic Tuesday - 110 Anything Goes with a twist: Sparkle Sky - Let's See some Stars
Papertake Weekly Anything Goes
Karleigh Sue Challenge One for the Boys
Not Just Cards - Always Anything Goes
Use Your Stuff - Use Old Stash

Thank you for your comments and all of the support you give me - you make blogging such an amazing place to be!! Your encouragement is such a blessing for me - it makes my day! God bless you!
{{{Hugs}}} and happy creating!

Tuesday, November 3, 2015

When I Count my Blessings

Hello friends - today I am sharing a card that has a shabby feel - I love flowers and the gorgeous roses on this card  are a favourite of mine - I am sure you can see why.


The card has been created using my Spellbinders Dies  - of course!  The Romantic Roses Two Spellbinders Nestabilities has been cut/embossed using the Platinum Die Cutting and Embossing Machine.  The Labels Thirty-Nine Spellbinders® Nestabilities®


The sentiment is from Flourishes llc.com and has been framed using the Royal Circle Spellbinders® Nestabilities® Decorative Elements, the tag is from A2 Valiant Honor Spellbinders® Nestabilities® Card Creator and has been cut using paper from Authentique Paper.   I have used Scrapbook Adhesives by 3L Crafty Foam Tape and E-Z Adhesive Runner on this card.

This card is linked to the following challenges:
2 Creative Chicks - Anything Goes
Noor! Designs UK - Anything Goes
The Sisters of Craft - Anything Goes
613 Avenue Create - Anything Goes or Thank You
Jo's Scrap Shack - Anything Goes
Star Stampz Challenge - Add A Sentiment
Crafting for all Seasons - All Dressed Up/Girly
WordArt Wednesdays - Anything Goes
Simon Says Stamp - Anything Goes

Thank you for your comments and all of the support you give me - you make blogging such an amazing place to be!! Your encouragement is such a blessing for me - it makes my day! God bless you!
{{{Hugs}}} and happy creating!

Sunday, November 1, 2015

Bird Song

Hello Blog Friends - I am sitting here listening to the rain, the occasional thunder roll and flash of lightning.  We love a good storm but don't get too many here in Canberra - so we try to make the most of them when they are here....there s nothing like going to bed and listening to the sound of rain on the roof - you know what I mean don't you!!?


I am sharing another card created using those bits on my desk - yes the pile does get smaller but you have to remember I add to it each day - so it is an endless battle - but I am not complaining! A lot of my product on this card has been sent to me in RAKs - Random Acts of Kindness - always so special to receive - thank you to those of you who have sent them - you know who you are - feel free to mention it when you comment!! 

I do have to add that this gorgeous bird image is from Crafty Secrets - it has been layered onto a preloved tag  and a button added to the side.


I am loving this ribbon from May Arts, the beautiful pearl swirls from Want2Scrap


This card is linked to the following challenges:
Simon Says Stamp - Anything Goes
Artbymiran Challenge - Anything Goes
Creative Fingers -  Always Anything Goes
4 Crafty Chicks - Anything Goes
Julia Spiri Challenge - Use Something Old
Creative Moments -  Always Anything Goes
Ruby's Rainbow - C10 -  Birds of A Feather 
WordArt Wednesdays - Anything Goes
Retarte - Anything Goes 

Thank you for your comments and all of the support you give me - you make blogging such an amazing place to be!! Your encouragement is such a blessing for me - it makes my day! God bless you!
{{{Hugs}}} and happy creating!