}

Wednesday, April 15, 2015

Spring Blog Hop

Welcome to the International Ambassadors Unofficial Spring Blog Hop! For those of you in the Northern Hemisphere spring is on its way - for me in the Southern Hemisphere, spring is a long way off.  The theme of today's Unofficial Blog Hop is spring and some of the new Spellbinders flowers may be making an appearance.


The Dies I have used for this card are:


Spellbinders products 


Cross Promotional Partners

Chameleon Pens: Alcohol Markers
Imagine Crafts 'featuring' Tsukineko: Memento Dye Ink in Cantaloupe
May Arts: - Ribbon
Scrapbook Adhesives by 3L: Adhesive Runner 3-D Foam Squares
Want2Scrap: Baby Bling - Purple Pearls - Self Adhesive

Other
Light Green cardstock; flower stamps acrylic block White sharpie; patterned paper

Directions:


1. Cut/emboss two (2) Fleur De Elegance using white cardstock
2. Cut/emboss one (1)  Royal Circle using light green cardstock
3. Use the Die as a Stencil and sponge the inside of the Die with Cantaloupe and a sponge dauber.


4. Score one die at 1.5cm and fold forward
5. Attach using E-Z Runner to form card base.


6. Center Royal Circles to the card base using 3D Foam Squares
7. Cut/emboss one (1) Standard Circles LG using patterned paper
8. Pop up onto layered Dies using 3D Foam Squares
9. Pop up the coloured and fussy cut images to the center of the circle as shown in the photos above
10. Cut/emboss two (2) Tudor Rose Collection solid flowers #1 #2 flowers as shown in the photo above
11. Curl Petals using a piercing tool or small paint brush
12. Split the Die cut flowers Dies carefully - the layers of the cardstock should separate easily
13. Glue together with petals alternating, using liquid glue
14. Add medium pearl to the center
15. Add Baby Bling around the Royal Circle as shown in the main photo
15. Secure a double bow at the base of the stamped images
16. Adhere the Tudor Rose Collection flower above the bow using liquid glue

I hope you have enjoyed my tutorial and can feel 'spring' in the air.  Make sure you pop in and visit the other International Ambassadors - these girls are amazing!!  The list of International Ambassadors is below, in case you get lost along the way.

Linda Lucas (you are here)
  
Thanks so much for stopping by - we hope you enjoy your time with us - we will be back with more!


Thank you for your comments and all of the support you give me - you make blogging such an amazing place to be!! Your encouragement is such a blessing for me - it makes my day! God bless you!
{{{Hugs}}}


Follow on Bloglovin

Sunday, April 12, 2015

Artist in Residence - Make a Splash Tutorial

I have a Tutorial on the Imagine Crafts Blog - the theme is April Showers...


You can see the whole project and details by clicking HERE.  I would love you to pop over there and leave me a comment letting me know what you think - you know I love to see you!

Thank you for your comments and all of the support you give me - you make blogging such an amazing place to be!! Your encouragement is such a blessing for me - it makes my day! God bless you!

{{{Hugs}}}


Friday, April 10, 2015

Spellbinders - Labels 47 Decorative Elements Tutorial

Hello Blog friends and Spellbinders fans - I always look forward to sharing a Spellbinders Step by Step Tutorial with you on my Blog.  I hope you enjoy this one - and are inspired to recreate it - especially when you see how easy it is - and suitable for so many occasions.


Spellbinders Products:

Cross Promotional Partners:

Other: white cardstock; corrugated cardstock;  image stamp; acrylic block, thin gold cord


1. Cut/emboss two (2) Labels Forty Seven Decorative Elements using white cardstock
2. Cut/emboss one (1) Labels Forty Seven Decorative Elements using white corrugated cardstock
3. Trim the bottom portion as shown in the photos above

4. Adhere the two white cardstock layers together at the filigree edges to form card base
5. Stamp rose image using Rhubarb Stalk Ink and allow to dry.
6. Cut the stamped image to size, " x "
7. Pop the stamped image up on Crafty Foam Tape
8. Wind gold cord around the card twice, securing at the back using double sided tape.
9. Adhere to the center of the card base


10. Adhere  double sheer bow using liquid glue
11. Attach Mulberry paper rose using liquid glue
12. Finish by adding a Le creme Baby Bling around the patterned frame as shown in the photos.


Thank you for your comments and all of the support you give me - you make blogging such an amazing place to be!! Your encouragement is such a blessing for me - it makes my day! God bless you!

{{{Hugs}}}


Follow on Bloglovin

Thursday, April 9, 2015

Spellbinders Shady Allure Tutorial

It is always exciting to create a Step by Step Tutorial for the Spellbinders Blog - so many wonderful products being added on a regular basis  - today I am sharing a card I created using the Spellbinders Sculpted Embossing Folders - the detail is amazing - and if you are wanting more than 1 dimension - this is the product for you!!


I would love you to pop over and check it out - and let me know what you think! You can see the Step by Step Tutorial HERE

Thank you for your comments and all of the support you give me - you make blogging such an amazing place to be!! Your encouragement is such a blessing for me - it makes my day! God bless you!
{{{Hugs}}}


Follow on Bloglovin

Tuesday, April 7, 2015

Deer Oh Deer

Hello Blog Friends - it is nice to be able to sit at my desk for a little while this morning - my back is on the mend, not as quickly as I would like but slowly is better then nothing.


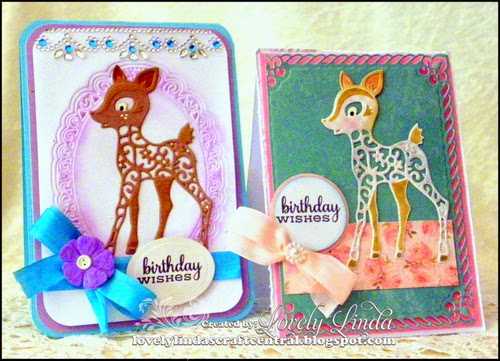
Today I am sharing a pair of cards I created for the first birthday of some very special twins in our family - these girls have been fostered by our nephews and are not only gorgeous but very loved and blessed to have a large family that adores them.

I have used the Deer Spellbinders® Shapeabilities® Die D-Lites™ and love how it can be used to create original little deer - depending on cardstock and the embellishing that is done.


The first deer has been adhered to white cardstock that has been embossed only using the Elegant Ovals Nestabilities® and sponged using Imagine Crafts Featuring Tsukineko Radiant Neon ink in Electric Purple.  The card base has been cut/embossed using A2 Curved Matting Basics B Nestabilities® Card Creator Dies - I love this shape card!  The sentiment on both cards us stamped using  Imagine Crafts Featuring Tsukineko  Memento in Tuxedo Black.


The second card has been cut using the A2 Valiant Honor Nestabilities® Card Creator Dies and Authentique Paper.  

 I have used  Scrapbook by Adhesives by 3L - 3D Foam Squares for dimension ,and E-Z Runner on this card, the bling is from Want2Scrap©.  All Dies have been cut/embossed using the Spellbinders® Grand Calibur® Die Cutting and Embossing Machine.

These cards are linked to the following challenges:
Cards in Envy - Card for a Child
Craft-Dee BowZ - Anything Goes with a Handmade Bow 
Mema's Challenge - Anything Goes + Die or Punch
Not Just Cards - Always Anything Goes
Amusing - Birthday
Pile It On - Diecuts and/or Punches
Scribble and Scrap - Always:  Anything Goes  
Simply Create Too - Anything Goes
*NEW* Simply Papercraft - Anything Goes
Sister Act Card Challenge - Anything Goes
Ladybug Crafts - Anything Goes 
One Crazy Stamper - Anything goes
Aud Sentiments Challenge - Anything Goes + A Sentiment

Thank you for your comments and all of the support you give me - you make blogging such an amazing place to be!! Your encouragement is such a blessing for me - it makes my day! God bless you!

{{{Hugs}}}
Follow on Bloglovin

Sunday, April 5, 2015

Best Wishes - Friends

Hello Blog Friends - it is Easter Sunday and I hope the real meaning of Easter does not get lost in among the chocolates eggs and rabbit - that we take the time to celebrate the risen Saviour - HE is Risen! He is Risen indeed!


Todays card is very quick and easy - unfortunately I have been off my feet for a couple of days with a bad back - but thanks to rest and heavy medication I am on the mend - bit have not spent much time in the Studio - mostly in bed sleeping or with my feet up....hoping for some serious Studio time tomorrow.....but in the meantime.....


I have cut the cardbase using A2 Curved Matting Basics B #9 (#1 being the smallest) The  Authentique Paper has also been cut using A2 Curved Matting Basics B #8.  This has been adhere using Scrapbook by Adhesives by 3L - E-Z Runner.  The next layer has been cut/embossed using the A2 Modern Stationery #5 and popped up on  Scrapbook by Adhesives by 3L 3D Foam Squares


The butterfly is from the Wonderful Wings Set (Discontinued), the bling is from  Want2Scrap© and the 'Best Wishes' sentiment from SRM Sentiments.


This card is linked to the following challenges:
Catch The Bug - anything goes 
Artbymiran Challenge Anything Goes
Craft for the Craic - Die-ing for Spring or Easter themed
Simply Create Too - Anything Goes
Fairy Tale Challenge - Many Colours
Sister Act Card Challenge - Anything Goes

Thank you for your comments and all of the support you give me - you make blogging such an amazing place to be!! Your encouragement is such a blessing for me - it makes my day! God bless you!

{{{Hugs}}}
Follow on Bloglovin

Thursday, April 2, 2015

Spellbinders Romantic Rose Tutorial

There is no doubt about it, Spellbinders  Dies just keep getting better and better - so many beautiful details - creating has never been so easy for Crafters. My card today is made using the Romantic Rose Decorative Accents - and it lives up to it's name - Romantic!


My tutorial today will show you how easy it is to create this card - the Dies do most of the work - as you can see below!


1. Cut/emboss the stamped and coloured image using white cardstock and the Romantic Rose Die - Frame #2
2. Dies are cut using the Spellbinders® Grand Calibur® Die Cutting and Embossing Machine.


3. Cut/emboss two (2)  Romantic Rose Die - Frame #3 using white cardstock and the Spellbinders® Grand Calibur® Die Cutting and Embossing Machine
4. Score one (1)  Romantic Rose Die - Frame #3 at 1/2" and fold forward
5. Adhere double sided tape to the 1/2" scored section
6. Line up the outside edges and adhere the card base together
7. Adhere blue cardstock measuring 4"x 3⅝” to card base using double sided tape
8. Adhere the  Romantic Rose Die - Frame #2 to the card base using 3D Foam Squares


9.  Attach a double sheer bow using liquid glue
10. Cut/emboss Romantic Rose Flowers #1 #2 #3 using red cardstock
11. Layer the flowers using Scrapbook Adhesives by 3L® Dodz
12. Adhere layered flowers to the center of the bow using liquid glue
13. Trim Want2Scrap Swirls Finesse and adhere to the card as shown in main photo.

Spellbinders Products:
Cross Promotional Partners:

Other: white, blue and red cardstock; sentiment stamp; acrylic block, 


Thank you for your comments and all of the support you give me - you make blogging such an amazing place to be!! Your encouragement is such a blessing for me - it makes my day! God bless you!
{{{Hugs}}}

Follow on Bloglovin


Wednesday, April 1, 2015

Vintage Rose Revisited

Hello Blog Friends - it is April 1 today in the Southern Hemisphere - April Fools Day - thankfully I was not pranked today - I think our three are past that - phew! LOL!  Today's card is created using one of my favourite stamp sets - Vintage Roses by Laura Kirste formerly of Layers of Color - which is sadly, no longer and the stamp set has been retired....but not forgotten!! 


The image has been stamped using Imagine Crafts featuring Tsukineko Versafine in Sepia - such a lovely ink.  It has then been cut out using Spellbinders Standard Circles LG and the Blooming Collection Shapeabilities® Decorative Frames has been popped up on top using Scrapbook Adhesives by 3L 3D Foam Squares to form a frame.

This has been layered onto Labels Thirty-Nine Nestabilities - cut/embossed using the Spellbinders® Grand Calibur® Die Cutting and Embossing Machine and Authentique Paper.  The background paper is from Canvas Corp, the sentiment from Penny Black Inc.  The beautiful pearls are from Want2Scrap© .

This card is for the following challenges:
Die Cuttin' Divas - Anything Goes
 Clear It Out  Stash: 2 or more things you are hoarding (paper and stamp)
Everybody Art Challenge- Anything Goes
613 Avenue Create - A True Anything Goes/NO TWIST
Artistic Inspiration Challenge - Anything Goes, Twist - Flowers
Come and Get It One For the Girls
The Pink Elephant Challenge - Anything Goes
Little Claire's - Springtime 
Not Just Cards Challenge - Anything Goes

Thank you for your comments and all of the support you give me - you make blogging such an amazing place to be!! Your encouragement is such a blessing for me - it makes my day! God bless you!
{{{Hugs}}}


Follow on Bloglovin